In this article
Elimination Journals
Use the Elimination Journals page to remove intercompany transactions from consolidated financial statements. This helps ensure that intercompany balances, revenues, expenses, profits, and losses are not overstated in consolidated financial reporting.
For more information see The complete guide to financial consolidation
Before You Begin
To process elimination journals you must first:
- Create an entity to use for elimination entries. To create a new entity, go to Dimension Valuesand mark it as an Elimination Entity.
- Set up at least one General Ledger account to use for elimination balances. To set up a General Ledger account for elimination, go to a G/L Account Card and turn on Include in Elimination for it.
- Ensure that entities and intercompany transactions are configured correctly for consolidation.
When you create elimination journals, intercompany transactions are removed from consolidated financial statements. Intercompany transactions that do not involve third parties are eliminated from consolidated financial statements.
Create Elimination Journals
To create elimination journals, do the following:
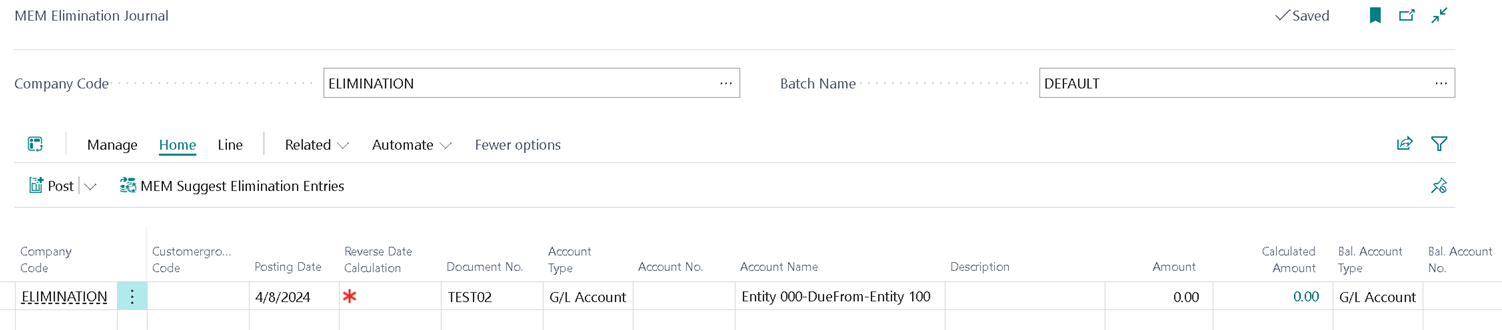
- Search for and open the Elimination Journals page.
- In the header, select the elimination entity that you have set up.
- The selected header entity is automatically applied to the journal lines.
- Journal lines are populated with transactions that match the selected entity and batch.
- In the lines section, enter a posting date for the journal line.
- Under Account No., select the General Ledger account to use. The account you select should be set up so that it is included for elimination.
- You can only select General Ledger type accounts.
- Modify the journal lines as needed before posting.
- For more detailed information about the elimination journal line, select the value under Calculated Amount.
- After you have added all the elimination journal lines, you can then post the entries by selecting Post.
MEM Suggest Elimination Entries
On the Elimination Journals page you can select MEM Suggest Elimination Entries to populate suggested elimination journal lines. A processing dialog opens where you enter the following information. The entity used in this action is based on the entity you select in the header of the Elimination Journals page and cannot be changed in the dialog. This process reviews all accounts marked for elimination and calculates balances up to the specified date.
- As of Date: Enter the date which is used to include General Ledger lines up to the date you enter.
- Posting Date: Enter the posting date which is used for suggested General Ledger lines.
- Reverse Date Calculation: Select the reverse date calculation to use for the elimination journal lines. For example, use 1M if the reverse date calculation should be one month after the posting date. These reversal entries are also used by the year-end elimination handling process during MEM Close Income Statement to determine whether counter-reversal entries should be created.
- Document No.: Select the document number, if needed.
Checking the History
To check history, go to the Posted General Journal page; on the desired line, you can see the Calculated Amount field. Here, you can click the Calculated Amount to drill down into the data to see how this amount was calculated.


Calculated Amount History
The MEM Elimination Calculated Amount History page displays the history of all the calculated amounts with the entries included in the previous elimination runs. Here, you can check the linked General Ledger entry by clicking GL Entry No. This page only displays newly created elimination history entries.
Example
Elimination Account: 11000
Amount: $10 for Entity 100
As of Date: 5/1/2024
Reversal Date: 6/1/2024
If elimination is run again on 6/2/2024 and the balance for account 11000 remains unchanged at $10 for entity 100, MEM does not create a new history entry. This prevents duplicate elimination history records for the same account, entity, and amount.
Fields
This page contains the following fields:
| Field | Description |
| Header | |
| Entity Code |
Select the entity for the transactions. The default value is your default entity. The default entity for the line is automatically updated with the entity value of the selected the customer, vendor, account, or item record. If needed, you can change it any entity to which you have access.
|
| Batch Name | Select the batch to use for the elimination journal. |
| Lines | |
| Entity Code |
Displays the entity for the line. The default value is specified in the header. The default entity for the line is automatically updated with the entity value of the selected the customer, vendor, account, or item record. The selected entity filters the other records such that only the records that belong to that entity are available. For example, when entity 100 is selected, only the account numbers that belong to entity 100 are available. You cannot change the entity on the line level. The entity you select on the header will be the one used on the line level. |
| Shortcut Dimension 2 | Displays the owner entity of the item, location or resource if Dimension 2 is used as the MEM Entity. |
| Posting Date | Enter the posting date for the elimination journal line. |
| Reverse Date Calculation | Displays the date for the reversal of the elimination transaction. This date is calculated as one month after the posting date. The entry is reversed on this date. |
| Document No. | Displays the related document number, if applicable. |
| Account Type | Displays the account type used for the elimination journal. |
| Account No. | Displays the account number. |
| Account Name | Displays the account name. |
| Description | Enter a description of the elimination transaction. |
| Amount | Displays the amount that will be eliminated. |
| Calculated Amount |
Displays the calculated amount. The Calculated Amount is filled in only when you use the MEM Suggest Elimination Entries action. You can select this value to open the MEM Elimination Calculated Amount. Use the MEM Elimination Calculated Amountpage to drill down into the balance amount that will be eliminated. You can see associated entities and the document type, for example, and also the relevant General Ledger entry, which you can also for more information about the elimination transaction. |
| Bal. Account Type | This field is hidden by default but you can add it to the page manually. For more information about accessing hidden fields, see Work with fields and columns . . |
| Bal. Account No. | This field is hidden by default but you can add it to the page manually. For more information about accessing hidden fields, see Work with fields and columns. |
Actions
This page contains the following actions:
| Action | Description |
| Post | Post the selected journal lines. |
| MEM Suggest Elimination Entries | Opens the MEM Suggest Elimination Entries dialog. Use this dialog to populate journal lines. |
Handling Year End Elimination from MEM Close Income Statement Report
During year-end close, elimination entries that are reversed in the new fiscal year can leave residual balances in income statement accounts after closing. Year-End Elimination Handling ensures these balances are automatically cleared.
This functionality applies only to accounts marked Include in Elimination and entities marked as Elimination Entity, and runs automatically during Close Income Statement.
How Year-End Elimination Handling Works
When the Close Income Statement process is run, MEM performs the following steps:
1. Identify relevant accounts
MEM reviews the generated journal lines and identifies General Ledger accounts that are marked Include in Elimination and belong to an Elimination Entity.
2. Locate elimination reversal entries
The system checks for elimination entries that were previously reversed (based on the configured reversal date formula).
3. Generate counter-reversal entries
For each identified account, MEM automatically creates counter-reversal journal lines to offset reversal entries.
4. Apply correct posting dates
The counter-reversal entries use the same posting date as the original elimination reversal entries (for example, Jan 1, or any configured offset such as +1 day or +7 days).
5. Add or post entries
In standard currency mode, the entries are added to the same journal batch. In additional reporting currency mode, the entries are posted directly to the General Ledger.
6. Final outcome
Income statement accounts are fully cleared, and no elimination-related balances remain in the new fiscal year.
Example
Scenario
Entities 100 and 200 record intercompany interest:
Dec 30
-
100: Interest Receivable 3,000 / Interest Revenue 3,000
-
200: Interest Expense 3,000 / Interest Payable 3,000
Step 1: Elimination Entries (Dec 31)
Entries are posted to the elimination entity (ELM) to cancel intercompany activity:
-
Interest Revenue 3,000 / Interest Receivable 3,000
-
Interest Payable 3,000 / Interest Expense 3,000
Step 2: Automatic Reversal (Jan 1)
The system creates reversal entries:
-
Interest Receivable 3,000 / Interest Revenue 3,000
-
Interest Expense 3,000 / Interest Payable 3,000
Step 3: Income Statement Closing (Dec 31)
Revenue and expense accounts are closed to Retained Earnings:
-
Retained Earnings 3,000 / Interest Revenue 3,000
-
Interest Expense 3,000 / Retained Earnings 3,000
Results
During the Close Income Statement process, the system automatically creates counter-reversal entries to offset the Jan 1 reversal. After the year-end process:
-
Revenue and Expense accounts = 0 balance
-
Elimination impact is fully cleared
-
No residual balances carry into the new fiscal year
Notes & Limitations
-
Only income statement accounts (e.g., revenue and expense) are adjusted
-
Balance sheet accounts (e.g., receivable, payable) are not affected
-
