In this article
Modifying a Report Workflow
Use this general workflow as a guideline for how to add and modify and then select a custom report layout for use in Subscription Billing. The custom report layout is a standard Microsoft Dynamics 365 Business Central feature. For more information, see the Microsoft Dynamics 365 Business Central documentation.
User Defined Fields
The user-defined fields that you can add are set up on the following pages:
Localized Reports
The following table shows the reports to which the user-defined fields can be added.
| Report/Object ID | Report Name |
| Sales | |
| 1303 | Draft Invoice |
| 1306 | Sales - Invoice |
| 1307 | Sales - Credit Memo |
| 23065956 | SBS Sales Invoice - EU |
| 23065957 | SBS Sales Invoice - US |
| 23065959 | SBS Sales Invoice - ES |
| 23065997 | SBS Sales Invoice - NA |
![]() Note: If you are using one of or both SBS and MEM user defined fields, a report layout based off of the 1303, 1306, and 1307 report IDs shows both MEM and SBS user defined fields in the report layout.
Note: If you are using one of or both SBS and MEM user defined fields, a report layout based off of the 1303, 1306, and 1307 report IDs shows both MEM and SBS user defined fields in the report layout.
Add a Custom Report Layout
To add a SBS report, follow these steps:
- Select Search
 and type, report layout. From the results, select Report Layout.
 - In the Search box, type SBS, which advances the list to the Subscription Billing reports.
- Select the report you want and select Process > Custom Layouts.
- If no copies of the report are available in the Custom Reports layouts list, select New > New to create a copy of the layout in the format you want.
Select the RDLC or Word layout, and select OK.
![]() Tip: The Subscription Billing report IDs start with 23065. Review the list to see which reports are available.
Tip: The Subscription Billing report IDs start with 23065. Review the list to see which reports are available.
The custom report layout appears on the Custom Reports Layouts list and can be customized.
Add SBS Fields to a Word Report Layout
For more information about customizing a Word report layout, see Add Fields to a Word Report Layout ![]() in the Microsoft Dynamics 365 Business Central documentation.
in the Microsoft Dynamics 365 Business Central documentation.
To add SBS fields to a custom report layout, follow these steps:
- If the custom report layout does exist, add a custom report layout.
- From the Custom Reports layouts list, select the layout, and then select Layout > Export Layout.
- Open the custom report layout in Microsoft Word.
- In the Developer tab, select XML Mapping pane and in Custom XML Part, select the custom XML part for ADD INCLUDE report, which is typically last in the list.
- Expand Header to see all the custom XML parts that you can add.
- Put the cursor at the place you want to add the field in the report, right-click the XML part you want to add, and select Insert Content Control > Plain Text.
- Save the changes.
- Back on the Custom Reports layouts list, in Microsoft Dynamics 365 Business Central, import (Layout > Import Layout) and then update (Layout > Update Layout) the layout.
The layout is exported to where you have set up your download location.
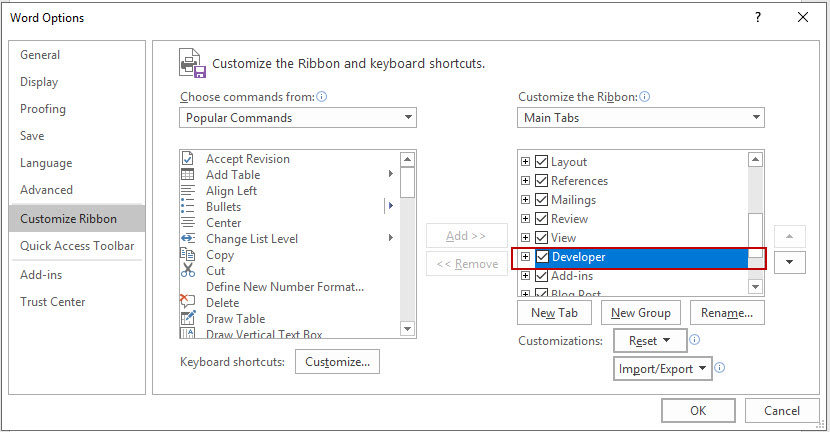
If the Developer tab is not available, open the Word Options to customize the ribbon.

![]() Tip: SBS fields start with Bssi_UDF.
Tip: SBS fields start with Bssi_UDF.
Add SBS Fields to a RDLC Report Layout
For more information about customizing a RDLC report layout, see Designing RDLC Report Layouts ![]() in the Microsoft Dynamics 365 Business Central documentation.
in the Microsoft Dynamics 365 Business Central documentation.
To add SBS fields to a custom report layout, follow these steps:
- If the custom report layout does exist, add a custom report layout.
- From the Custom Reports layouts list, select the layout, and then select Layout > Export Layout.
- Open the RDLC layout in SQL Server Report builder.
- Expand the Datasets folder to get all fields in that are in Microsoft Dynamics 365 Business Central plus the additional SBS fields.
- Drag the SBS fields to the report as needed save the changes.
- Back on the Custom Reports layouts list, in Microsoft Dynamics 365 Business Central, import (Layout > Import Layout) and then update (Layout > Update Layout) the layout.
The layout is exported to where you have set up your download location.
![]() Tip: SBS
Tip: SBS
Select the Custom Report Layout to Use
After you have modified a report layout, you must select your custom report layout in the Report Layout Selection. If you do not select the modified report, Microsoft Dynamics 365 Business Central continues to use the default report that is available in the Microsoft Dynamics 365 Business Central.
- Back on the Report Layout Selection page, for the report line, change the Selected Layout to Custom Layout.
- On the Custom Report Layouts dialog, select the custom layout that you want to use, and select OK.
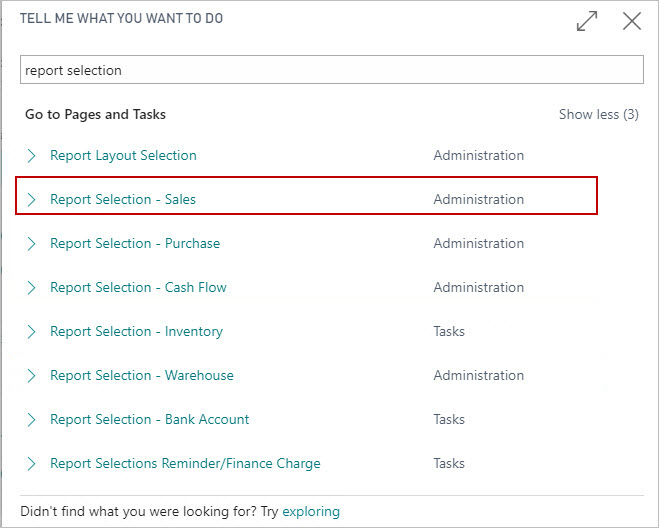
- Select Search and type, report selection. From the results, select the Report Selection page for the specific type you want. For example, you can select sales.
- On the Edit Report Selection page of your choice, select the Usage option you want. The usage option is available for sales.
- In the lines, change the Report ID to the Subscription Billing report ID that you want to use for the report.
If you had noted the report ID, specify the report ID. Or you can search for the report you want.
The line is updated with the layout. If needed, you can update the Custom Layout Description.
![]() Tip: Make note of the report ID that you want to use.
Tip: Make note of the report ID that you want to use.