In this article
Register Customer Payments
Use this page to verify and post payments, process discounted payments, and find specific unpaid documents for which payment is made.
For more information, see the Microsoft Dynamics 365 Business Central documentation.
Register Customer Payment Examples
Review the following examples to better understand how the actions work with MEM. When registering customer payments, you set the entity to 2000.
Post Payments/Preview Posting Payments
From the list, you select one or more records, and select Actions > Preview Posting Payments.
The distribution is as follows:
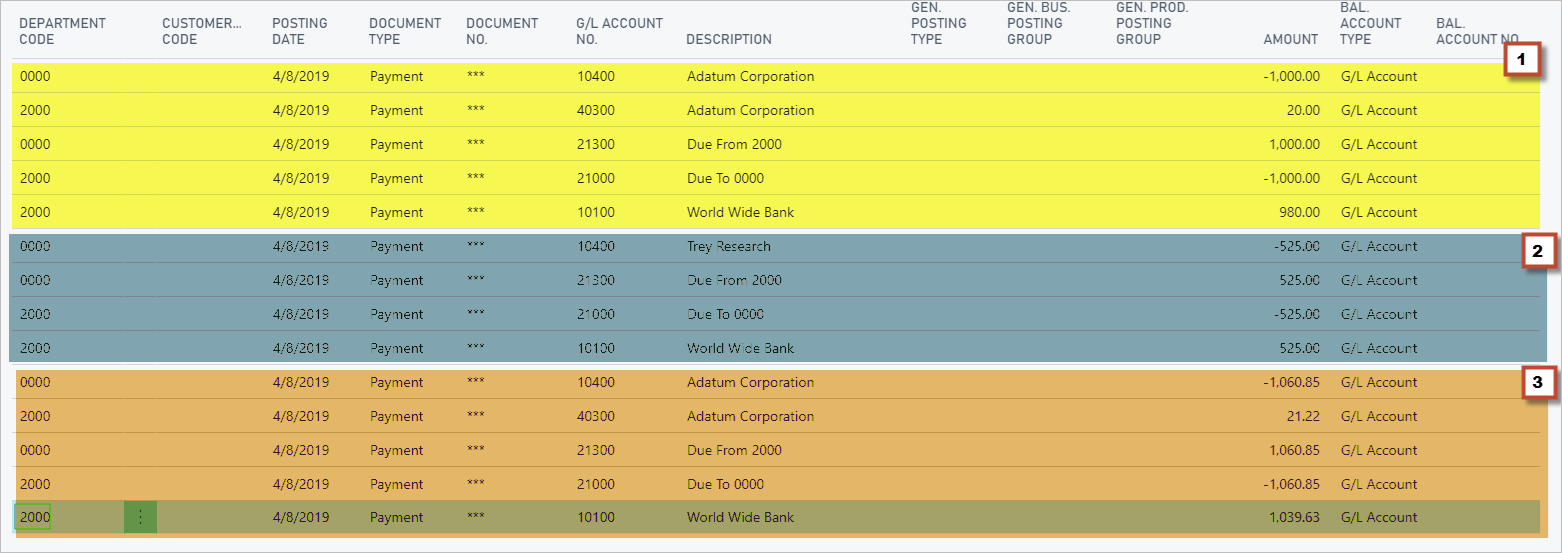
Sections 1, 2, and 3, show the GL Preview of the first three records. These lines include discounts and intercompany distributions with the header entities for the bank GL line.
Post as Lump Payment/Preview Posting Payments as Lump
From the list, you select one or more records, and select Actions > Preview Posting Payments as Lump. When posting transactions a lump payment, the following values must be the same for all selected records:
- Entity
- Customer
- Date Received
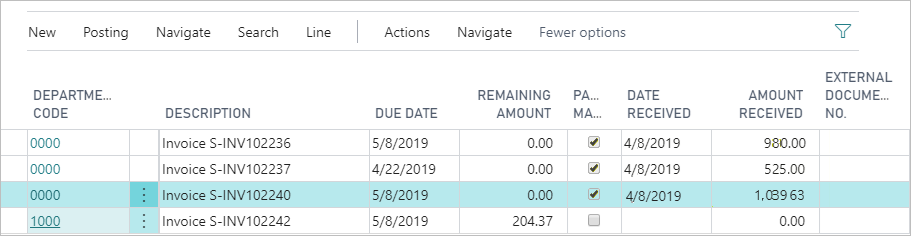
From the list, you select one or more records, and select Actions > Preview Posting Payments as Lump.

The first line selected is for 980.00 and the second is for 1,039.63. The following image shows the following:
- Area 1 - the sum payment for the customer 2060.85.
- Area 2 - discounts applied to the payment 41.22.
- Area 3 - intercompany due to and due from accounts.
- Area 4 - the bank account debit is the sum total of the payments minus the discounts 2019.63

Centralized Receivables Example
Review the following example for using the customer payments with centralized processing.
On the setup, the CHECKING bank account that belongs to the entity 000 is selected, and the following invoices are selected to be paid:
| Entity | Amount |
| 000 | 100.00 |
| 100 | 230.00 |
| 300 | 170.00 |
| 000 | 400.00 |
After the payments are processed, the following General Ledger entries are created:
| Account | Debit | Credit | Entity | |
| Bank | 100.00 | 000 | ||
| Accounts Receivables | 100.00 | 000 | ||
| Bank | 230.00 | 000 | ||
| Accounts Receivables | 230.00 | 100 | ||
| Bank | 170.00 | 000 | ||
| Accounts Receivables | 170.00 | 300 | ||
| Bank | 400.00 | 000 | ||
| Accounts Receivables | 400.00 | 000 | ||
| Due From 000 | 230.00 | 100 | ||
| Due To 100 | 230.00 | 000 | ||
| Due From 000 | 170.00 | 300 | ||
| Due To 300 | 170.00 | 000 |
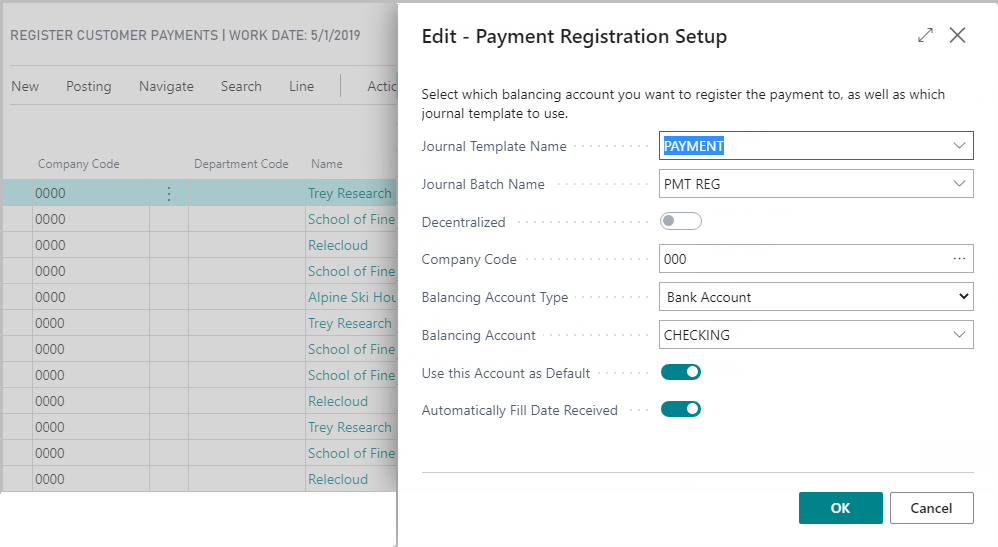
Set up Centralized Customer Payments
To set up customer payments for use with centralized processing, follow the steps within the Microsoft Dynamics 365 Business Central documentation, and incorporate these steps:
- For a payment line, select Actions > Setup > Setup.
- On the Payment Registration Setup page:
- Select the Entity Code. The default entity is from the payment line.
- Select the Balancing Account.
- Check that the Decentralized option is turned off.
This option is set on the Sales & Receivables FastTab on the Multi-Entity Management Setup.
- Back on the Register Customer Payments page, select the lines you want to process and select the Payment Made check box for any lines.
- Post the payments using one of the Posting actions:
- Post Payments
- Post as Lump Payment
The payments are posted based on the values from the Payment Registration Setup. Due From and Due To entries are created as needed. For more information, see:
Discounts are applied to the invoice entity using the standard Microsoft Dynamics 365 Business Central functionality.
Set up Decentralized Customer Payments
To set up customer payments for use with decentralized processing, follow the steps within the Microsoft Dynamics 365 Business Central documentation, and incorporate these steps:
- For a payment line, select Actions > Setup > Setup.
- On the Payment Registration Setup:
- Select the Entity Code. The default entity is from the payment line.
- Select the Balancing Account. The bank account must belong to the same entity as the Entity Code selected.
- Check that the Decentralized option is turned on.
This option is set on the Sales & Receivables FastTab on the Multi-Entity Management Setup.
- Back on the Register Customer Payments page, select the lines you want to process and select the Payment Made check box.
Lines can be selected based on the Balancing Account selected.- When bank account is selected, any entity can be specified on the Payment Registration Setup, and only lines with the entity the same as the owner entity of the bank account.
- When G/L account is selected, any entity can be specified on the Payment Registration Setup, and any line can be selected.
- When a bank account posting group is selected, any entity can be specified on the Payment Registration Setup, and only lines that have the same entity as the entity code in the Payment Registration Setup can be selected. Bank account posting groups are part of standard Microsoft Dynamics 365 Business Central. For more information, see Setting Up Posting Groups
 .
.
- Post the payments using one of the Posting actions:
- Post Payments
- Post as Lump Payment
The payments are posted based on the values from the Payment Registration Setup. Due From and Due To entries are created as needed based on the header, line, and bank entity. For more information, see:
No Due From and Due to entries are created when a regular G/L account is selected. Discounts are applied to the invoice entity using the standard Microsoft Dynamics 365 Business Central functionality.
Fields
The Register Customer Payments page contains the following fields:
| Field | Description |
| Entity Code | Select the entity for the balancing account for registering the payment. |
| Decentralized |
Displays the type of payment processing method used by the batch and only visible if you have turned on Centralized/Decentralized AR on the Fly in your Multi-Entity Management Setup. Decentralized is locked and cannot be changed in this page. Its value is determined by how you set up your journal batch in your Payment Registration Setup window.
For more information about batch settings and if you want to change the processing method, see Using Centralized/Decentralized Processing on the Fly. |
The Payment Registration Setup page contains the following fields:
| Field | Description |
| Decentralized |
Determines whether the entity selected in the header is used as the payment entity for all lines or whether each line entity creates a payment for itself and processes only the transactions in self-contained batches.
The value is from the Sales & Receivables FastTab on the Multi-Entity Management Setup. |
Buttons
This page contains the following buttons:
| Button | Description |
| Posting | |
| Post Payments | Posts each payment line selected separately and line by line. In this situation, each line can have a unique entity. |
| Posting as Lump Payment | Posts all lines selected as a lump sum payment in one line. In this situation, all lines must have the same entity along with the same other values: customer, due date, and date received. |
| Preview Posting Payments | Generates a preview of each payment line selected separately and line by line. In this situation, each line can have a unique entity. |
| Preview Posting Payments as Lump | Generates a preview of all lines selected as a lump sum payment in one line. In this situation, all lines must have the same entity along with the same other values: customer, due date, and date received, |