In this article
Multi-Entity Management Setup
Use this page to set up the options for using Multi-Entity Management.
![]() Tip: As a best practice, set up the
global dimensions and complete the MEM Assisted Setup before you use this window to set up
Multi-Entity Management.
Tip: As a best practice, set up the
global dimensions and complete the MEM Assisted Setup before you use this window to set up
Multi-Entity Management.
![]() Note: You might require permission to access the setup pages and perform setup tasks. For assistance, contact your system administrator.
Note: You might require permission to access the setup pages and perform setup tasks. For assistance, contact your system administrator.
General
Turn Off Multi-Entity Management
When Multi-Entity Management is installed to Microsoft Dynamics 365 Business Central, it is installed and automatically turned on for all companies in your environment.
If you do not want to use Multi-Entity Management for a company, follow these steps:
- In My Settings, select the Company you want and select OK.
- Open the Multi-Entity Management Setup page.
- Turn on the Disable Multi-Entity Management option.
When Multi-Entity Management is not used, the entity security features for the records are not used, and all records and transactions actions are available to all users based on the security permissions of standard Microsoft Dynamics 365 Business Central.
Set Up the Entity Dimension
Before you can select a global dimension as the entity dimension, at least one global dimension must already be set up on the Dimensions page.
For more information, see the Microsoft Dynamics 365 Business Central documentation.
To set the entity dimension, follow these steps:
- After the global dimensions are setup, open the Multi-Entity Management Setup page.
- On Entity Dimension, select the global dimension to use as the entity
dimension in
Microsoft Dynamics 365 Business Central.
The entity dimension selected in this page becomes the Entity Code that appears on all pages. - Close the page.
Fields
The following field boxes are available:
| Field | Description |
| Disable Multi-Entity Management |
Use this option to stop using Multi-Entity Management (MEM) in the current company (database).
|
| Entity Dimension |
Select the entity dimension:
The global entities should already have been setup on the Dimensions page. For more information, see the Microsoft Dynamics 365 Business Central documentation. |
| Do Not Clear Blocked Dimension Values |
Specifies whether to clear blocked dimension values for Journal and Transactions. This field is hidden by default, but users can add it via the personalize/design screen functions. |
| Entity Label |
Displays the label to replace the field label Entity Code in many MEM pages and reports. This value is updated when you select the Entity Dimension. Read-only. To change the entity label, you must change the global dimension on the Dimensions page.
|
| Use Default Entity |
Select whether or not the records and data displayed on the Role Center page are filtered by the default entity or by all entities available to the user.
This field is turned off and hidden by default but you can add it to the page manually. For more information about accessing hidden fields, see Work with fields and columns
|
| Disable Elimination Entity Check |
Select whether or not you can use an Elimination Entity to post transactions using any type of page.
This field is turned off and hidden by default but you can add it to the page manually. For more information about accessing hidden fields, see Work with fields and columns |
| Disable MEM Statistical Account Integration |
Allows users to opt out of the MEM Statistical Account Integration functionality. This field is turned off and hidden by default. For more information about accessing hidden fields, see Work with fields and columns. |
Limitations of Role centre filtering currently not supported by MEM
The following cues are not currently supported by MEM role center filtering and will not have their values filtered based on MEM entity.
-
ROLE: Shipping and Receiving- Warehouse Management System
- Released Sales Orders - Today
- Shipments - Today
- Picked Shipments - Today
- Posted Shipments - Today
- Expected Purchase Orders
- Arrivals
- Posted Receipts - Today
- Picks - All
- Unassigned Picks
- Put-aways - All
- Unassigned Put-aways
- Movements - All
- Unassigned Movements
- Registered Picks - Today
-
ROLE: Warehouse Worker- Warehouse Management System
- Unassigned Picks
- My Picks
- Unassigned Put-aways
- My Put-aways
- Unassigned Movements
- My Movements
-
ROLE: Inventory Manager
- Released Sales order - Until Today
- Posted Sales Shipment - Today
- Excepted Purchase Order - Until Today
- Posted Purchase receipt- Today
- Inventory Picks- Today
- Inventory Put-Away- Until Today
- Open Phys. Invt. Orders
- Releases Sales order- Today
- Shipment Today
- Picked Shipment Today
- Posted Shipment -Today
- Expected Purchase Orders
- Arrivals
- Posted Receipt- Today
- Picks-All
- Unassigned Pick Put Aways -All
- Unassigned Put-aways
- Movements-ALL
- Unassigned Movements
- Registered Picks- Today
Intercompany Suite
For more information about Intercompany Suite reporting, see Intercompany Suite: Overview.
Fields
The following field boxes are available:
| Field | Description |
| Enable Intercompany Suite |
Select whether to use the Intercompany Suite functionality: On or Off. For more information about the Intercompany Suite functionality, see Intercompany Suite: Overview. |
| Disable Auto Synchronization |
Select whether to disable Intercompany Suite auto synchronization: On or Off. For more information about the Intercompany Suite functionality, see Intercompany Suite: Overview. |
| Destination Dimension Selection |
This represents whether the users will be allowed to select non-entity dimension values from the destination company on the intercompany suite transaction. It is applicable only when the destination company is on the same database. When this new setting is enabled, users will be able to select non-entity dimensions for the intercompany suite transactions. While posting these transactions in the destination company, dimension values on the intercompany transactions will be overridden with the dimension values selected by users through the IC Suite Dimension action on the transaction window. If this is disabled, MEM will use existing behavior where dimension values will be used from Intercompany Dimension Mapping process. Note: By default, this value will be false. Users can enable this setting. It’s added to ensure that for the existing clients who are using Intercompany dimension mapping to populate the correct dimensions in the destination company transactions don't run into some unexpected behavior, if they need to continue with the existing behavior, they can keep this setting to false. |
Security
User-entity access are relationships between users and entities that are created for data access. Relationships between master file records and entities are also created for data access. As a result, users can access data only when the users and the records have relationships with the same entity or entities.
User-entity access relationships are set up on the MEM User Security Setup page. Relationships between master file records and entities are set up on MEM Master Security page.
If you do not set any security options, then all Microsoft Dynamics 365 Business Central users are able to see all records (e.g., vendor, customer, item, transactions) in the entire database.
The following pages are all used for setting up MEM security:
Set Up Security Restrictions
To set up MEM security restrictions by entity on data, follow these steps:
- Open the Multi-Entity Management Setup page.
- In the Security FastTab, turn on the security option for the data you want to restrict user access.
- Close the page.
After you select the data where you want to apply MEM security, complete the MEM User Security Setup and MEM Master Security pages to set up the entity relationships.
If you choose to use the number security feature, be sure to specify the number series that you want to use on the MEM Entity Setup page.
For more information, see Security Workflow.
Fields
The following field boxes are available:
| Field | Description |
| Bank Account Security |
Select to restrict user access to accounts by entity. Users can select accounts only when the accounts belongs to an entity that the user has permission to access. After you select this option, you can set up the entity relationships with the master file records on the MEM Master Security page. |
| Customer Security |
Select to restrict user access to customers by entity. Users can select customers only when the customer belongs to an entity that the user has permission to access. After you select this option, you can set up the entity relationships with the master file records on the MEM Master Security page. |
| Item Security |
Select to restrict user access to items by entity. Users can select items only when the item belongs to an entity that the user has permission to access. After you select this option, you can set up the entity relationships with the master file records on the MEM Master Security page. |
| Location Security |
Select to restrict user access to After you select this option, you can set up the entity relationships with the master file records on the MEM Master Security page. |
| Vendor Security |
Select to restrict user access to vendors by entity. Users can select vendors only when the vendors belongs to an entity that the user has permission to access. After you select this option, you can set up the entity relationships with the master file records on the MEM Master Security page. |
| Fixed Asset Security |
Select to restrict user access to fixed asset records by entity. Users can select fixed asset records only when the fixed asset records belong to entities that the user has permission to access. After you select this option, you can set up the entity relationships with the master file records on the MEM Master Security page. |
| No. Series Security |
Select to automatically assign a number series for transactions based on entity. Currently, this feature is only available for sales and purchase transactions. When you use the number series, you must also specify which number series to use for the different transaction types on the MEM Entity Setup. Number series is a standard feature in Microsoft Dynamics 365 Business Central. For more information, see the Microsoft Dynamics 365 Business Central documentation. |
| Project Security | Select to restrict user access to projects by entity. Users can select project records only when the projects records belong to entities that the user has permission to access. |
| Multi-Entity Project Billing |
Select to remove the ownership restriction when creating sales invoices from Get Project Planning Lines. Default value is false. |
| Resource Security | Select to restrict user access to resources by entity. Users can select resources only when the resources belong to entities that the user has permission to access. |
| Resource Owner Mandatory |
Select to display an error message if a user posting with the Resource without assigning an owner entity. This option is disabled by default. |
| Ignore Resource Owner |
This new setting in MEM Multi-Entity Management setup is added to allow users to choose whether to ignore resource owner entity while posting transaction with resource. This new setting will be false by default; this will ensure that the existing customer will not find any unexpected behaviour with MEM upgrade. However, if client turn on this setting; it will have an impact on posting process whenever a resource is used on the transactions. The transactions that will have an impact includes, Sales, Purchase, Services, Calculate WIP and Post WIP to G/L. Review the new behavior with this setting enabled. Please see the Resource Card help topic for additional information. |
| Service Item Security | Select to restrict user access to service items by entity. Users can select service items only when they belong to entities that the user has permission to access. |
| Work Center Security | Select to restrict user access to work centers by entity. Users can select work centers only when they belong to entities that the user has permission to access. |
| G/L Account Security | Select to restrict user access to G/L accounts by entity. Users can select G/L accounts only when the G/L accounts belongs to an entity that the user has permission to access. After this option is selected, users can set up the entity relationships with the master file records on the MEM Master Security page. |
| Payment Method Security |
Select to restrict user access to payment methods by entity. Users can select payment methods only when they belong to entities that the user has permission to access.
|
| Restrict General Ledger Entries | Select to restrict user access to the General Ledger Entries page, by
entity. Users can view G/L Entries on the page only when they belong to entities that the
user has permission to access. |
| Edit Multiple Journal Lines in Excel |
Select to include records from all header entities which you have access to when using the Edit in Excel action with journal batches. When Edit Multiple Journal Lines in Excel is turned off, only records assigned to the currently selected batch header entity are included with the Edit in Excel action. |
| Dimension Security: | Specifies whether to show restricted/validated non-entity dimensions. (Refer to Block Dimension Combinations for dimension restriction setup.) |
Intercompany
The intercompany and Intercompany Suite functionality in Multi-Entity Management extends the standard intercompany functionality in Microsoft Dynamics 365 Business Central. For more information about the standard intercompany functionality in Microsoft Dynamics 365 Business Central, see the Microsoft documentation: Managing Intercompany Transactions![]() .
.
Automatic Intercompany Distributions
If you use intercompany distributions between different entities in a company database, you can use a setting on the Multi-Entity Management Setup page such that intercompany distributions are automatically processed. When you turn on the automatic intercompany distributions, MEM detects an intercompany transaction from distributions. When a transaction is detected, MEM gets the intercompany distribution accounts that are set up and adds the Due To and Due From accounts to the distribution.
Also on the Multi-Entity Management Setup page, you can choose not to post a transaction if the Due To and Due From accounts are not set up. When this option is selected, MEM adds empty distribution lines to the transaction. These empty distribution lines prevent the transaction from being posted.
Turn On Automated Intercompany
To turn on automated intercompany distributions, follow these steps:
- Open the Multi-Entity Management Setup page.
- In the Intercompany section, leave the Disable Intercompany option turned off.
- To prevent a distribution from posting, turn on Enable Stop Posting w/o Intercompany Accounts.
As a best practice, turn this option on. - Close the page.
Fields
The following field boxes are available:
| Field | Description |
| Disable Intercompany |
Select whether to turn off the intercompany functionality.
|
| Enable Stop Posting |
Select to prevent transactions from posting when the Due To and Due From accounts have not been set up. When this option is cleared, the transactions are posted without the Due To and Due From accounts. As a best practice, turn this option on. |
| Journals - Copy Non-Entity Dimension to Originating and Destination Intercompany |
Indicates whether to use the non-entity dimension values from the journal line to each of its intercompany entries. Applicable only on journals posting.
|
Report
For more information about 1099 reporting, see 1099 Reporting.
Fields
The following field boxes are available:
| Field | Description |
| 1099 Report | |
| Print by Paying Entity |
Indicates under which entity (invoice or payment) the reportable amount appears for 1099 reports .
For a list of reports affected by this option, see MEM 1099 Reports. |
| 1099 Reporting Sort By |
Determines how the data in the 1099 dividend, interest, and miscellaneous reports are organized:
For a list of reports affected by this option, see MEM 1099 Reports. The following records appear on the report:
When Sort By Entity/Vendor is selected, the data on the report is organized by entity first, and then organized by vendor. Each company appears on a separate page as follows:
When Sort By Entity/State is selected, the data on the report is organized by entity first, and then organized by state. Each company appears on a separate page as follows:
When Sort By State/Entity is selected, the data on the report is organized by state first, and then organized by entity. Each company appears on a separate page as follows:
|
| General | |
| Disable Report Selection by Entity |
Disable Report Selection by Entity is a hidden field which is turned off by default. For more information about accessing hidden fields, see Work with fields and columns When it is turned off, you can assign reports and report layouts based on entities. For example, for entity 100, you can assign specific Sales Order and Sales Quote reports and layouts when processing those transactions which involve entity 100. For more information about using report selection by entity, see: MEM Report Selection by Entity.
|
Tax
The Tax FastTab is only available for users in the NA, EU and AU/NZ regions.
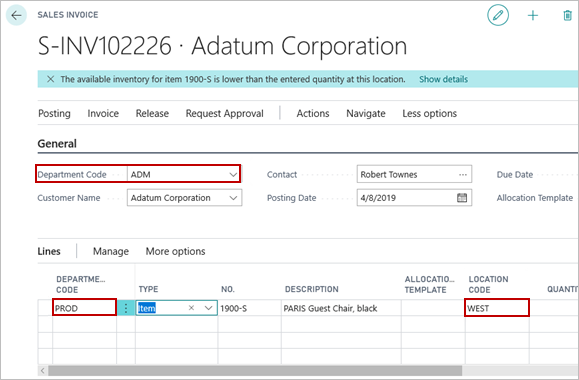
Assign Tax Amounts to Header Entity
When you use Assign to Transaction Header Entity on a transaction where the header and line entities differ, all VAT entries (and any other tax‑related entries) are assigned to the header entity.
To assign tax amounts to the transaction header entity:
-
Turn on: Assign to Transaction Header Entity (EU/AU)
-or-
-
Turn off: Assign to Transaction Line Entity (NA)
Changes will apply to the following journal types:
- General Journals
- Sales Journals
- Payment Journals
- Purchase Journals
- Cash Receipt Journals
- Project G/L Journals
- Fixed Asset G/L Journals
- Recurring General Journal
Changes will also apply to all Purchase transactions (e.g., purchase orders, purchase credit memos) and Sales Transactions (e.g., sales orders, sales credit memos).
Split Tax on Transaction Line
The Split Tax on Transaction Line action lets you distribute tax amounts across multiple entities based on allocation templates. With this feature, tax amounts can mirror the allocation percentages used on each transaction line.
Use Split Tax on Transaction Line when:
-
A transaction amount is allocated across multiple entities using a MEM Allocation Template.
-
You want the tax (GST/PST/HST) to be split in the same proportion as the transaction amount.
-
You want tax entries posted to the line entity (not the header entity).
Example
A company purchases $600 in office supplies, allocated equally to 4 entities:
-
Expense allocation: $150 per entity
-
PST: $42
-
GST: $30
With Split Tax enabled, each entity is assigned:
-
PST: $10.50
-
GST: $7.50
Without Split Tax, all $72 in tax would go to the header entity.
Supported Transactions
Not Supported
-
Service Orders
-
Service Invoices
-
Service Credit Memos
Fields
The following field boxes are available:
| Field | Description |
| Assign to Transaction Header Entity |
Select whether the tax amounts for transactions are assigned to the entity of the transaction header.
Note: This option is only available for the EU/AU localization. |
| Assign to Reporting Entity |
Select whether the tax amounts on reports appear under a reporting entity.
|
| Assign to Transaction Line Entity |
Select whether tax amounts are assigned to the line entity (splitting tax based on allocation) or the header entity. On: Tax amounts are assigned to the line entity, splitting tax based on allocation. Off: All tax amounts are assigned to the header entity. (Default) Note: This option is only available for the North American Localization. |
Bank Deposits
Do Not Split Bank Deposit Ledger Entries: This switch setting determines whether customer ledger entry will be split for each invoice or payment.
On: Create a customer ledger entry for each customer payment. This option works only for the customer and bank deposit as a lump sum.
Off: Create a customer ledger entry only for each invoice that payment applies to.
Note: Post as Lump Sum only works when the Bank Deposit Line contains more than one line.

Purchase & Payables
The following field boxes are available:
| Field | Description |
| Decentralized |
Select whether decentralized processing is used by default:
This option is available on various pages throughout Multi-Entity Management.
|
| AP Replicator Post Through |
Indicates whether invoices that are created with the AP replicator process are automatically posted.
|
| AP Replicator Use Line Dimensions |
Specifies whether to use line dimensions on replicated invoices.
|
| Posting Discount to Transaction Entity |
Indicates to which entity the discount distribution is recorded.
|
| Entity Fields on Electronic Payments |
Indicates whether to use the field values from MEM Entity Setup, instead of from Company Information, for electronic payments:
|
| Centralized/Decentralized AP on the Fly |
Select to be able to choose whether you want to use the decentralized or centralized methods when you process vendor transactions.
For more information see Using Centralized/Decentralized Processing on the Fly. |
| Do Not Split Vendor Ledger Entries |
Select to not split vendor ledger entries when processing vendor transactions. Turning on this option causes vendor transaction processing to behave according to standard Business Central processing. Do Not Split Vendor Ledger Entries is only available to use if you are using the Decentralized payment processing method and have turned on at least one of Decentralized or Centralized/Decentralized AP on the Fly.
|
| Prompt Selection for Print All Checks |
Select the default prompt setting when you use the Print all Checks action on the Payment Journal page. You can select a specific default prompt setting to save time when using the Print all Checks action.
|
Sales & Receivables
The following field boxes are available:
| Field | Description |
| Decentralized |
Select whether decentralized processing is used by default:
|
| Posting Discount to Transaction Entity |
Indicates to which entity the discount distribution is recorded.
|
| Centralized/Decentralized AR on the Fly |
Select to be able to choose whether you want to use the decentralized or centralized methods when you process customer transactions.
For more information see Using Centralized/Decentralized Processing on the Fly. |
| Do Not Split Customer Ledger Entries |
Select to not split customer ledger entries when processing customer transactions. Turning on this option causes customer transaction processing to behave according to standard Business Central processing. Do Not Split Customer Ledger Entries is only available to use if you are using the Decentralized payment processing method and have turned on at least one of Decentralized or Centralized/Decentralized AR on the Fly.
|
Service Management
This FastTab contains the following fields:
| Field | Description |
| Disable Item Security on Service Item Worksheet |
Indicates whether to turn off the item security on the Service Item Worksheet and the Service Line pages when both Item Security and Service Item Security are turned on, on the Security FastTab.
|
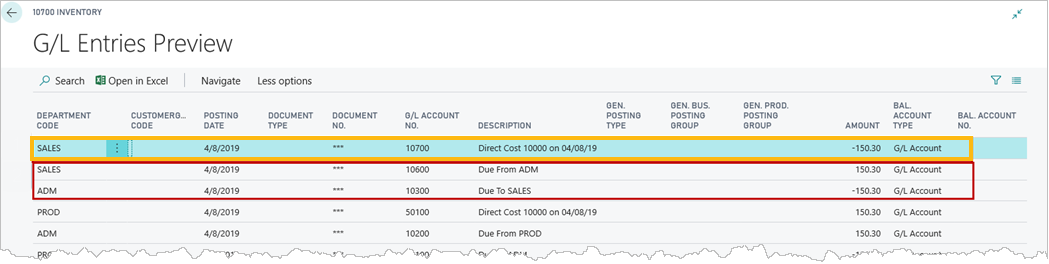
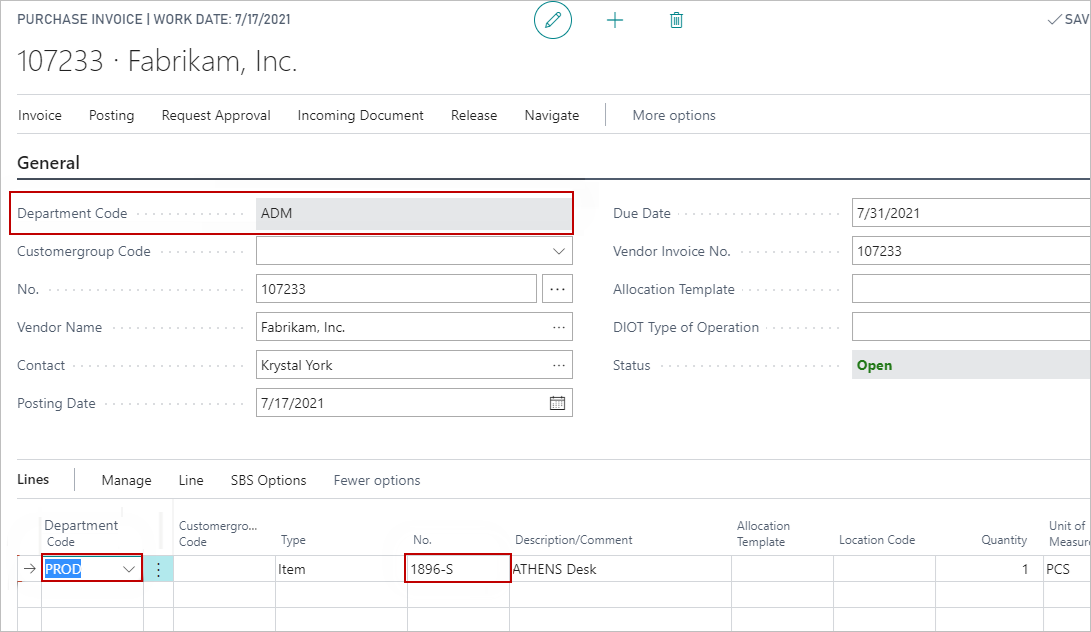
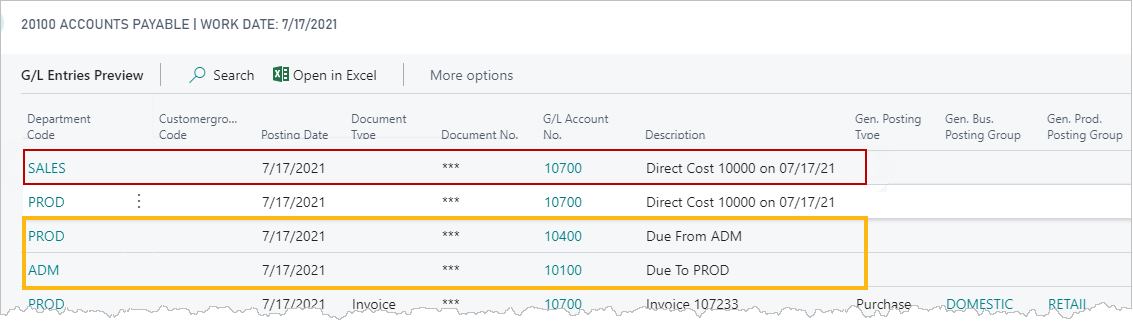
Inventory Posting
The following field boxes are available:
| Field | Description |
| Inventory Posting |
Determines whether the entity for the inventory account for a transaction is from the location or the item. This setting is used on the Inventory Entity Code option on the MEM Calculate Plan - Req. Wksh.
When Entity from Item is selected, inventory transactions are processed similar to the purchase and sales transactions with the following differences: |
Additional Intercompany Dimensions
The following field boxes are available:
| Field | Description |
| IC Dimension 1, 2, 3 Code |
Select other dimensions that you want to use the intercompany functionality. You can select up to three other dimensions.
After you select the additional dimensions, complete the MEM Additional Intercompany Setup to ensure that the intercompany distributions that you want work as expected. |
| Enable Additional IC Restriction |
Indicates whether to restrict the use of additional intercompany dimension values in the header of a journal. This option is available for use when at least one additional intercompany dimension is used.
|
Licensed User
The following field boxes are available:
| Field | Description |
| User Mandatory Error |
Indicates whether an error message for users who are not assigned a Multi-Entity Management license appears:
|
| Skip Device License Mandatory Check |
Specifies whether to skip blocking users from using Business Central when MEM Device License is unavailable.
|
Workflow & Approval Process
The following field boxes are available:
| Field | Description |
| Decentralize Process |
Indicates whether decentralized processing is used by default:
Users who are allowed to approve the transactions must also have access to the entity of the transaction on the MEM Entity Setuppage. |
Intercompany Trade
The following field boxes are available:
| Field | Description |
| Trigger for automatic creation of Corresponding Inter-company Trade document |
Indicates whether the corresponding inter-company trade transaction is created.
|
| Copy Dimensions |
Specifies whether the system will copy the dimensions from the source document to the destination document on Inter-company Trade transactions.
|
| Enable IC Trade Allocation on Purchase |
Specifies whether enable IC Trade allocation on purchase transactions. On: default IC Trade Allocation to true in the purchase order, purchase invoice page. |
| Post IC Trade Allocation on Purchase |
Specifies how to post the IC trade allocation on purchase transaction. Never: Only post purchase transaction and create internal sales invoices. In Originating Only: Post purchase transaction, create internal sales invoices and post them, create intercompany trade purchase invoice. Always: Post purchase transaction, create internal sales invoices and post them, create intercompany trade purchase invoices, and post them. |
| Enable IC Trade Allocation on Sales |
Specifies whether enable IC Trade allocation on sales transactions. On: default IC Trade Allocation to true in the sales order, sales invoice page. |
| Post IC Trade Allocation on Sales |
Specifies how to post the IC trade allocation on sales transaction. Never: Only post sales transaction and create internal purchase invoices. In Originating Only: Post sales transaction, create internal purchase invoices and post them, create intercompany trade sales invoice. Always: Post sales transaction, create internal purchase invoices and post them, create intercompany trade sales invoices, and post them. |
| Intercompany Sales with Drop Ship |
Specifies whether to enable the Intercompany sales with drop shipment functionality.
Note: When this setting becomes enabled, users will be prompted to enable Feature Update: New sales pricing experience feature if it is not already enabled. |
Planning
The following field boxes are available:
| Field | Description |
| Centralize Process |
Determines how the entity is assigned to a production order, purchase order, or transfer order.
When the action message is change quantity, reschedule, or reschedule and change quantity, the header of the existing document that is being changed remains the same. Currently, this option does not apply to assembly orders. This setting is used on the Centralize Process option on the MEM Carry Out Action Msg - Req., and is used for the Requisition Worksheets, Planning Worksheets, and Subcontracting Worksheet. |
Assembly Management
MEM is automatically integrated with the Assembly Management module. You can disable the integration manually by turning it off in the MEM Setup page. Disable MEM Assembly Integration is a hidden field on the page which you can access by opening the Add Field to Page page. For more information about accessing hidden fields, see Work with fields and columns![]() .
.
Warehouse Management
MEM is automatically integrated with the Warehouse Management module. You can disable the integration manually by turning it off in the MEM Setup page. Disable Warehousing is a hidden field on the page which you can access by opening the Add Field to Page page. For more information about accessing hidden fields, see Work with fields and columns![]() .
.
The following field boxes are available:
| Field | Description |
| Use Entity Legal Name |
Specifies whether the company name or the entity name is used in your email subject lines.
When Use Entity Legal Name is turned on, the entity used in the email subject line depends on type of message you want to send. For example, if you send a purchase order in an email, the entity used in the subject line comes from the Purchase header. Review the following scenarios to see which entity is used in specific scenarios. |
| Type of Document | Entity Used |
| Purchase Order | Using entity of: Purchase header |
| Purchase Quote | Using entity of: Purchase header |
| Sales Credit Memo | Using entity of: Sales Header |
| Sales Invoice | Using entity of: Sales Header |
| Sales Order | Using entity of: Sales Header |
| Sales Quote | Using entity of: Sales Header |
| Vendor Remittance | Using entity of the bank as specified by the Bal. Account Type. |
| Posted Vendor Remittance | Using entity from the related Bank Account Ledger Entry. |
| Issue Reminder | Using entity from the Entity for Email Scenario in the MEM Issue Reminders page. |
| Customer Statement | Using entity from the Entity for Email Scenario in the MEM Customer Statement page. |
User Defined Fields
Use this FastTab for creating user-defined fields for saving additional information. The user-defined fields boxes created on this page are available for all entities. To create user-defined field boxes for a specific entity, use the MEM Entity Setup page. User-defined fields can be used when customizing reports.
User-defined fields are supported across all MEM Check, Purchase, and Sales report types:
North America (NA) Reports
-
MEM Check (Check / Stub / Stub)
-
MEM Check (Stub / Check / Stub)
-
MEM Check (Stub / Stub / Check)
-
MEM Three Checks per Page
-
MEM Check
-
MEM Purchase Blanket Order
-
MEM Purchase Invoice
-
MEM Purchase Receipt
-
MEM Purchase – Order
-
MEM Sales – Credit Memo
-
MEM Draft Invoice
-
MEM Sales – Invoice
-
MEM Sales – Confirmation
-
MEM Pro Forma Invoice
-
MEM Sales – Quote
AU/NZ Reports
-
MEM Check
-
MEM Purchase Blanket Order
-
MEM Purchase – Invoice
-
MEM Purchase – Receipt
-
MEM Purchase – Order
-
MEM Sales – Credit Memo
-
MEM Draft Invoice
-
MEM Sales – Invoice
-
MEM Sales – Confirmation
-
MEM Pro Forma Invoice
-
MEM Sales – Quote
EU Reports
-
MEM Blanket Purchase Order (DK, FI, NL)
-
MEM Blanket Purchase Order DE
-
MEM Blanket Purchase Order GB
-
MEM Check
-
MEM Check DE
-
MEM Check FI / DK / NL
-
MEM Check ES
-
MEM Purchase – Invoice (DK, FR, NL)
-
MEM Purchase – Invoice DE
-
MEM Purchase – Invoice ES
-
MEM Purchase – Invoice GB
-
MEM Purchase – Receipt (DE, DK, FR, NL)
-
MEM Purchase – Receipt ES
-
MEM Purchase – Receipt GB
-
MEM Purchase – Order
-
MEM Sales – Credit Memo
-
MEM Sales – Credit Memo ES
-
MEM Draft Invoice
-
MEM Draft Invoice ES
-
MEM Sales – Invoice
-
MEM Sales – Invoice ES
-
MEM Sales – Confirmation
-
MEM Sales – Confirmation ES
-
MEM Pro Forma Invoice
-
MEM Sales – Quote
-
MEM Sales – Quote ES
For each user-defined field you want to add, specify the name of the field box. The following field boxes are available:
| Field | Description |
| User Defined Field |
If you require user-defined field boxes for saving additional information, specify the name of the field box that you want to add. The available formats for the user-defined field boxes are as follows:
|
Actions
The following actions are available:
| Action | Description |
| MEM Entity Setup | Opens the MEM Entity Setup page. |
| Action > MEM Sample Data > Process | Opens MEM Install Sample Data page, from where you can install the MEM sample data on top of the default Business Central data. Find more about MEM sample data on the MEM Install Sample Data page. |
Obsolete
This following FastTab is obsolete:
| Field | Description |
| Location | |
| Entity From Location |
Select to use the entity of the location for the inventory account when creating purchase and sales transactions. If you select this option, ensure that you also complete the Locationpage.
If you are using MEM build 1.0.4.5 (and earlier), you must select this option to use the feature. |
The following action is obsolete:
| Action | Description |
| Actions > Change Binary Stream Customer | Opens a dialog where you can change the Binary Stream customer ID. This action is the same as the action on the License Subscription Informationpage, and is typically used by Binary Stream administrators. |