In this article
Import MERA
Workspaces > Data management > Import
Use this page to import transactions and setup information. The Data Management workspace in Microsoft Dynamics 365 for Finance and Operations is used for importing data.
![]() Tip: To save time and work more efficiently, use the sample import files (SB_ImportTemplates-YYYYMMDD.zip) that are provided with Subscription Billing installation download file. If a sample file does not exist, you can export the data entities.
Tip: To save time and work more efficiently, use the sample import files (SB_ImportTemplates-YYYYMMDD.zip) that are provided with Subscription Billing installation download file. If a sample file does not exist, you can export the data entities.
![]() Notes: The following items provide information with respect to importing data:
Notes: The following items provide information with respect to importing data:
- When a target mapping is generated, any non-standard fields that are added to the standard Microsoft Dynamics 365 for Finance and Operations data entities are automatically removed. You must manually add the non-standard fields to the target mapping for the data entity (for example, sales order lines)
- If you manually specify the LINECREATIONSEQUENCENUMBER field for sales order lines, leave a gap in the number sequence after each revenue split header. Since sequence numbers for child lines are automatically assigned, the gap is needed to avoid conflicts for numbers that are already used. If the sequence number of a child line is the same as one of the imported lines, the data import fails.
 View example.
 - The header and line records can be combined into a single composite entity, which means it can be included in a single file. However, only XML files can be used with composite entities.
- For the item standalone selling price, when a parent item that uses revenue split is imported, the corresponding child items are also imported.
When the child items are imported, the SSP origin, Standalone selling price, and Percent values override any existing values. - For the revenue split allocation method and the SSP origin, the value on the import file must match the value that appears on the form.
- Each entity record is processed independently of all other entity records. As a result, when an import error occurs, only the line that has the error is rolled back. All other lines that are successfully imported are not affected.
For composite entities, the header and line are considered a single entity. If an import error occurs with the line, the header is not imported.
Revenue Split
Revenue splitting can be automatically applied to items that are added or imported based on the Automatically create revenue split setting on the Multiple Element Revenue Allocation Parameters page for Multiple Element Revenue Allocation.
When you import data that uses revenue splitting, the value in the RevenueSplit column indicates whether revenue splitting is used for the line: Yes indicates the line uses revenue splitting; No (or empty) indicates that revenue splitting is not used.

![]() Note: When automatic revenue splitting is used, the value in the RevenueSplit column takes precedence. if the value in the RevenueSplit column is empty or the column is missing from the import file, revenue splitting automatically occurs when the item has a corresponding with an revenue allocation template.
Note: When automatic revenue splitting is used, the value in the RevenueSplit column takes precedence. if the value in the RevenueSplit column is empty or the column is missing from the import file, revenue splitting automatically occurs when the item has a corresponding with an revenue allocation template.
Before importing data that uses the revenue split functionality, do the following:
- Go to Data Management, and in the Import / Export section, select Data entities.
- On the Target entities page, type sales order lines V2 in the filter box.
- In the list, select Sales order lines V2, and select Modify target mapping.
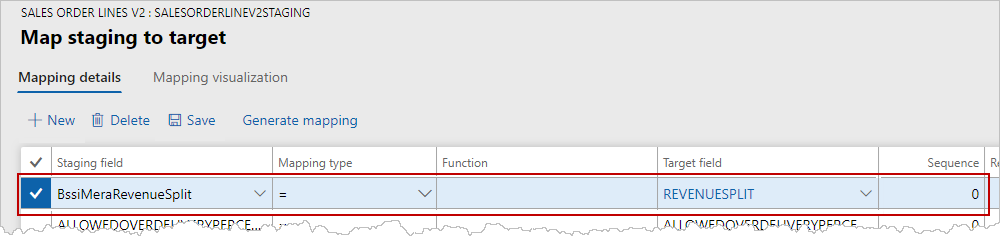
- On the Map staging to target page, select the Mapping details tab.
- Select New to add a new line with the following details:
- Staging field: BssiMeraRevenueSplit
- Mapping type: =
- Target field: REVENUESPLIT
- Select Save.
- Go to back to Data Management, and in the Import / Export section select, Import.
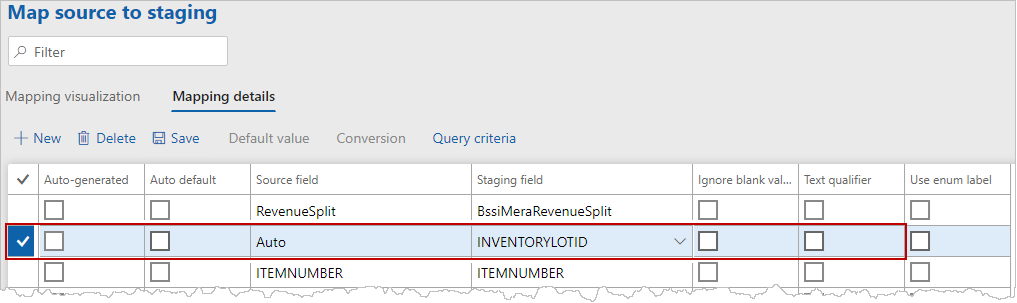
- In the list, select Sales order lines V2, and select View map
 .
. - In the Map source to staging page, find the line for INVENTORYLOTID, and clear the Auto-generated check box.
- Select Save.
Import Data Entities
Before you can import data, the data entities must be visible. If they are not visible, update the entity list:
- Go to Data management > Framework parameters > Entity settings.
- Select Refresh Entity list.
After you perform these steps, the data entities should appear as expected, and you can proceed with the data import.
To import data, follow these steps:
- Select Workspaces > Data management > Import, which opens the Data management page.
- Select Import.
- Specify a Name for the import job.
- In Source data format, select XML-Attribute.
- In Entity name, select the entity (for example, SB ARCB billing schedule composite, SB MERA revenue split template header).
- Select Upload, and select the file you want to import.
- Select Import.
To view any import errors, select View execution log. Sometimes this log does not show detailed information for the errors. If you cannot see the detailed information, select View staging data, to see the actual error.