In this article
HMM Supply Requisitions
Use this page to view a list of your supply requisitions (SR) and to view and edit single SR entries. You can create two different types of supply requisition transactions which are used to request items.
Use supply requisitions to request items from replenishment locations to be sent to your consumption locations.
Requesting Items with Supply Requisitions
There are two types of SRs which you can create.
- Expense Preview: This type of supply requisition entry is created between a stock and a non-stock location. This SR creates an inventory transfer entry for stock items which are sent to non-stock locations.
- The on hand quantity is decreased at the stock location and increased at the non-stock destination location. After the item is transferred to the non-stock destination location, an inventory adjustment transaction is created to expense the item which was transferred to the destination.
- Transfer Preview: This type of supply requisition entry is created between two stock locations. This SR creates an inventory transfer entry for stock items which are sent to other stock locations.
- The on hand quantity is decreased at the stock location and increased at the stock destination location.
You can edit any SR until it is processed.
Creating Supply Requisitions
There are three ways to create supply requisitions.
- Auto Replenishment Process: Use auto replenishment templates with the HMM Auto Replenishment Process page to create supply requisitions.
- Par Count Process: You can run the par count process either manually or by using the handheld portal to create supply requisitions.
- Manual Par Count Process: Use the HMM Par Count Process page to run a manual par count process.
- Handheld Portal Par Count Process: Use the handheld portal to count on hand quantities to create supply requisitions.
- Manually Create SRs: Use the HMM Supply Requisitions page to manually enter details for a supply requisition.
After you have created supply requisitions, you can then use the HMM Supply Requisition Process page to process them.
Create Supply Requisitions with the Auto Replenishment Process
To use auto replenishment templates to create supply requisitions, do the following:
- Make sure that you have created auto replenishment templates. See Set up Auto Replenishment Templates.
- Go to the HMM Auto Replenishment Process page.
- Select the template you want to use.
- Only items which have replenishment locations can be used to create SRs.
- If the on hand quantity is less than the par quantity, then SRs will be created.
- Select the lines you want to use to create the supply requisition.
- Select Process.
Create Supply Requisitions with the Par Count Process
Use either of the following methods to create SRs.
Manual Par Count Process
To create a manual par count to create supply requisitions, do the following:
- Search for and open the HMM Par Count Process page.
- Select Manual Par Count as the Action Type.
- For Location, select the location for the par count.
- Items which you have added to the par list for the location will appear.
- On the HMM Par Count Process table, under Quantity on Hand, enter the quantity on hand of the item at the location.
- The Quantity to Order will automatically update when you enter value for the Quantity on Hand.
- You can select Add New Item on the Action tab to add other items to the par count process. The items you add must be set up as stockkeeping units for the location selected for the par count process.
- After adding any other items, select Process.
Handheld Portal Par Count Process
To use the handheld portal to create supply requisitions, do the following:
- Go to your handheld device which has the Materials Management Portal installed.
- Follow the steps here: Count On Hand Quantities at Locations.
- To create a supply requisition, you must select a replenishment location when creating a Requisition Inventory portal request.
- Once the portal request is uploaded to Business Central, go to the HMM Par Count Process page.
- In the header of the HMM Par Count Process, select Par Count by Portal as the Action Type.
- Select the lines you want to use to create the supply requisition.
- Select Process.
A new SR will be created and displayed in the HMM Supply Requisitions (List) page.
Manually Create Supply Requisitions
To create a supply requisition entry, do the following:
- Search for and open the HMM Supply Requisitions page.
- On the Action tab, select New to create a new SR.
- Under the header section of the Supply Requisition, for Requested Date, enter the date for when you want to issue the SR.
- In the Supply Requisition Lines section, fill in the following fields:
- For No., select the item that you want to request.
- Select the Unit of Measure and enter the Quantity of the item.
- Under From Location, select the location from which you want to request the item. You can only select replenishment locations.
- Under To Location, select the location to which you want to send the item. You can select consumption or replenishment locations.
- Under Quantity Picked, enter the amount of the item that has been picked. This amount will be transferred to the To Location when you process the SR.
- You can also enter an amount under Quantity Canceled. This amount will not be included in the transfer of items.
- When you have finished entering any other details of the SR, selecting a Contact Name or entering a Shipping Comment, for example, you can select SR Process on the Action tab.
You will be taken to the HMM Supply Requisition Process page. You can then process the SR which will create a transfer journal entry.
Create Supply Requisition with MEM Integration
You can expect the following workflow on the Supply Requisition Entry page when MEM is installed and enabled on the MEM Multi-Entity Setup page:
-
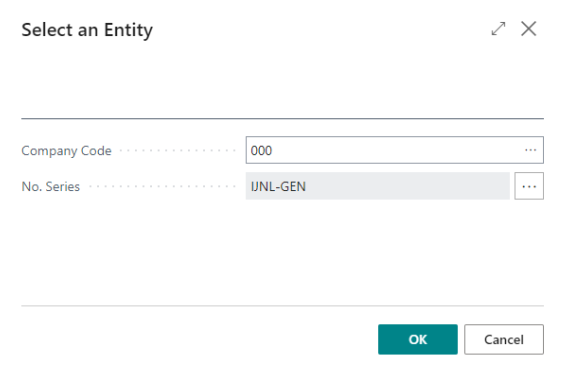
When creating the new Supply Requisition, you will be prompted to select the Entity ID. This Entity ID will become the Header Entity ID of Supply Requisition. Once entered, it cannot be changed on this step.


-
The Entity ID captions will be picked from the MEM Multi-Entity Setup Page depending on the Entity Dimension.

-
The Header Entity is automatically copied to the new line, where you are now able to change it.

-
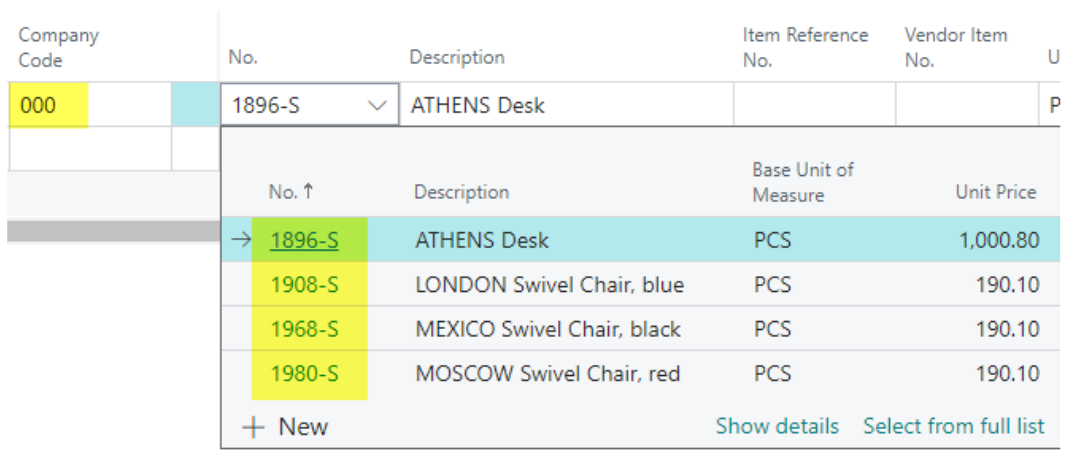
Only line items that have access to the From Entity will be shown. (In this example, the From Entity is labeled as the Company Code) in the MEM Master Security Setup Page.

-
Similarly, only those locations which have access to the From Entity ID will be shown. (In this example, the From Entity ID is the Company Code.)
-
An Entity ID field will also be added to the Line level (labeled as New Company code in this example). This field cannot be changed, and its value will either be picked from the Location Code or Item Number based on the Inventory Posting setting in the MEM Multi-Entity Setup Page.

-
In this example, the New Location code is WEST, and the Entity (Company Code) assigned to it is 200, so it is therefore set as the New Entity ID on the Line Level.

-
A MEM Entity ID field (Company Code) will be shown in all the Log Reports after processing the SR. When MEM is not installed or is disabled, this field will not appear in the Log report.

Supply Requisition with Lot and Serial Trackable Items
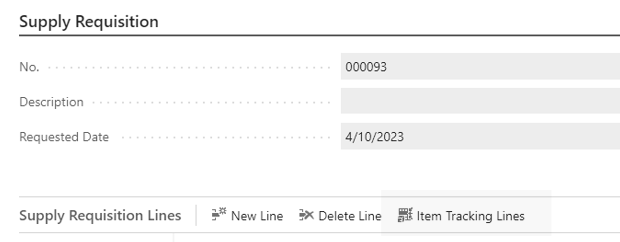
The action Item Tracking Lines opens the Business Central’s Item Tracking Lines Page, where user will be able to assign Lot and Serial Numbers information against the quantity for the supply requisition item. The allocation of Lot and Serial works as it works in Business Central inventory transactions.

Below is a workflow with Lot and Serial Trackable Items on HMM Supply Requisitions:
-
Users can create Lot and Serial tracking details for trackable items using the Item Tracking Lines page in Business Central. To access this, click on the Item Tracking Lines action.
-
When processing a Supply Requisition entry, the system will check and validate whether the item is trackable. The Serial/Lot information will be added to the Item Tracking Lines if the item is trackable.
-
If a trackable item is removed or modified after entering its tracking details, the system will update or remove the associated Lot/Serial information accordingly.
-
When a Supply Requisition line is processed, the system creates an Item Reclassification Journal and a Negative Adjustment Item Journal Line. These journal lines will include the same Lot/Serial information as defined in the Supply Requisition entry for the trackable item.
Supply Return: When you select the Reverse action for a Supply Requisition, HMM creates a Supply Return document, which will include the same Lot/Serial tracking information to transfer the quantities to the location where the Return will be performed.

Supply Requisition Fields
The following field boxes are available:
| Field | Description |
| Header | |
| No. | Enter the SR document number. |
| Description | Displays the SR description. |
| Requested Date | Enter the date when the SR was requested. |
| Replenishment Location | Enter the replenishment location of the SR. |
| Destination Location | Enter the destination location of the SR. |
| Reference | Enter any other relevant information about the SR here. |
| Entity ID |
Enter the MEM Entity ID. The selected Entity ID will be the Header Entity ID and will be automatically copied to the new line. When this field is filled, only items that have access to the From Entity in the MEM Master Security Setup page will be visible. Similarly, only those locations which have access to From Entity ID will be visible. This field is only available when MEM is installed and enabled on the MEM Multi-Entity Setup page. |
| Lines | |
| No. | Select the item number for which you create the SR. You can only select Inventory type items. |
| Description | Displays the item description. |
| Item Reference No. | Displays the item reference number. |
| Vendor Item No. | Displays the vendor item number. |
| Unit of Measure | Select the unit of measure you want to use for the item. The default UoM is based on the Item Setup. |
| Quantity | Enter the quantity of the item that you want to request. |
| From Location |
Select the replenishment location from which the item will be sent. If you don't select a Replenishment Location, then the default one is based on the replenishment location in the header. |
| From Location Description | Displays the name of the originating location. |
| To Location | Select the location to which the item will be sent. |
| To Location Description | Displays the name of the destination location. |
| Transaction Type |
Displays the type of transaction.
|
| Quantity to Pick | Displays the remaining quantity which has not yet been picked up for transfer yet. This field is automatically updated based on the Quantity Picked and Quantity Requested fields. |
| Quantity Picked | Enter the quantity of the item that will be picked from the warehouse which will then be transferred. When you update the Quantity Picked field, the Quantity to Pick field is automatically updated as well. |
| Quantity Transferred | Displays the quantity of the item which has been successfully transferred. It is updated after an item reclassification entry is processed. |
| Quantity Canceled | Enter the quantity of the item which is canceled, unavailable for the fulfillment of the SR. |
| IV Transaction | Displays the number of related item ledger entries for the SR. You can select and open the list of Item Ledger Entries. |
| Contact Name | Displays the name of the contact person which is printed on the picking ticket. |
| Contact No. | Displays the number of the contact. |
| Shipping Comment | Enter any other information about the shipping process which will be printed on the Picking Ticket. |
| Requested Date | Displays the date when the SR was created. |
| New Entity ID |
The value of this field will either be based on the Location Code or Item Number based on the Inventory Posting setting in the MEM Multi-Entity Setup Page. |
Actions
The following actions are available:
| Action | Description |
| SR Process | Open the HMM Supply Requisition Process. You cannot make any modifications to the SR after you process it. |
| Actions > Suggest Par Items | Select to populate the lines section of the SR with data based on the par list for the selected item and its location. |
| Actions > Import/Export > XML or CSV Files | Select to import or export data for a SR entry. |
| Item Tracking Lines |
Opens the Item Tracking Lines Page, where Lot and Serial Number information can be assigned against the item. |
HMM Supply Requisitions (List)
Use this page to view a list of your supply requisitions (SR).
Fields
The following field boxes are available:
| Field | Description |
| No. | Displays the SR document number. |
| Description | Displays the SR description. |
| Requested Date | Displays the date when the SR was created. |
| Replenishment Location | Displays the replenishment location of the SR. |
| Destination Location | Displays the destination location of the SR. |
| User ID |
Displays the user ID of the user who created the SR. |
| Reference | Displays any other relevant information about the SR. |