In this article
PLM Properties
Use this page to define the level details for a category.
![]() Note: Throughout the documentation, the text for the different levels within a category are as follows: PLM for the level 1 category, Building for the level 2 category, and Unit for the level 3 category.
Note: Throughout the documentation, the text for the different levels within a category are as follows: PLM for the level 1 category, Building for the level 2 category, and Unit for the level 3 category.
![]() Important: As a best practice, set up a single property with one category. If you set up a property with two categories, your data might be compromised. For example, you have two categories: Residential and Commercial. Set up Building A with the Residential category only.
Important: As a best practice, set up a single property with one category. If you set up a property with two categories, your data might be compromised. For example, you have two categories: Residential and Commercial. Set up Building A with the Residential category only.
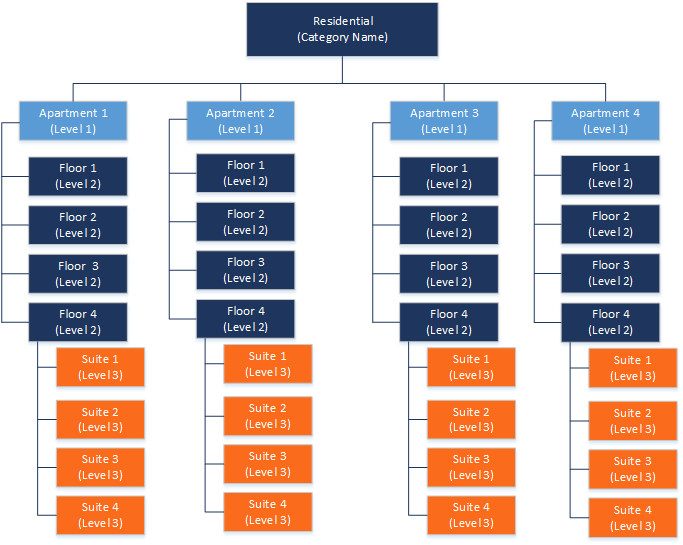
Property Levels Example
Review the following example to better understand how categories and levels work.
On the , the following category is created:
| Category name | Levels required | Level 1 label | Level 2 label | Level 3 label | Customer Label | Vendor label |
| Residential | Three | Apartment | Floor | Suite | Tenant | Landlord |
On the PLM Properties page, the details for the Residential category are set up as follows:
Apartment (Level 1)
The following table shows the different apartments set up for the Residential category.
| Facility number | Total area | Leasable area | Area unit |
| Apartment 4 | 400,000 | 400,000 | sq. ft |
| Apartment 3 | 400,000 | 400,000 | sq. ft |
| Apartment 2 | 400,000 | 400,000 | sq. ft |
| Apartment 1 | 400,000 | 400,000 | sq. ft |
Floor (Level 2)
The following shows the rooms for the Apartment 1.
| Room number | Total area | Leasable area | Area unit |
|---|---|---|---|
| Floor 4 | 100,000 | 100,000 | sq. ft |
| Floor 3 | 100,000 | 100,000 | sq. ft |
| Floor 2 | 100,000 | 100,000 | sq. ft |
| Floor | 100,000 | 100,000 | sq. ft |
Suite (Level 3)
The following table shows the beds for room Floor 3 (Level 2) in the Apartment 1 (Level 1).
| Bed number | Total area | Leasable area | Area unit |
|---|---|---|---|
| Suite 4 | 25,000 | 25,000 | sq. ft |
| Suite 3 | 25,000 | 25,000 | sq. ft |
| Suite 2 | 25,000 | 25,000 | sq. ft |
| Suite 1 | 25,000 | 25,000 | sq. ft |
Set Up Category Details
To set up the details for a category, follow these steps:
Note: In the following two fields, PLM Levels, and Category Name, only letters, numbers, and dashes will be accepted. All other special characters will be ignored.
- From the Properties List, select New.
The PLM Levels page opens. - In the General FastTab, select the Category Name.
All fields on this FastTab are automatically updated and are read-only.
For each level available for the category, a Level FastTab appears. - For each level complete the Level FastTab as follows:
- Specify a unique Level name.
- Select the Dimension Value for the level.
- Specify the Total area and Leasable area.
- For Level 1 only, select Show more to show the Contact Information field boxes and select a Contact Code for the property.
Level 2 appears as a list within the Level 1 FastTab.
To access Level 3, select a Level 2 line and then select Manage > Level 3.
- To attach documents to the record, do the following:
- Select
 to expand the FactBox pane.
 - Select the number to open the details for the documents and attach the files you want.
- Select Close to return to the main page.
- Select
Edit Category Details
To edit the details for a category, follow these steps:
- From the list, select a category and select Edit.
- Select the level that you want to edit, and make the necessary changes, such as add a line, remove a line, or edit the total area or leasable area.
![]() Note: Category levels that are attached to leases cannot be deleted.
Note: Category levels that are attached to leases cannot be deleted.
For details for editing the area of a property, see Modify Property Area (Setup).
PLM Level
Use this page to define the level details for a category.
General
In this FastTab, select the category for which you want to set up properties. All fields on this FastTab are read-only.
Fields
This page contains the following fields:
| Field | Description |
| Category Name |
Select the category name. The available categories are created on the PLM Categories Setup page. Categories that have no required levels are not available. After the category is selected, the read-only field boxes in this FastTab are automatically updated with the number of required levels and the labels for the levels, area unit and customer and vendor labels. |
| Validate Occupancy |
Validates whether the lowest level is already occupied. The option selected is the default value for the PLM Lease page.
|
Level
The Level FastTabs appear based on the number of required levels for the selected category. Use these FastTabs to specify the details for each level.
For categories that have two or three levels the fields for each level appear in a layered format on the page. For example,
- Level 1 values are in the main fields of the FastTab.
- Level 2 values are in a list after the Level 1 fields.
- Level 3 values are accessed by selecting a line in the Level 2 list and selecting Manage > Level 3.
Fields
This page contains the following fields:
| Field | Description |
| Level 1 | |
| Level Number | Specify a unique value for the level number. |
| Dimension | Displays the dimension for the level. Read-only. The dimension is set on the PLM Categories Setup page. |
| Dimension Value | Select the dimension value for the level number. When this value is empty, the value is take from the customer or vendor record. |
| Total Area | Specify the total area for the line. This value must be greater than or equal to the Leasable Area. |
| Leaseable Area | Specify the leaseable area for the line. This value must be equal to or less than the Total Area. |
| Contact Information |
To see the contact information for the first level of a property, select Show more. Select the Contact Code for the property contact. Available only for the first level of a property. All values for the contact information are read-only and can be changed by editing the record on the Contact Card. Contacts are a standard feature in Microsoft Dynamics 365 Business Central. For more information, see Managing Contacts |
| Level 2 List | |
|
For each Level 1 entry, add one or more Level 2 entries as needed. Each Level 2 entry has the same fields that need to be completed. The Total area for a Level 2 entry must be less than or equal the Level 1 entry. Also, the sum of the Total area of all Level 2 entries cannot exceed the Total Area of the associated Level 1. |
|
| Level 3 Page | |
|
For each Level 2 entry, add one or more Level 3 entries as needed. Each Level 3 entry has the same fields that need to be completed. The Total area for a Level 3 entry must be less than or equal the Level 2 entry. Also, the sum of the Total area of all Level 3 entries cannot exceed the Total Area of the associated Level 2. |
|
FactBox
The FactBox shows the following information:
- Attachments Displays the number of attachments for the property. Adding an attachment is part of the standard Microsoft Dynamics 365 Business Central functionality.
Actions
The following actions are available:
| Action | Description |
| CAM Pools | Opens the PLM CAM Levels where you add CAM expense pools to a property. This action is available from the header level, where you can add a CAM expense pool to the whole property, or at the second lowest level, where you can add a CAM expense to a specific second lowest level. |