In this article
Payment Journals
Use this page to post transactions directly to the payment journal.
For more information, see the Microsoft Dynamics 365 Business Central documentation.
For information how the different combinations of the Account Type and Balance Account affect the entities to which the accounts belong, review the concept information for the Bank Account page.
Payment Method Security
When the Payment Method Security option is turned on on the Multi-Entity Management Setup page, the payment method that can be selected is based on balance account type selected for the line.
- When the Bal. Account Type for a line is Bank Account, the available payment methods belong to the same entity as the bank account selected.
- When the Bal. Account Type for a line is G/L Account and the selected account belongs to a balance account posting group, the available payment methods belong to the same entity as the transaction header.
- For all other balance account values, the available payment methods belong to the same entity as the line.
If the Payment Method Code has a value and you use the Suggested Vendor Payments action, the payment method code value for a line is cleared if the payment method code value is not valid for the line based on the balance account type selected.
Suggested Vendor Payment
The Suggested Vendor Payments Options action can be used with both centralized or decentralized processing. For this processing, the Apply Vendor Entries action is not used.
This action is part of standard Microsoft Dynamics 365 Business Central.
If the payment journal is centralized and the Suggest Vendor Payment (Entity) Filter has been set for the bank account, the Suggest Vendor Payment Filter defaults to the Suggest Vendor Payment (Entity) Filter of the bank account. Otherwise, it remains unchanged.
Centralized Processing (Suggested Vendor Payment)
Centralized processing is the process of grouping transactions from multiple entities together into a single batch. To use centralized processing, the following setup is required:
- On the Multi-Entity Management Setup page, select the Purchase & Payables FastTab and turn off the Decentralized option.
![]() Note: If you turn on Centralize/Decentralized AP on the Fly, you can use centralized processing for particular journal batches. For more information see Using Centralized/Decentralized Processing on the Fly.
Note: If you turn on Centralize/Decentralized AP on the Fly, you can use centralized processing for particular journal batches. For more information see Using Centralized/Decentralized Processing on the Fly.
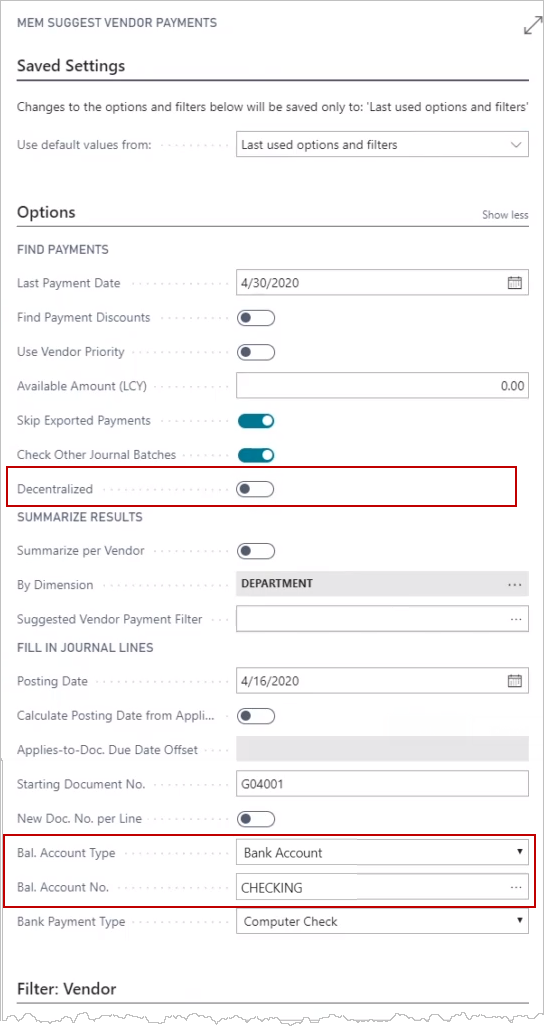
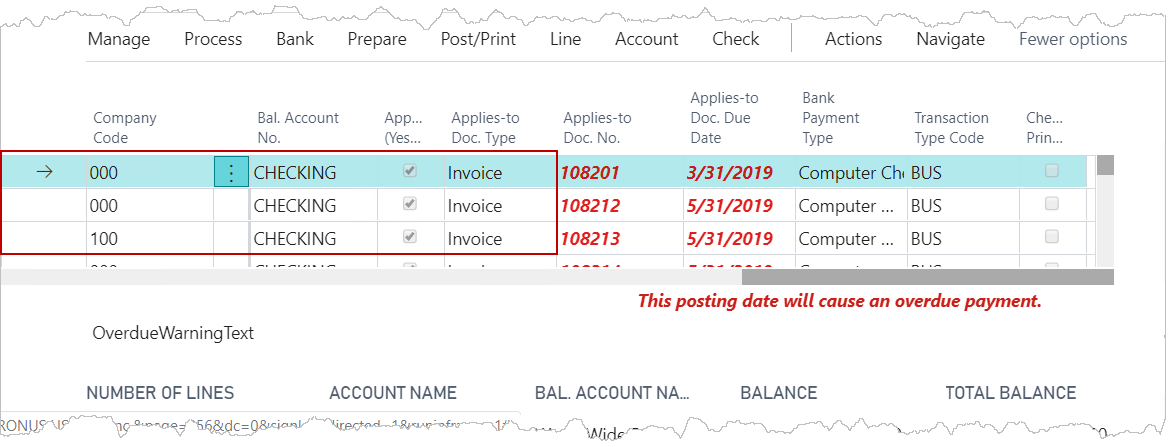
When using the Suggested Vendor Payments Options, the Decentralized option should be turned off. The payment account that is used for each line is the payment account that belongs to the entity in the header. The general process is as follows:
- Check that Decentralized is turned off.
This option is set by the Decentralized option or the Centralize/Decentralize AP on the Fly option in the Purchase & Payables FastTab on the Multi-Entity Management Setup. - Specify the Entity Code, Allocation Template (optional), and Batch Name.
- Select Prepare > Suggested Vendor Payments.
- In the dialog, specify the values you want.
In Options, select the Bal. Account Type and select the Bal. Account No. - Select OK.
- When you review the lines, you can see that all lines use the same Bal. Account No..
- Finish processing the transaction as per the instructions in the Microsoft Dynamics 365 Business Central documentation.
Only accounts that belong to the header entity are available from the list of account numbers.
![]() Note: The value for By Dimension will always have the Global dimension 1 selected. You can select other dimensions in addition to the Global dimension 1, but you cannot clear the check box.
Note: The value for By Dimension will always have the Global dimension 1 selected. You can select other dimensions in addition to the Global dimension 1, but you cannot clear the check box.
![]() Note: If you do not have access to the Bal. Account No. for the line, the account number is blank. You can then select an account.
Note: If you do not have access to the Bal. Account No. for the line, the account number is blank. You can then select an account.
Decentralized Processing (Suggested Vendor Payment)
Decentralized processing is the process where each entity makes or receives a payment for itself using the bank account specified for the entity on the MEM Entity Setup page. To use decentralized processing, the following setup is required:
- On the Multi-Entity Management Setuppage, select the Purchase & Payables FastTab and turn on the Decentralized option.
![]() Note: If you turn on Centralize/Decentralized AP on the Fly, you can use centralized processing for particular journal batches. For more information see Using Centralized/Decentralized Processing on the Fly.
Note: If you turn on Centralize/Decentralized AP on the Fly, you can use centralized processing for particular journal batches. For more information see Using Centralized/Decentralized Processing on the Fly.
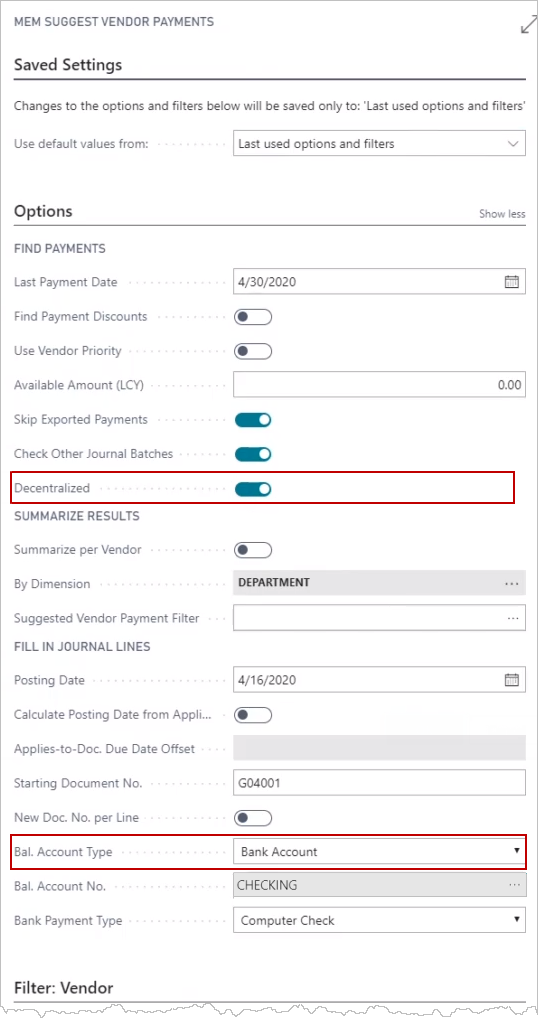
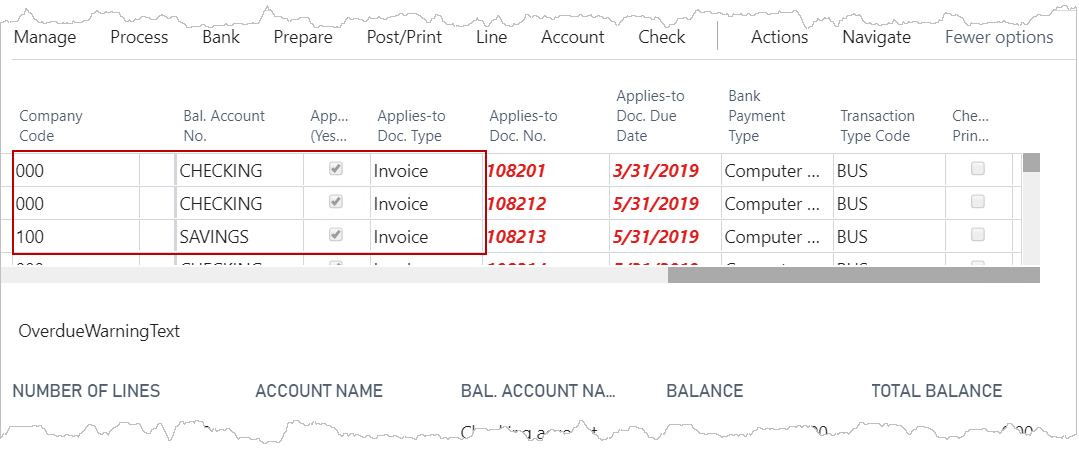
When using the Suggested Vendor Payments Options, the Decentralized option should be turned on . When you use the Suggested Vendor Payment prepare feature, the payment account that is used for each line is the payment account that belongs to each entity of the line. The general process is as follows:
- Check that Decentralized is turned on.
This option is set on the Purchase & Payables FastTab on the Multi-Entity Management Setup. - Specify the Entity Code, Allocation Template (optional), and Batch Name.
- Select Prepare > Suggested Vendor Payments.
- In the dialog, specify the values you want.
In Options, select the Bal. Account Type . The Bal. Account No. is not used when the Decentralized option is selected. - Select OK.
- When you review the lines, the default Bal. Account No. that is set up for the entity of the line is used.
- Finish processing the transaction as per the instructions in the Microsoft Dynamics 365 Business Central documentation.
![]() Note: The value for By Dimension will always have the Global dimension 1 selected. You can select other dimensions in addition to the Global dimension 1, but you cannot clear the check box.
Note: The value for By Dimension will always have the Global dimension 1 selected. You can select other dimensions in addition to the Global dimension 1, but you cannot clear the check box.
![]() Note: If you do not have access to the Bal. Account No. for the line, the account number is blank. You can then select an account.
Note: If you do not have access to the Bal. Account No. for the line, the account number is blank. You can then select an account.
Apply Credit Memo To Same Entity
By default, Business Central applies credit memos to any open invoice in centralized payment environments, regardless of entity ownership. This can lead to credits being applied across entities, which isn’t always desired.
When enabled, Apply Credit Memo To Same Entity restricts credit memo application to invoices within the same entity. It applies only in centralized payments and is available in the Suggest Vendor Payments process and General Journal Templates.
![]() Note: This new option can only be used if Summarize per Vendor is enabled and the value gets defaulted from the Batch setting.
Note: This new option can only be used if Summarize per Vendor is enabled and the value gets defaulted from the Batch setting.
Benefits
-
Prevents cross-entity credit memo application
-
Reduces manual corrections and cleanup
-
Ensures entity-specific accounting integrity
Example
Conditions:
-
All documents belong to the same vendor
-
Summarize per Vendor is enabled
-
By Dimension is not summarized by entity
-
Invoices and credit memos belong to different entities
Documents in the system:
-
Invoice – Entity 000
-
Credit Memo – Entity 000
-
Credit Memo – Entity 100
Without the feature enabled:
-
A single payment line is created, and both credit memos (from Entities 000 and 100) are applied under the same Applies-to ID.
With the feature enabled ("Apply Credit Memo to Same Entity"):
-
The credit memo from Entity 000 is valid because there's an invoice from Entity 000.
-
The credit memo from Entity 100 is excluded because there is no invoice from Entity 100.
The system will:
-
Leave the Applies to ID field blank for the Entity 100 credit memo
-
Prevent application to any invoice
-
Exclude the amount from the payment suggestion
Example 2
Documents in the system:
-
Invoice – Entity 000 – $500
-
Invoice – Entity 100 – $1,000
-
Invoice – Entity 200 – $55
-
Credit Memo – Entity 000 – $750
-
Credit Memo – Entity 100 – $750
Without the feature enabled:
-
One payment line is created with a total amount of $55, and the same Applies to ID is assigned across all invoices and credit memos.
-
The system attempts to apply $750 from the credit memo for Entity 000, even though the invoice total for Entity 000 is only $500.
With the feature enabled:
-
The credit memo from Entity 000 is capped at $500, matching the total invoice value for that entity.
-
The excess $250 from that credit memo is not applied.
-
The payment journal line is updated accordingly to reflect only the valid applied amount.
-
Credit memos for each entity are applied only to invoices within the same entity.
-
Credit memos that exceed their entity’s open invoice total are partially applied or excluded, depending on the scenario.
Note: This feature only applies to Credit Memo document types. Other documents (invoices, refunds, etc.) are unaffected.
Apply Vendor Entries
The Apply Vendor Entries action can be used with both centralized or decentralized processing. This action is part of standard Microsoft Dynamics 365 Business Central.
For more information, see the Microsoft Dynamics 365 Business Central documentation.
The option to use centralized or decentralized processing is on the Purchase & Payables FastTab of the Multi-Entity Management Setup.
Centralized Processing (Apply Vendor Entries)
When using centralized processing for applying vendor entries, follow the steps in the Microsoft Dynamics 365 Business Central documentation and incorporate the following:
- On the Payment Journals header, select the entity code you want.
- For the line, select any entity to which you have access.
The entity selected can be different from the header entity. - Select Process > Apply Entries, and on the Apply Vendor Entries page, select and apply the documents that are created.
- Select Prepare > Suggested Vendor Payments, and on the Suggested Vendor Payment page:
- Check that Decentralized is turned off.
This option is set on the Purchase & Payables FastTab on the Multi-Entity Management Setup. - Select the Suggested Vendor Payment Filter.
- Set the Bal. Account Type to Bank Account, and select the Bal. Account No.
The Payment Journals lines are updated with lines that use the same Bal. Account No. from the Suggested Vendor Payment page.
- Check that Decentralized is turned off.
Single and multiple documents can be applied. When multiple documents are created, Due From and Due To entries are created as needed. For more information, see Centralize/Decentralize: Processing .
Discounts are applied to the payment entity using the standard Microsoft Dynamics 365 Business Central functionality.
Decentralized Processing (Apply Vendor Entries)
When using decentralized processing for applying vendor entries, follow the steps in the Microsoft Dynamics 365 Business Central documentation and incorporate the following:
- On the Payment Journals header, select the entity code you want.
- For the line, the entity selected must be the same as the header.
- Select Process > Apply Entries, and on the Apply Vendor Entries page, only documents that belong to the payment journal line entity appear and can be created.
- Select Prepare > Suggested Vendor Payments, and on the Suggested Vendor Payment page,
- Check that Decentralized is turned on.
This option is set on the Purchase & Payables FastTab on the Multi-Entity Management Setup. - The Suggested Vendor Payment Filter is set to the same entity as the payment journal header and cannot be changed.
- Set the Bal. Account Type to Bank Account and select the Bal. Account No. The owner entity of the bank account must be the same entity as the Suggested Vendor Payment Filter.
- Check that Decentralized is turned on.
The Account Type selected, restricts the balancing bank account that you can select. For information on restrictions, see Centralize/Decentralize: Processing .
No due from and due to entries are created.
Only documents that have the same entity as the payment journal header appear in the lines.
Vendor Pre-Payment Journal Report
Actions > Posting > Vendor Pre-Payment Journal
This MEM version of this report is a copy of the Microsoft Dynamics 365 Business Central report. The entity for the report is based on the setting from the Payment Journal page.
Based on the security settings on the Multi-Entity Management Setup page, the generated report(s) shows only the records that belong to entities to which you have access and match the other criteria that you specified. MEM security settings can restrict the visibility and access to the following types of records based on the entities to which you have access: bank account, customer, fixed asset, item, location, and vendor.
Electronic Payments
When using the electronic funds transfer (EFT) payments functionality in Microsoft Dynamics 365 Business Central, multiple invoices for a vendor can be consolidated into a single remittance regardless of the entities assigned to the invoices.
![]() Notes: Review the following notes for using this functionality
Notes: Review the following notes for using this functionality
- Consolidating multiple vendor invoices to a single remittance regardless of the entity is available only for centralized processing.
- The entity of the bank account is assigned to the remittance payment.
- The entity of the line is assigned to the payment term discount.
To be able to use the standard EFT payments functionality, ensure to complete the Microsoft Dynamics 365 Business Central setup on the following pages:
- Bank Account
- Ensure the information for the Transfer FastTab is completed.
For more information, see the Microsoft Dynamics 365 Business Central documentation (Set Up Bank Accounts ).
).
- Ensure the information for the Transfer FastTab is completed.
- Vendor Bank Account Card
- From the Vendor Card, select Related > Vendor > Bank Accounts.
- From the list of vendor bank accounts, select an account.
- For the vendor bank account, ensure to specify a transit number, and in the Transfer FastTab, turn on Use for Electronic Payments.
For more information, see the Microsoft Dynamics 365 Business Central documentation (To set up vendor bank accounts for export of bank files).
When creating a single remittance from multiple invoices for each vendor, use the Payment Journal page, and do the following:
- Select Prepare > Suggest Vendor Payment to update the lines with suggested vendor payments.
- On the MEM Suggested Vendor Payment dialog, turn on Summarize per Vendor and clear the By Dimension box.
- For each line you want to process, ensure that following values are set as follows:
- The Recipient Bank Account is one that you have set up to use for electronic payments.
- The Bank Payment Type is Electronic Payment.
- Select Bank > Export, which opens the Export Electronic Payments dialog.
- Back on the Payment Journal page, select Actions > Functions > Generate EFT.
Generate All EFT Files
The Generate All action exports electronic payment files for all bank accounts in a single step, without requiring you to select a specific account. This has been added to Payment Journal and is accompanied by a matching Void All to conveniently handle any mistakes. It’s useful when processing payments across multiple bank accounts or legal entities.
To accompany this, there is also a new Generate All EFT Files page available in search. Unlike Generate EFT Files, which exports one bank account at a time, this option creates EFT files for all accounts at once.
What it does
-
Exports payment lines for all bank accounts, regardless of the balancing account on the journal batch
-
Automatically groups payments by bank account
-
Creates one EFT file per bank account
-
Packages all generated EFT files into a single downloadable ZIP file
Note: Payment export setup must be completed before using this feature
Unlike the standard export, this option does not require matching the balancing account number on the journal batch
Actions
| Action | Description |
| Functions>Generate All EFT Files |
Exports all bank accounts without having to select one from the search function. It automatically groups payments by bank account and generates one EFT file for each bank involved. |
Payment Transaction
To create a payment journal transaction, follow the steps within the Microsoft Dynamics 365 Business Central documentation, and incorporate these steps:
- In the header, do the following:
- Specify the Entity Code. The default value is your the default entity.
- Specify the Batch Name or accept the default value.
- If needed for intercompany distribution, select Related > Header > Header Dimension.
- For each line you add, specify the following:
- Specify the Entity Code. The default entity is the same as the header value, but you can change it.
- Select Post/Print > Preview Posting to review the ledger entries for the transaction.
When the entity of the line is different from the entity of the header, intercompany distributions for the line are applied during the preview or posting of the transactions. - You can then finish processing the transaction as per the instructions in the Microsoft Dynamics 365 Business Central documentation.
Print Multiple Checks
When printing checks, use one of the following actions:
- With standard Microsoft Dynamics 365 Business Central functionality, use the Check > Print Check action to print multiple checks for a single bank account.
To print checks for other bank accounts, this action must be run separately for each bank account. - In Multi-Entity Management, use the Check > Print All Checks action to print multiple checks for each bank account in the list. This action can be run once to include several bank accounts.
Check Report
When using the Print Check and Print All Checks actions, the check report used is based on the setting on the Report Selection – Bank Account page. For more information about this page, see the Microsoft Dynamics 365 Business Central documentation (Reconcile Bank Accounts![]() ).
).
As a best practice when using Multi-Entity Management, set the Report Selection – Bank Account page for the Check usage option to use one of the following MEM check reports. These reports are provided as part of the Multi-Entity Management installation.
You can view entity information when you use most of the following check stub reports. If you use the non-entity report layout you can still add MEM fields, such as the paying entity address or applied document entity name to the layout manually.
| Report ID | Report Caption | Report Layouts | Report Notes |
| 70210888 |
|
|
The MEM Check - Entity Information report layout displays the entity code, entity name, and the full legal name of the entity. If you are in the EU and AU regions, you can also use this report. |
| 70210967 |
|
|
The MEM Check (Stub/Stub/Check) - Entity Information report layout displays the entity code, entity name, and the full legal name of the entity. |
| 70210968 |
|
|
The MEM Check (Stub/Check/Stub) - Entity Information report layout displays the entity code, entity name, and the full legal name of the entity. |
| 70210980 |
|
|
The MEM Check (Check/Stub/Stub) - Entity Information report layout displays the entity code, entity name, and the full legal name of the entity. |
| 70211136 | MEM Three Checks per Page |
|
This report does NOT display the entity code, entity name, and the full legal name of the entity. You can still add MEM fields, such as the paying entity address or applied document entity name to the layout manually. |
| Europe MEM Check Reports | |||
| 70210895 |
|
|
The MEM Check (DE) - Entity Information report layout displays the entity code, entity name, and the full legal name of the entity. |
| 70210896 |
|
|
The MEM Check (FI,DK,NL) - Entity Information report layout displays the entity code, entity name, and the full legal name of the entity. |
| 70210940 |
|
|
The MEM Check (ES) - Entity Information report layout displays the entity code, entity name, and the full legal name of the entity. |
| 70211160 |
|
|
The MEM Check (CH) - Entity Information report layout displays the entity code, entity name, and the full legal name of the entity. |
When Print All Checks is used, checks for all bank accounts are printed only when the MEM version of a check report is selected for use.
Print Checks
To print checks, follow these steps:
- Using standard functionality in Microsoft Dynamics 365 Business Central, post several purchase invoices.
- Open the Payment Journals page.
- Select Prepare > Suggested Vendor Payments, and specify the filter criteria that you want and check that Decentralized is turned on.
This option is set on the Purchase & Payables FastTab on the Multi-Entity Management Setup. - Select Check > Print All Checks.
- In the MEM Print All Checks dialog, set the following:
- Depending on the setting of the Decentralized option ensure that the One Check per Vender per Document option is set for your needs:
- When Decentralized is turned on, the default setting for One Check per Vender per Document is off.
- When Decentralized is turned off, the default setting for One Check per Vender per Document is on.
- Turn on any of the other options as needed, and select OK.
- Depending on the setting of the Decentralized option ensure that the Sort Applied Documents by Company Code option is set for your needs. Turn it on to group documents according to entity code on the printed report.
- Depending on the setting of the Decentralized option ensure that the One Check per Vender per Document option is set for your needs:
- The MEM Check dialog is updated with the next Bank Account automatically selected. You can select other options as needed, and select Print. And when you see the Print dialog, select Print to print the next set of checks that use the selected bank account.
- After the checks for each Bank Account is printed, the MEM Check dialog is updated with the next account.
- When all checks are finished printing, you can check the list to see that the Check Print check box for all lines is selected.
- With the checks printed, you can post the payment lines as per the instructions in the Microsoft Dynamics 365 Business Central documentation.
The list shows the payment lines for all open invoices.
The Check dialog appears and is updated with the settings from the MEM Print All Checks dialog. All checks that use the selected bank account are to be printed as part of the process. Select Print.
This iterative process continues until all bank accounts have been processed and all checks have been printed.
| Action | Description |
| Sort Applied Documents by Company Code |
When you print checks and use the MEM Check dialog, you can turn on Sort Applied Documents by Company Code which sorts applied documents by entity code in the printed reports. This setting is only available if you are using centralized processing. Make sure that Decentralized is turned off in your MEM Setup.
|
Remittance Advice
You can send remittance advice to notify vendors of payments made. Sending remittance advice is a standard part of Microsoft Dynamics 365 Business Central. For more information see: Send Remittance Advice![]() .
.
With MEM, you can view entity information when you use the Send Remittance Advice or Print Remittance Advice actions. For payment journal entries, you can generate a report, MEM Remittance Advice – Journal by Entity which displays remittance advice per entity. Each page of the report displays a separate paying entity and its relevant entries.
There are two remittance reports with entity information which you can create:
- MEM Remittance Advice - Journal by Entity
- Use this report by processing invoices using the Payment Journals page.
- Before you can use the Send Remittance Advice action, you must have at least one payment journal line to use.
- MEM Remittance Advice – Entries by Entity
- Use this report by processing invoices using the Vendor Ledger Entries page.
- MEM Export Electronic Payments
- Use this report by processing invoices using the Payment Journals page.
Remittance Advice Report Layouts
When you create a remittance advice report you can select any of the following layouts to display the entity information in the report. If you use the non-entity report layout you can still add MEM fields, such as the paying entity address or applied document entity name to the layout manually.
| Report ID | Report Caption | Report Layouts | Report Notes |
| NA Remittance reports | |||
|
70210892 |
|
|
This report displays the entity code, entity name, and the full legal name of the entity. Use this report when you generate remittance from the Payment Journal page. |
| 70211197 |
|
|
Use this report to display the applied document entity name and when you generate remittance from the Payment Journal page. |
| Remittance reports for all regions | |||
|
70211186 |
|
|
This report displays the entity code, entity name, and the full legal name of the entity. Use this report when you generate remittance from the Vendor Ledger Entries page. |
|
70211187 |
|
|
This report displays the entity code, entity name, and the full legal name of the entity. Use this report when you generate remittance from the Payment Journal page. |
To generate the report, do the following:
- Search for and open the Report Selection - Purchase page.
- Under Usage, select Vendor Remittance to be able to generate the MEM Remittance Advice - Journal by Entity report.
- On the Report Selection - Purchase table, create a new line, and select the report you are using.
- The report ID is 70211187.
- Save your selection in the Report Selection - Purchase page.
- Then, search for and open the Payment Journals page.
- Select the entries to use in the report.
- On the Action tab, select Related > Payments > Send Remittance Advice.
- For the EU and AU regions, you can also select Print Remittance Advice.
- The Send Document to dialog opens in which you can select how to generate the report. For example, you can print the report or create a PDF version of the report.
- Select OK to generate the report.
Use these steps to generate any of the reports listed in the table above.
Payment Journal Fields
The following field boxes are available:
| Field | Description |
| Batch Name | Displays the name of the batch. |
| Entity Code |
Select the entity for the transactions. The default value is your default entity. The default entity for the line is automatically updated with the entity value of the selected the customer, vendor, account, or item record. If needed, you can change it any entity to which you have access.
|
| Decentralized |
Displays the type of payment processing method used by the batch and only visible if you have turned on Centralized/Decentralized AP on the Fly in your Multi-Entity Management Setup. Decentralized is locked and cannot be changed in this page. Its value is determined by how you set up your journal batch.
For more information about batch settings and if you want to change the processing method, see Using Centralized/Decentralized Processing on the Fly. |
| Lines | |
| Entity Code |
Displays the entity for the line. The default value is specified in the header. The default entity for the line is automatically updated with the entity value of the selected the customer, vendor, account, or item record. The selected entity filters the other records such that only the records that belong to that entity are available. For example, when entity 100 is selected, only the account numbers that belong to entity 100 are available. |
Payment Journal Actions
The following actions are available:
| Action | Description |
| Actions > Functions > MEM Allocation Template |
Shows the details of the entity allocation for the transaction line. You can change the entity allocation for the transaction line as needed. Any changes made are in real-time for the transaction line and do not affect the template. You can make any of the following changes:
|
| Navigate > Header > Header Dimensions |
For use with intercompany distributions, allows you to assign other dimensions to the header entity. When intercompany distributions occur, only the entity code of the header of the originating line is used in the distribution. In turn the destination line uses the entity code from the corresponding originating line. |
| Page > Edit in Excel |
When editing data in Microsoft Excel, a column has been added for the header entity (BssiBatchHeaderEntityID).
For more information, see the Microsoft Dynamics 365 Business Central documentation. |
| Check > Print All Checks |
Allows you to print the checks for all lines based on the Bank Account. For more details, review Print Multiple Checks. |
| Request Approval > Send Approval Request > Send Approval for Multiple Entities |
Opens the MEM Mass Batch Processing window where you can select specific entities when you are sending batch approval requests. For more information see Approval Request Batch Processing. |
| Request Approval > Cancel Approval Request > Cancel Approval for Multiple Entities |
Opens the MEM Mass Batch Processing window where you can select specific entities when you are canceling batch approval requests. For more information see Cancel Approval Requests. |
| Home > Process with Multiple Entities |
Opens the MEM Mass Batch Processing page, where you can do the following types of actions:
|
| Export All | Exports all payment journal lines, regardless of the bank account assigned to each line or the batch. |
MEM Suggested Vendor Payment
Use the MEM copy of the dialog for the suggested payment lines. For more information about this dialog, see the Microsoft Dynamics 365 Business Central documentation:
This dialog contains the following fields:
| Field | Description |
| Find Payments | |
| Decentralized |
Determines whether the entity selected in the header is used as the payment entity for all lines or whether each line entity creates a payment for itself and processes only the transactions in self-contained batches.
The value is from the Purchase & Payables FastTab on the Multi-Entity Management Setup.
If this option is changed on the Multi-Entity Management Setup, previously suggested lines are not affected. At the time of posting the transaction, Due To and Due From entries are created based on the header, line, and bank entity. For more information, see Control Account for Due To/Due From Entries. |
| Summarize Results | |
| Summarize per Vendor |
When this option is turned on, one check per vendor per entity is created. As part of standard Microsoft Dynamics 365 Business Central behavior, different document numbers are assigned to each entity that is processed. As a best practice when the Decentralized option is turned off, ensure that this option is turned off. For more information about this standard Microsoft Dynamics 365 Business Central option, see the Microsoft Dynamics 365 Business Central documentation. |
| By Dimension | Select the entity by which to summarize the payments. |
| Suggested Vendor Payment Filter |
Select the entity to which you have access. Only invoices that are attached to the specified entities are filtered when preparing the vendor payments. For example, when the filter is entity 000, only invoices attached to entity 000 are filtered for payment. When Prepare > Suggested Vendor Payments is selected, only the lines that belong to the specified entity appear in the list. The balancing account for the lines is the balancing account selected in the dialog. |
| Apply Credit Memo to Same Entity |
When enabled, Credit Memos will only be applied to invoices that belong to the same entity. Only payment lines for invoices or other documents where the amount is greater than the credit memos for the same entity will be suggested. This option is only available in centralized payment batches. |
MEM Check (Stub/Check/Stub)
Use the MEM copy of the dialog for printing all checks. For more information about this dialog, see the Microsoft Dynamics 365 Business Central documentation.
This dialog contains the following fields:
| Field | Description |
| Options | |
| Add Entity as Prefix to Document No. |
Determines whether the entity code of the line is added as a prefix to the check number when it is saved as the document number.
This option is useful for situations where different bank accounts use the same check numbers. The actual printed checks and check stubs are not affected by this option. |