In this article
Invoice Creator
Modules > Advanced recurring contract billing > Periodic tasks > Invoice creator
Use this page to create mass monthly recurring invoices using the information that you set up on the Billing Schedules and the View Billing Detail pages.
When an invoice or quote is created, the sales order processing line item description is updated with the item description as well as the billing start and end dates for the schedule line being invoiced.
To set up a recurring batch job process, use the Invoice Creator Batch Processing page.
Revenue Split - Suppress Child Items
When the sales invoice includes items that use revenue split, you can select whether the child items appear on the invoice. When child items are hidden from the invoice, the parent line shows the summary value of the hidden child items. ![]() See example for details.
See example for details.
Determine Top Billing Items
To use the top billing feature on a sales invoice, ensure that Split by item group is Yes on the Invoice Creator page. The top items feature is applied to each separate invoice with the most expensive items determined by the net amount, not the unit price.
The process for determining the top items for invoices created from the Invoice Creator page is as follows:
- All item group splitting and consolidation is performed.
- For each individual sales order, the following validations occur:
- The Split by item group option is set to Yes.
- The item group is on the Top billing setup list with a value greater than zero (0).
- After the validations pass, the top most expensive items are determine based on the Net amount.
The amounts for these lines remain unchanged. - Item A = 900.00
- Item B = 800.00
- Item C = 700.00
- Item D = 700.00
- Item E = 700.00
- The remaining items above the top billing are not billed and the unit price and net amount are changed to zero (0).
If multiple lines have the same amount, the items that are used for the invoice are randomly selected. For example, the top billing for an item group is 3. The net amount for the top 3 items are:
The top 3 items have the amounts: 900.00, 800.00, and 700.00. For the amount of 700.00, one of item C, D or E is selected at random to be included in the top 3.
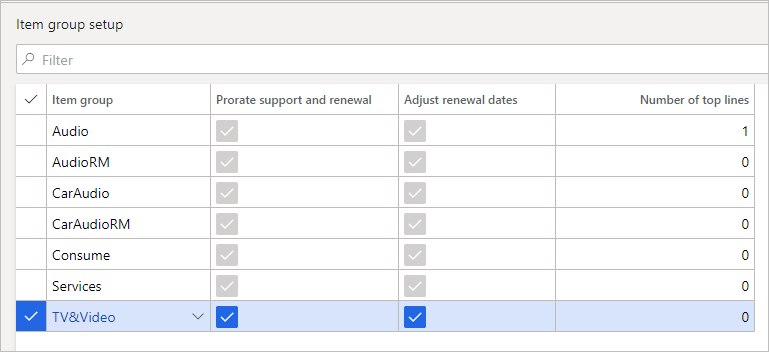
![]() Notes: When the top billing feature is used (e.g., one or more lines on the Item Group Setup have Number of top lines greater than zero), the following features are not available.
Notes: When the top billing feature is used (e.g., one or more lines on the Item Group Setup have Number of top lines greater than zero), the following features are not available.
- The revenue splitting functionality in Multiple Element Revenue Allocation cannot be used.
The Revenue Allocation button for billing schedules on any page is not available. - The unbilled revenue feature cannot be used.
The Unbilled revenue button on the Billing Schedulespage is not available. - On the Invoice Creator, the Consolidate by Item and the Split by item group options cannot work together (Split by item group is Yes, Consolidate by Item is automatically set to No and cannot be changed to Yes).
 View example.
Item Group: Separating Invoices
To be able to create separate invoices for renewal schedules based on item groups, the following setup is needed:
- As part of the standard Microsoft Dynamics 365 for Finance and Operations setup, items must be assigned to item groups.
- On the Advanced Recurring Contract Billing Parameters page, Unique schedule type is set to Customer.
- When creating invoices on the Sales Order or the Invoice Creator pages, set Split by item group to Yes.
For billing schedules with multiple item groups, separate sales orders are created for each item group.
![]() Note: For lines that use revenue splitting, all child items are on the same sales order as the parent item.
Note: For lines that use revenue splitting, all child items are on the same sales order as the parent item.
Unbilled Revenue Journal Entries
Lines that use the unbilled revenue feature appear in the list. However, only the lines that have a corresponding unbilled revenue journal entry created can be processed. Furthermore, lines that do not use the unbilled revenue journal entries feature and do not have an unbilled revenue journal entry created do not appear in the list.
The journal entries that are created for non-deferrable items and deferrable items posts a credit to different revenue accounts.
Non-deferrable item
An item is non-deferrable when the Deferrable check box is cleared. The following journal entries are created:
| Unbilled Revenue account | DR | ||
| Revenue account | CR |
The unbilled revenue account is attached to each billing line item. The revenue account is the sales account for the billing schedule line. If the revenue account value is empty, the default account for the customer-item combination is used.
Deferrable item
An item is deferrable when the Deferrable check box is selected. The following journal entries are created:
| Unbilled Revenue account | DR | ||
| Deferral Revenue account | CR |
The unbilled revenue account is attached to each billing line item. The deferral revenue account is the deferrable account for the billing schedule line. Also, the deferral schedule for the total extended amount with any discount is created.
When revenue splitting is used, the deferred amount is the contract revenue amount, which is the total period revenue of the billing schedule line item. The recognition type is credit, and the distribution type is revenue.
After the journal entries are created, the deferral schedule for the extended amount (without any discount) is created, and the information is copied to the Renewals tab of the billing schedule for reference.
The distribution for the invoice is as follows:
| Accounts Receivables | DR | ||
| Unbilled Revenue account | CR |
The distribution for the deferral schedule is as follows:
| Deferred Revenue account | DR | ||
| Recognition account | CR |
Create Invoices
To create invoices, follow these steps:
- In Date Range:
- In Filter by, select to filter the records by billing start or end date.
- Specify the the From date and To date range of the records to appear in the list.
- Select the Select button to apply the Select query, enter additional filter criteria as needed, and select OK.
Back on the Invoice Creator page, the line grid is updated with the records that match the select query specified. - In Consolidation, select whether to consolidate the invoice by customer, item, billing code, or any combination of the options.
- If you want to use the top billing feature, set Split by item group to Yes.
 Note: The top billing feature is not available for items that use revenue splitting in Multiple Element Revenue Allocation.
 - In Invoice Processing, specify the following:
- Invoice transaction type
- Posting option
To save time and post the invoice immediately, select Show posting invoice form or create invoice proposal or Post invoice automatically. - Invoice date
- If you use revenue splitting, select whether to suppress the child items.
- In the line grid section, select any lines that you do not want to create an invoice, and select Remove.
- To review the invoice on the Invoice Creator Preview page before it is created, select Preview.
- Select Batch to add the lines to a batch job, which you can process later.
- Select OK.
After the records are processed, you can view the sales orders on the Sales Order page and view the billing schedule numbers from which the sales orders originated.
The bill-to address for the resulting sales order is based on the invoice account specified for the billing schedule and the Invoice address setting on the customer record:
- When Invoice address is Invoice account, the bill-to address and payment term information is from the invoice account selected on the billing schedule.
- When Invoice address is Order account, the bill-to address and payment term information is from the customer account for the billing schedule.
Technical note: For these sales orders created from billing schedules, the BssiArcbCreatedFromSB boolean field is set to True. When the sales orders do not originate from billing schedules, the BssiArcbCreatedFromSB boolean field is set to False.
Top billing feature
On the sales order, the lines that appear in the list are based on whether the top billing feature is used.
When the top billing feature is used, the lines appear in the following order:
- Descending order according to the net amount, where the largest net amount is at the top
- Ascending order according to the end date, where the earliest date is at the top and the furthest future date is at the bottom
- Ascending order by the original billing schedule number.
- Ascending order by line number.
When the top billing feature is not used, the lines appear the following order:
- Ascending order according to the end date, where the earliest date is at the top and the furthest future date is at the bottom.
- Ascending order by the original billing schedule number.
- Ascending order by line number.
Different bill-to addresses
Sales orders for billing schedule lines that use different bill-to addresses are processed as follows:
- If all lines have the same bill-to address, one sales order with all the lines is created.
- If the bill-to address is different for some lines, a sales order is created for each bill-to address with all corresponding lines on the correct sales order.
Consider the following examples, one billing schedule has three billing schedule lines:
- All lines use the same delivery and bill-to address: One sales order with three lines is created.
- All lines use the same bill-to address, but have three different delivery addresses: One sales order with three lines is created.
- All lines use three different bill-to addresses and deliver address: Three different sales orders with one line each are created.
- Two lines use the same bill-to address, but different delivery addresses: Two different sales orders are created: one sales order has two lines, the other sales order has one line.
The bill-to address appears on the generated pro forma invoice and the sales invoice report.
Invoices with Project IDs
When creating an invoice with a project ID, the typical process is as follows:
- When creating the invoice, set Posting option to Create sales invoice and process the transaction.
- On the Sales Order page, you can review the sales order and check the project ID.
- From the All projects list, select the project ID that has the newly created sales order, and select Manage > New > Invoice Proposal.
- On the Create invoice proposal page, in the Transaction types, ensure that Sales order line with the All option is selected.
- In the grid, all the sales order lines appear, and you can select them for the invoice.
Working with project IDs is standard Microsoft Dynamics 365 for Finance and Operations functionality. For more information, review the Microsoft Dynamics 365 for Finance and Operations documentation.
Fields
This page contains the following fields:
| Field | Description |
| Date range | |
| Filter by |
Select how records are included in the list grid:
This default value is specified on the Advanced Recurring Contract Billing Parameters page. |
| From/To date |
Specify the date range for the records for which you want to create invoices. Based on the option selected in Filter by, the records that have a start date or end date within the specified date range appear in the list. The default value for From date is no value, and the default To date is the current date. |
| Exclude zero consumption |
Select whether to include the billing schedule lines that are usage items with a zero (0) consumption amount and use the free quantity feature.
|
| Consolidation | |
| The default consolidation settings are from the Advanced Recurring Contract Billing Parameters page. | |
| Consolidate all periods |
Select whether the billing periods for which invoices are to be created are consolidated into a single sales document:
|
| Consolidate by customer |
Select whether sales documents are consolidated by customer:
|
| Consolidate by item |
Select whether sales documents are consolidated by item:
If any items belong to item groups that have a Number of top lines greater than zero on the Item Group Setup page, this option is automatically set to No. |
| Split by item group |
Indicates whether renewal items are also put into item groups for invoice purposes:
When this option is set to Yes and Number of top lines on the Item Group Setup page has a value greater than zero (0), the top billing feature is used and only the top items in the transaction are charged. The remaining items not included in the number of top billing items have an amount of zero (0.00). For more information, see Top Billing Workflow. |
| Consolidate by billing code |
Select whether invoices are consolidated by billing code:
|
| Invoice Processing | |
| Invoice transaction type |
Select the invoice transaction type you want to process. |
| Posting option |
Select the action for posting the invoice after the sales order is created:
|
| Invoice date |
Specify the date on which to create the invoice. The default date is the session date for Microsoft Dynamics 365 for Finance and Operations, which can be set on the calendar that appears on the left of the home page. When Posting Option is Create sales order, the invoice date is not applicable and cannot be edited. |
| Suppress child items on print |
Indicates whether child items of a revenue split appear on a sales invoice:
If the net amount of the (hidden) child items has a non-zero sum, the net amount of the parent line shows a summary of the child lines. For more information, see Revenue Split - Suppress Child Items. This option can be used only when all (parent and child) items in a revenue split are included on the invoice. |
| Line Grid | |
| Billing Schedule number | Displays the billing schedule number. |
| Description | Displays a description of the billing schedule. |
| Customer | Displays the customer account ID or number. |
| Customer name |
Displays the customer name. |
| Variant number |
Displays the variant number for the item. |
| Item number | Displays the item number for the line. |
| Product name | Displays the product name. |
| End user account | Displays the end user account. |
| End user name | Displays the end user name. |
| Billing start date | Displays the billing start date. |
| Billing end date | Displays the billing end date. |
| Quantity | Displays the quantity of the item. |
| Unit | Displays the unit for the item. |
| Unit price | Displays the unit price for the item. |
| Discount | Displays the discount applied to the item. |
| Net amount | Displays the net amount, which is a calculated value. Read-only. |
| Auto Renew | Displays whether the billing schedule is set to automatically renew. |
| MEA type | Displays the MEA type. Available when Multiple Element Revenue Allocation is installed and used. |
| MEA number | Displays the MEA number. Available when Multiple Element Revenue Allocation is installed and used. |
| Period revenue |
Displays the calculated period revenue value, which is calculated based on the quantity per billing period: |
| Project ID |
Displays the project ID for the billing schedule. The project ID is attached to the sales order that is created as part of the invoice creator process. Free text invoices are excluded because they do not have a project ID field. The project ID is considered when consolidating invoices by customer or item. |
Buttons
This page contains the following buttons:
| Button | Description |
| Select | Opens a query form, where you can select the records you want. |
| Remove (Line Grid) | Removes the selected rows. |
| OK |
Processes all records or queue in the batch job.
|
| Cancel |
Cancels any changes you made and closes the form. When you open this page from batch jobs, this button is not available. |
| Batch |
Opens the page for batch processing. Batch processing is a standard Microsoft Dynamics 365 for Finance and Operations feature. For more information, see Batch processing overview When you open this page from batch jobs, this button is not available. |
| Preview | Opens the Invoice Creator Preview page, where you can review the invoice before posting it. |