In this article
Billing Schedules
Modules > Advanced recurring contract billing > Billing schedules > All billing schedules > [select a billing schedule]
Modules > Advanced recurring contract billing > Billing schedules > Active billing schedules > [select a billing schedule]
Modules > Accounts Receivable > All Customers > Advanced recurring contract billing > New > Billing schedule
Use this page to create, delete, or edit billing schedules. You can also review a list of all billing schedules.
When you select to view a billing schedule, a separate page showing the details of the billing schedule.
When you create a billing schedule, the default values for the billing schedule are determined by the billing group associated with the billing schedule. Also, other default values are set up on the Advanced Recurring Contract Billing Parameters page. You can change any of the default values as needed.
The top of the page allows you to apply a filter value so that you can see only the records that match the filter you enter.
![]() Tip: When you select a billing schedule to view, the page opens in view mode and all options are read-only. Select Edit to make changes to the record.
Tip: When you select a billing schedule to view, the page opens in view mode and all options are read-only. Select Edit to make changes to the record.
Automatic Renewal
When Auto Renew is set to Yes and specify the Lines to add per renewal, the billing schedule will automatically renew after invoices have been created for all detail lines.
For example, a billing schedule has the following settings:
- Auto Renew is set to Yes
- Lines to add per renewal is set to 6
- Frequency is Monthly
After an invoice for the last detail line has been created, the billing schedule is automatically renewed with six more lines, one line for each month.
Revenue Split
When you add an item that is a part of a revenue split, keep the following information in mind:
- The Parent amount cannot be deferred.
- The start date, end date, quantity, unit, site, and warehouse values for child items are based on the parent item.
You cannot change these values for the child items. Any changes must be made for the parent item. - The Pricing method is Flat and cannot be changed.
- Child items can be added or removed.
- Parent and child items must use the same item group.
- Child items can have one of the following:
- Same Billing frequency and Billing intervals as the parent item.
- The Billing frequency set to One-time, which automatically sets the Billing intervals to 1.
- For parent or child items that have a One-time billing frequency, after the invoice for the item, the status of the line remains Active.
- If the billing schedule is terminated before the start date of the line item, a refund in the full amount of the item is given.
- If the billing schedule is terminated after the end date of the line item, no refund is given.
- The sum of the net amount of the child items is equal to the Parent amount.
When the allocation method is Zero amounts, both the sum of the child items and the Parent amount are zero (0). Note: When the allocation method is Zero parent amount, the sum of the child items (non-zero) is not equal to the parent amount, which is zero (0). This allocation method is used for internal purposes, so that employees can see the child items, but the customer can only see the parent item.
 - If the MEA type for the sales order is single, the corresponding MERA transaction line is created when the parent and child lines are added.
- When the allocation method for a revenue split is Equal amounts and the Parent amount is changed, the amounts for all child lines are recalculated.
- For a revenue split that has the Allocation method set to Variable amount:
- The net amount of the parent item appears in the Parent amount column.
This value can be edited. However, the unit price, net amount, and discount cannot be edited and show a zero (0) amount. - The unit price for child items shows a zero (0) value.
You can edit the unit price or net amount. When you edit one value, the other value is automatically updated.
- The net amount of the parent item appears in the Parent amount column.
- For a revenue split that has the Allocation method set to Percentage:
- The net amount of the parent item appears in the Parent amount column.
This value can be edited. However, the unit price, net amount, and discount cannot be edited and show a zero (0) amount. - The net amount for child items is calculated as follows: Percentage * Parent amount.
- The net amount of the parent item appears in the Parent amount column.
- For a revenue split that has the Allocation method set to Equal amount:
- The net amount of the parent item appears in the Parent amount column.
This value can be edited. However, the unit price, net amount, and discount cannot be edited and show a zero (0) amount. - The net amount of the child items is calculated by dividing the Parent amount equally among all child items.
- When child items are removed or added, the net amount and unit prices are recalculated so that all child lines have equal amounts.
- If the Parent amount cannot be divided perfectly equal, the net amount and unit price of the last child item may be slighter more or less than the other child items.
- The net amount of the parent item appears in the Parent amount column.
- For a revenue split that has the Allocation method set to Zero amount:
- The unit price, net amount, and discount can be edited.
The Parent amount cannot be edited and show a zero (0) amount. - The quantity, unit, site, and warehouse values for child items are based on the parent item. You cannot change these values for the child items. Any changes must be made for the parent item.
- The unit price and net price for the child items cannot be edited and show a zero (0) amount.
- The unit price, net amount, and discount can be edited.
- For a revenue split that has the Allocation method set to Zero parent amount:
- For the parent item, the unit price, parent amount, and net amount are zero (0).
- In a billing schedule, the child lines appear as if they had been manually added and all values are updated based on the selected billing schedule group. These values can be edited.
Also for child items, you can access the escalation and discount and advanced pricing options and also edit certain billing detail fields (quantity entered, unit price, discount, and net amount). - In a sales order, the child lines have a discount and discount percentage of zero (0).
- The billing frequency for the parent and the child items can be changed, and each line can have a different frequency. However, the parent item is automatically updated to use the shortest frequency from its child lines. For example, for a revenue split has two child items that use the billing frequencies Monthly and Annually. The billing frequency of the parent item is updated to Monthly.
Revenue splitting can be automatically applied to items that are added or imported based on the Automatically create revenue split setting on the Multiple Element Revenue Allocation Parameters page for Multiple Element Revenue Allocation.
![]() Note: Auto renewal is not allowed for revenue split items.
Note: Auto renewal is not allowed for revenue split items.
Unbilled Revenue: Change in Quantity or Price
If after the unbilled revenue journal entry has been created, you need to change the quantity or unit price of an item, the unbilled revenue journal entry is reversed and it is recalculated with the new amount based on a recalculation date. For a deferral item, the recalculated date is also used for the deferral schedule.
When changing the quantity or unit price for a billing schedule line, the extended amount is updated and the following occurs:
- For a line, you change the Quantity or Unit price.
- When you are asked to confirm the action, select Yes.
- A dialog appears, where you specify the Recalculation date, specify a Comment and select OK.
- During processing, the original unbilled revenue journal entry is reversed, and a new unbilled revenue journal entry with the new amount is created.
- For the deferral schedule, only the periods after the recalculation date are adjusted.
- You can review the audit trail on the Unbilled Revenue Journal Entry Audit page, Line details, Renewals tab.
![]() Note: The updated unit price or quantity is applied only to periods that have not yet been billed.
Note: The updated unit price or quantity is applied only to periods that have not yet been billed.
For items that use revenue splitting, all items that belong to the same MEA number are adjusted in the same way. The original unbilled revenue journal entry is reversed, and a new unbilled revenue journal entry with the new amount is created.
A contract is set up as follows:
- 1-year contract with a total amount 1,200.00
- Start date = January 1
- Billing frequency = Monthly
- Amount = 1,200.00
Invoices have been processed up until May. Also, the deferral schedule is recognized up until May. The unit price is updated, and the total extended amount is increased to 1,400.00. Changes are applied only to the periods that have not yet been invoiced. Review the following process.
Reverse the original journal entry, using the adjustment date as the transaction date:
| Revenue OR Deferred Revenue | 1200.00 | ||
| Unbilled Revenue | 1200.00 |
Recreate the journal entry with new amounts, using the adjustment date as the transaction date:
| Unbilled Revenue | 1400.00 | ||
| Revenue OR Deferred Revenue | 1400.00 |
The recalculation date is June 01. With the deferral schedule, the processing is as follows:
The deferral schedule is recognized until May: 1200.00 - 500.00 = 700.00. The price increase is 200.00. As a result, 900.00 is allocation to the remaining periods (June - December) for the deferral schedule.
| Deferral start date | Deferral end date | Amount | Recognized |
| January 01 | January 31 | 100.00 |
|
| February 01 | February 28 | 100.00 |
|
| March 01 | March 31 | 100.00 |
|
| April 01 | April 30 | 100.00 |
|
| May 01 | May 31 | 100.00 |
|
| June 01 | June 30 | 128.57 | |
| July 01 | July 31 | 128.57 | |
| August 01 | August 31 | 128.57 | |
| September 01 | September 30 | 128.57 | |
| October 01 | October 31 | 128.57 | |
| November 01 | November 30 | 128.57 | |
| December 01 | December 31 | 128.57 |
Creating a Billing Schedule
To create a billing schedule, follow these steps:
- Select New.
- Accept the default value for the Billing schedule group, or change it as needed.
The Billing schedule number is automatically entered. - Specify a Description for the billing schedule.
- Select a Customer account.
- Select the Invoice account number.
The default bill-to address and payment information are based on the settings of the invoice account. - Select the Billing frequency and Billing interval.
- Select the Start date and specify the Number of periods.
- Complete other optional settings for the billing schedule header. The following options can be useful:
- If the contact for the billing schedule is different from the selected customer account, select the Contact.
- Associate the actual End user account to a billing schedule. This end user value can be useful for the item group functionality.
For information on the end user accounts, review the End Users page description. - To track partner commission information, specify the Partner account and Partner commission rate. These values are for informational purposes only, and do not affect the calculations for the billing schedule.
- For project management, specify a Project ID.
- For a billing schedule to automatically renew after the final billing period, set Auto Renew to Yes and specify the Lines to add per renewal.
- For the amount of a billing schedule to be prorated, set Prorate partial periods to Yes.
- To align the billing schedule detail lines to the end of a month, set Align to month to Yes.
- To allow for separate invoices to be created, set Invoice separately to Yes.
- Select the contract start and end dates. These dates are for information only and are not used in any processing.
- Select a Milestone template for the Milestone billing functionality.
- In the Address FastTab, if needed change the delivery and bill-to address and the payment method.
- In the Billing schedule lines, some of the values are rolled down from the header settings of the billing schedule. You can change the values for each line as needed:
- Select Add.
- Select the Item number.
- Select the Item type.
- Edit the start and end dates as needed.
- Select the Unit of measure for the item and the Pricing method.
- Specify the Unit price.
- If needed, review the tabs of the Line Details FastTab and make changes as needed.
- Select Save.
When the customer account is selected, various boxes are updated with the settings for the customer. In particular, the Currency code is updated with the currency code of the customer. If necessary, you can change the Currency code.
The End date automatically updates based on the number of periods specified.
Delete a Billing Schedule
To delete a billing schedule, follow these steps:
- Select Delete.
- When you are asked to confirm the action, select Yes.
Archive a Billing Schedule
To archive a billing schedule, follow these steps:
- Select a billing schedule or a billing schedule line:
- From the All/Active Billing Schedules list, select a billing schedule, and select Archive.
- When you are in the Billing Schedules page reviewing a specific billing schedule, select Archive.
- When you are asked to confirm that you want to archive the billing schedule, select Yes.
To be able to archive a billing schedule, all lines within the billing schedule and the billing schedule itself must have a status of Terminated.
![]() Caution: Archiving a billing schedule is a permanent action and cannot be reversed.
Caution: Archiving a billing schedule is a permanent action and cannot be reversed.
![]() Tip: To archive several billing schedules simultaneously, use the Mass Archive Process page.
Tip: To archive several billing schedules simultaneously, use the Mass Archive Process page.
Remove Termination from Billing Schedule
To remove a termination from a billing schedule, follow these steps:
- In the list of all billing schedules, select the Schedule number of the billing schedule from which you want to remove a termination.
- Select Remove Termination.
- When you are asked to confirm the action, select Yes.
You can perform these other actions on the billing schedule:
- Apply Escalation or Discount
- Copy Schedule
After the copy process is finished, the new billing schedule appears in this page - Hold a Schedule and Remove Hold
- Terminate a Billing Schedule or Line and Remove Termination
- View the Invoice Creator Preview
- Apply the Revenue Allocation
Adding a Line Item
To add an item to a billing schedule, follow these steps:
- In the list of all billing schedules, select the Schedule number of the billing schedule that you want to edit.
- In the Billing Schedule Lines FastTab, select Add line.
- Select the Item number, Variant number, and change any other values on the line as needed.
To add a revenue split item, see Add or Remove Item for Revenue Splitting. - In the Line Details FastTab, select the Product tab, and select the Site for the item.
- If needed, go to the Line Details FastTab and edit the details in the Address tab as needed:
- Change the Delivery Address and Bill To Address.
- Make any other changes as needed.
- Repeat these steps to add more items.
- Select Save.
For each item you add to the billing schedule, accept the default values and make no changes, or change the delivery or bill-to addresses as needed. The delivery address can be different from the bill-to address, and you can select only from the addresses that have been set up for the customer.
![]() Tip: To add several items to a billing schedule in a single action, select Add from items list. After the items are in the billing schedule, you can edit each item line as needed.
Tip: To add several items to a billing schedule in a single action, select Add from items list. After the items are in the billing schedule, you can edit each item line as needed.
Removing a Line Item
To remove an item from a billing schedule, follow these steps:
- In the list of all billing schedules, select the Schedule number of the billing schedule that you want to edit.
- In the Billing Schedule Lines FastTab, select the line you want to delete, and select Remove.
- Select Save.
Add or Remove Item for Revenue Splitting
Before a revenue split item can be added, the item must already be set up to be used revenue splitting. For more information on a general workflow for using the revenue split functionality, see Revenue Split Workflow.
To add or remove a item for revenue splitting, follow these steps:
- In the list of all billing schedules, select the Schedule number of the billing schedule that you want to edit.
- In the Billing Schedule Lines FastTab, select Add line, and select a parent item, and on the line select the Revenue split check box.
If a revenue split template is already set up, the lines are updated with the parent item and all child items. - To add more child item:
- Select the parent item, and select Add revenue split child.
- Select the item you want to add and select OK.
- To remove a child item, do the following:
- Select the line and select Remove.
 Tip: If you want to remove all items in a single action, removing the parent item removes all items in the revenue split.
 - When you are asked to confirm the action, select Yes.
- Select the line and select Remove.
Remove Termination from a Line
To remove a termination from a billing schedule line, follow these steps:
- For the billing schedule, in the Billing Schedule Lines FastTab, select the line from which you want to remove the termination.
- Select Remove Termination.
- When you are asked to confirm the action, select Yes.
You can perform these other actions on the billing schedule line:
- Terminate a Billing Schedule or Line
- Hold a Schedule or Remove Hold
- Apply Escalation or Discount
- Specify Deferral Accounts for lines that have deferral items
- Edit Milestone Allocation for lines that use the milestone functionality
- Edit Support/Renewal Information for lines that use the support and renewal functionality
- Setting Up Pricing Options
- Mass Create Unbilled Journal Entry for selected lines
To create the unbilled revenue journal entry for multiple billing schedules, see Unbilled Revenue Mass Processing.
Billing Schedule List
The billing schedules list contains the following fields:
| Fields | Description |
| Schedule number | Displays the number for the billing schedule. |
| Description | Displays a description of the billing schedule. |
| Customer account | Displays the customer account ID or number. |
| Customer name | Displays the customer name. |
| End user account | Displays the end user account ID or number. |
| End user name | Displays the end user name. |
| Billing start date | Displays the billing start date. |
| Billing end date | Displays the billing end date. If needed, you can change the end date. |
| Schedule status |
Displays the billing schedule status:
|
Billing Schedule Header
The billing schedule header contains the following fields:
| Fields | Description |
| Billing schedule group |
Select the billing schedule group to associate with the billing schedule. Any default values from the billing schedule group are automatically applied to the billing schedule. Billing schedule groups are created on the Billing Schedule Group page. |
| Billing schedule number | Automatically updates with the next schedule number when you create a billing schedule. |
| Description | Specify a description for the billing schedule. |
| Order Account Info | |
| Customer account | Select the customer account number to associate with the billing schedule. |
| Customer name | Displays the customer name. |
| Invoice Account Info | |
| Invoice account |
Select the account used for processing the invoice. The default value is based on the customer account selected. For information on how the invoice account affects sales orders, free text invoices, and billing schedules, see Common Invoice Account for Different Customers: Example. |
| Invoice address |
Select whether the bill to address for the for the Address FastTab.
|
| Customer reference |
Specify reference text for the billing schedule. This box is also available in the Line Details. |
| Customer requisition |
Specify requisition text for the billing schedule. The customer requisition is a standard Microsoft Dynamics 365 for Finance and Operations feature. This box is also available in the Line Details. |
| Currency code | Displays the currency for the billing schedule. This value is automatically updated based on the currency of the customer. |
| End user account |
Select the end user account to associate with the billing schedule. The Unique schedule type option on the Advanced Recurring Contract Billing Parameters page determines which end users accounts are available to be selected.
|
| End user name | Displays the end user name. |
| Contact Info | |
| Contact |
Select the contact name for the billing schedule. The contact information is applied to the sales orders that are created from the Invoice Creator.
To view the primary contact information for the customer, view the Contact information FastTab of the Customerpage. For more information about this page, see the Microsoft Dynamics 365 for Finance and Operations documentation. To view the details for a contact, go to the Contactspage for the selected customer. You can access the page by viewing the Customerpage and selecting Accounts > Contacts > View Contacts. For more information, see the Microsoft Dynamics 365 for Finance and Operations documentation. |
| Displays the email address for the selected contact customer or billing schedule contact.. | |
| Internet address | Displays the Internet address for the selected contact customer or billing schedule contact. |
| Partner account |
Select the partner account to associate with the billing schedule. This value does not affect the calculations for the billing schedule. For information purposes only. |
| Partner name | Displays the partner name. This value does not affect the calculations for the billing schedule. For information purposes only. |
| Partner commission rate | Specify the commission rate for the partner. This value does not affect the calculations for the billing schedule. For information purposes only. |
| Schedule status |
Displays the billing schedule status:
|
| Billing frequency |
Select the default billing schedule frequency (for example, Daily, Weekly, Monthly, Annually, etc.). The default value is set on the Parameters page. |
| Billing interval | Specify the number of intervals for the billing schedule. |
| Start date |
Specify the start date of the billing schedule, which is used for the annual accumulation logic. This date rolls down to lines where the deferral start date is greater than the billing start date on the header and also the lines are not billed yet. When the billing frequency is set to One-time, the date is not rolled down to the line items. |
| Number of periods |
Specify the number of periods for the billing schedule. This value is used when calculating the end date for the billing schedule.
|
| End date |
Displays the end date for the billing schedule. The billing end date is used for the annual accumulation logic. The end date is automatically calculated based on the billing start date, billing frequency, and the number of periods. This date rolls down to lines where the billing schedule end date is not specified. When the billing schedule line has a specified date that is earlier than the billing end date in header, no changes occur to the line. When the billing frequency is set to One-time, the date is not rolled down to the line items. If you leave the number of billing periods empty or zero, you can specify an end date. The billing end date cannot be earlier than the billing start date. |
| Auto renew |
Select whether to automatically renew a recurring contract billing schedule for the next billing period:
|
| Invoice transaction type |
Select the invoice transaction type you want to process. |
| Lines to add per renewal | Specify the number of lines to add to a billing schedule that is being renewed. Available when Auto renew is Yes. |
| Prorate partial periods |
Select whether to prorate the partial billing periods:
The default value is set on the Parameters page. When this option is modified, the modification can be updated for all lines. For more information on proration, see Proation Method: Examples. |
| Align to month |
Select whether to align the billing schedule line to the end of a month when a billing schedule is created or updated:
The default value is set on the Parameters page. |
| Invoice separately |
Select whether separate invoices are based on the customer:
For example, a customer have five contracts. Three of the contracts are to be consolidated on a single invoice, and the other two contracts each require separate invoices. |
| Termination date | Displays the date on which a billing schedule is terminated. |
| Termination type |
Displays the termination type:
The default value is set on the Parameters page. |
| Contract start date | Select the contract start date. Optional. This date does not affect the functionality of the billing schedules. For information purposes only. |
| Contract completion date | Select the date on which the contract is completed. Optional. This date does not affect the functionality of the billing schedules. For information purposes only. |
| Milestone template |
Select the milestone template that you want to use. The template determines how the price of a milestone item is allocated. |
| Project ID |
Select the project ID that you want to attach to the billing schedule. The project IDs that are available are based on the selected customer. After the billing schedule is saved or billing schedule lines have been added, this value becomes read-only and cannot be changed. |
Billing Schedule Total
This FastTab shows the total amounts for the billing schedule. These amounts can also be viewed on the Unbilled Revenue Reconciliation Report. This FastTab shows the following totals.
- Total Contract Amount
- Total Invoiced Amount
- Unbilled Revenue Balance
- Original Deferral Amount
- Deferral Recognized Amount
- Deferral Remaining Amount
If the billing schedule does not have any corresponding deferral schedules, the deferral amounts are empty.
Address
This FastTab shows the delivery and bill-to address for the billing schedule. When you change the address, you can roll down the address to the Line Details for an item.
| Field | Description |
| Delivery Address |
Select the delivery address for the line item. The default delivery address is the primary delivery address for the customer regardless of purpose. When the sales order is created, the delivery address in the sales order header uses this address. If needed, you can change this address to any customer address. Customer address are a standard Microsoft Dynamics 365 for Finance and Operations feature and are set up on the customer record. When you change the address, you can select the following address options:
For items that use revenue splitting, only the address for the parent item can be edited. The address for the child items(s) is the same as the parent and cannot be edited separately. |
| Bill to Address |
Select the bill-to address for the line item. The default value of the bill-to address is based on the invoice account selected in the header and the purpose of the address.
If needed, you can change this address to any customer address. Customer address is a standard Microsoft Dynamics 365 for Finance and Operations feature and is set up on the customer record. For items that use revenue splitting, only the address for the parent item can be edited. The address for the child items(s) is the same as the parent and cannot be edited separately. |
| Payment |
Displays the customer payment information. The default values are from the customer record and can be changed as needed.
When a line item is on hold or terminated, the payment information cannot be changed.
|
Hold Lines
The hold lines shows a history of the holds that were applied to or removed from the billing schedule. The following columns appear on the line grid:
- Hold date
- User applied
- Removal date
- Resume date
- Deferral date (only if Advanced Revenue & Expense Deferrals is used)
- User removed
Termination Lines
The termination lines shows a history of the terminations that were applied or removed to the billing schedule. The following columns appear on the line grid:
- Termination date
- User
- Removal date
- Removal user
- Reason code
- Reason description
- Notes
Header Buttons
The header contains the following buttons:
| Button | Description |
| Save |
Save Saves the record and any changes to the page. When a line is created or updated and then saved, the billing detail lines are automatically created. |
|
Edit |
Changes the mode of the page from view mode to edit mode. All options on the page can be modified. |
| New | Creates a billing schedule. |
| Delete | Deletes a billing schedule. |
| Escalation and discount | |
|
Select an action: |
|
| Escalation and discount | Opens the Escalation and Discount dialog page. |
| Billing schedule | |
|
Select an action: |
|
| Copy Schedule | Opens the Copy Schedule dialog page, where you can copy the currently displayed billing schedule. |
| Archive | Archives the selected billing schedule. Select Archived to archive the billing schedule.To be able to archive a billing schedule, all lines within the billing schedule and the billing schedule itself must have a status of Terminated. |
| Hold | |
|
Select an action: |
|
| Place Hold | Opens the Place Hold dialog, where you specify the details of putting a billing schedule on hold. |
| Remove hold | Opens the Remove Hold dialog, where you can remove a hold on a billing schedule. |
| Termination | |
|
Select an action: |
|
| Terminate | Opens the Terminate Schedule Lines dialog. |
| Remove termination | Opens the a page dialog where you confirm whether you want to remove the termination. |
| Invoice preview | |
|
Select an action: |
|
| Invoice preview |
Opens the Invoice Preview dialog. |
| Revenue allocation | |
|
Select an action: |
|
| Revenue allocation | Opens the Revenue Allocation page. Revenue allocation can be set up and edited only at the time the billing schedule is created and is available when more than one item is in the Billing Schedule Lines. |
| Unbilled revenue processing | |
|
Select an action: |
|
| Create unbilled revenue journal entry |
Opens the Unbilled Revenue Mass Processing page. This action is not available for existing billing schedules or for billing schedule lines in which the invoice has already been created. |
| Alignment date | |
|
Select an action: |
|
| Alignment date | Opens a dialog where you can specify the Item group and the Alignment date for support and renewal. |
| Invoice Creator | |
|
Select an action: |
|
|
Invoice creator |
Creates the invoices for the current billing schedule only (without having to open the Invoice Creator page separately). |
Billing Schedule Lines
In the billing schedule lines, you can add items to or remove items from the billing schedule. You can also perform various actions (such as terminate or place hold) to the billing schedule at the line level. All fields have a default value based on the Billing Schedule Header values or the Subscription Billing setup. You can change the values as needed.
![]() Note: If a line that uses the unbilled revenue feature has more than one renewal term, the entire line cannot be edited as a precaution to prevent accidental date changes that could result in overlapping renewal terms.
Note: If a line that uses the unbilled revenue feature has more than one renewal term, the entire line cannot be edited as a precaution to prevent accidental date changes that could result in overlapping renewal terms.
The line grid has the following fields:
| Fields | Description |
| Variant number |
Select the variant number available for the selected Item number. After the variant number is selected, the color configuration, size, and style values are automatically updated. The default value for revenue split items is selected on the Revenue Split Template. You can change the values as needed.
|
| Item number | Select the item number. |
| Product name |
Displays the product name. |
| Item type | Select the item type: Standard, Usage, or Milestone. |
| Start date |
Displays the billing start date. For lines created from the Support and Renewal Process, changing this date recalculates the billing end date. This value can only be edited by using the Billing Schedule Lines data entity (BssiArcbBillingScheduleLineEntity). |
| End date | Displays the billing end date. |
| Attachments | Displays the number of attachments for the line. |
| Alignment date | Displays the alignment date. |
| Icon |
Displays an icon to indicate that the item is a parent ( |
| Deferred | Indicates whether the item is a deferral item (selected) or not (cleared). |
| Unbilled Revenue | Indicates whether the item uses the unbilled revenue feature (selected) or not (cleared). |
| Billing Frequency |
Displays the billing frequency. Before invoices are created, the billing frequency can be changed. After the first invoice for the billing schedule is created, the billing frequency cannot be edited. If you use the Calculate Unit Price functionality and need to change the billing frequency, the best practice is to terminate the existing line, and then create a line with the new frequency. This value can only be edited by using the Billing Schedule Lines data entity (BssiArcbBillingScheduleLineEntity). |
| Billing interval | Displays the billing interval. |
| Quantity |
Specify the quantity of the line item.
|
| Unit |
Displays the unit for the item. |
| Pricing method |
Select the default pricing method for items in a billing schedule:
|
| Unit price |
Displays the unit for the item. For Standard type items, this value can be edited. For items that use the standard pricing method and have a trade agreement, the price is the Amount in transaction value from the trade agreement. For items that use the standard pricing method, but do not have a trade agreement, the unit price is the price from the Base Sales Price on the Release Product Details.
|
| Parent amount | Displays the parent amount. |
| Net amount |
Displays the net amount for the item. The calculated net amount is based on the depending on the pricing method used and whether a trade agreement exists. For line items that are sold in large quantities and have a low per item price, the net amount is calculated based on the Base Sales Price values from the Release Product Details page. For line items that have a trade agreement, the net amount is calculated with the following formula: (Quantity * Amount in transaction) / Price unit.
|
| Revenue split |
Indicates whether an item uses the revenue split feature:
When a parent item for a revenue split is added, the child items automatically appear in the lines below the parent. |
| Prorate partial periods |
Select whether to prorate the partial billing periods:
The default value is set from the header. For items that use revenue splitting, this option can be selected only for the parent line. For more information on proration, see Proation Method: Examples. |
| Align to month |
Select whether to align the billing schedule line to the end of a month when a billing schedule is created or updated:
The default value is set from the header. For items that use revenue splitting, this option can be selected only for the parent line. |
| Invoice separately |
Select whether a separate invoice for the item is created:
This option appears if the Invoice Separately option is set to Yes in the Billing Schedule Header. |
| Status |
Displays the billing schedule line status:
|
| Original sales order |
Specify the original sales order number for the billing schedule line. Use this value to apply custom sales order number for the billing schedule line. When the invoice is created for the initial billing period, this original sales order number is used. For any subsequent invoices for the line, the standard functionality to generate sales order numbers is used. When using the invoice consolidation options, the same original sales order number must be used for all affected lines. This value is useful when importing data from a different program to Subscription Billing. |
Actions
This tab contains the following actions. These actions can be applied to only one line at a time.
| Action | Description |
| Add line | Adds a new line to the billing schedule. |
| Add from items list |
Opens the Item list dialog, where you can select multiple items to add to a billing schedule. This action is the same as the Copy > From item list on the Sales Order page. The Item list dialog is part of standard Microsoft Dynamics 365 for Finance and Operations functionality. |
| Remove |
Removes the selected line from the billing schedule. For items that are part of a revenue split, you can only remove the parent item, which also removes all associated child items. |
| View billing detail | Opens the View Billing Detail page. |
| Terminate |
Terminates the selected billing schedule lines. When you select this button, a dialog appears, where you can select the termination code. Available only when the selected lines have a status of Active. For revenue split items, this action can be applied only to the parent item. |
| Remove Termination |
Removes the termination from the selected lines. You can use this action only on billing schedule lines that have a status of Terminated. For revenue split items, this action can be applied only to the parent item. |
| Place hold |
Opens the Place Hold page, where you specify the details of putting a billing schedule line on hold. For revenue split items, this action can be applied only to the parent item. |
| Remove hold |
Opens the Remove Hold page, where you can remove a hold on a billing schedule line. For revenue split items, this action can be applied only to the parent item. |
| Escalation & discount |
Opens the Escalation and Discount dialog page. Not available for items that are part of a revenue split, except for parent items where the revenue split uses the Zero amount allocation method. |
| Advanced deferrals |
Opens the Transaction Deferral page for Advanced Revenue & Expense Deferrals, where you can enter the deferral options for the schedule line. This button is not available for parent items in a revenue split. |
| Milestone allocation |
Opens the Milestone Allocation page, where you view and update the milestone allocation information for the line. Available only when the billing schedule line item is a milestone item. |
| Support and renewal |
Opens the Support and Renewal Audit page where you view and edit the support and renewal information for the line. Available only when the billing schedule line item is a support or renewal item. |
| Display dimensions | Opens a dialog where you show or hide the dimension columns that you want to appear in the billing schedule lines list. |
| Calculate unit price |
Opens the Calculate Unit Price dialog where you specify the Contract price and Price frequency, and the unit price of the item is calculated so that the customer can pay the contract amount installments, such as one-time, daily, monthly, quarterly, semiannually, or annually. This dialog also shows an Audit trail of the changes: old contract price and frequency, new contract price and frequency, user who made the change, and the date and time of the change. The audit trail does not appear when this dialog is opened from the Renewal term dialog. |
| Alignment date |
Opens a dialog where you specify the alignment date for renewal items. If you choose an Item group, the alignment dates for all items are updated to the use the same date as the first existing item in the billing schedule that has the same item group. The alignment date works only when the billing frequency is annual. |
| Unbilled revenue |
Opens a dialog where you can set the item to use the unbilled revenue feature and then specify the unbilled revenue and unbilled discount accounts for the item. You can accept the default values or edit them as needed. Only available for items where Item type is Standard. This action is not available for existing billing schedules or for billing schedule lines in which the invoice has already been created. |
| Add revenue split child |
Opens a dialog where you can select a child item to add to the sales order. Available only for parent items of a revenue split. |
| Advanced pricing options | Opens the Advanced Pricing Options page, where you edit the pricing options for an item. |
Line Details
When you select a line in the Billing Schedule Lines FastTab, you can view specific details for the selected line.
| Fields | Description |
| General tab | |
| Usage |
Provides information for usage items:
|
| External references |
Specify information for external references: External and Line number.
|
| Milestone |
Provides information for milestone items:
|
| Text |
Displays comment for the line. This text is translated to the default language of the customer or legal entity. For more information, see Item Text Translation. This value can only be edited by using the Billing Schedule Lines data entity (BssiArcbBillingScheduleLineEntity). |
| Item group |
Displays the item group for the line item. Read-only. |
| Alignment date | The alignment date for the billing schedule. |
| Customer reference |
Specify reference text for the billing schedule. The default value is from the Billing Schedule Header. |
| Customer requisition |
Specify requisition text for the billing schedule. The customer requisition is a standard Microsoft Dynamics 365 for Finance and Operations feature. The default value is from the Billing Schedule Header. |
| Address tab | |
| Delivery Address |
Select the delivery address for the line item. The default delivery address is the primary delivery address from the Address FastTab. When the sales order is created, the delivery address of the corresponding sales order line uses this address. If needed, you can change this address to any customer address. Customer address are a standard Microsoft Dynamics 365 for Finance and Operations feature and are set up on the customer record. When you change the address, you can select the following address options:
For items that use revenue splitting, only the address for the parent item can be edited. The address for the child items(s) is the same as the parent and cannot be edited separately. |
| Bill to Address |
Select the bill-to address for the line item. The default bill-to address is the primary bill-to address from the Address FastTab. You can change the address as needed based on the purpose of the available addresses:
If needed, you can change this address to any customer address. Customer address is a standard Microsoft Dynamics 365 for Finance and Operations feature and is set up on the customer record. For items that use revenue splitting, only the address for the parent item can be edited. The address for the child items(s) is the same as the parent and cannot be edited separately. |
| Product tab | |
| Product Dimensions |
Displays the product details for the item. Product dimensions are part of standard Microsoft Dynamics 365 for Finance and Operations.
The values are automatically updated based on the Variant number selected for the billing schedule line. |
| Tracking Dimensions |
Displays the tracking details for the item.
When using the Invoice Creator, these values are copied to the resulting sales order document. When the consolidation feature is used and any of these values are different, the lines cannot be consolidated to a single line. For the tracking dimensions to appear, an active tracking dimension group must be assigned to the item in the Released Products page. Tracking dimensions are part of standard Microsoft Dynamics 365 for Finance and Operations. |
| Storage Dimensions |
Displays the storage information for the item. .
For the storage dimensions to appear, an active storage dimension group must be assigned to the item in the Released Products page. Storage dimensions are part of standard Microsoft Dynamics 365 for Finance and Operations. For more information on using Storage dimensions, see the Financial Dimensions. For more information on using Dimension links to Sites, see the Financial dimension links to Sites . |
| Account tab | |
| Main account | Displays the main account that is created on the sales line. The default value is from the sales order. However, this field can be empty. |
| Item financial dimensions |
Displays the default financial dimension values based on the customer and item record.
If both the customer and item records have a value for the financial dimension, the financial dimension value from the customer record takes precedence over the value from the item record. You can change the values as needed for the item in the billing schedule. Financial dimension is a standard Microsoft Dynamics 365 for Finance and Operations feature. For example, the following financial dimensions are set up: Customer:
Item:
When the item is added to the billing schedule, the detail account values for the item line appear as follows:
When Dimension link to the Site is activated it displays the default financial dimension values based on the dimension link record. If all Dimension link, customer and item records have a value for the financial dimension, the financial dimension value from the Dimension link record takes precedence over the value from the customer and item record. You can change the values as needed for the item in the billing schedule. Financial dimension is a standard Microsoft Dynamics 365 for Finance and Operations feature. Example 1: For example, the following financial dimensions are set up:Dimension link:
Customer:
Item:
When the item is added to the billing schedule with Site = 1 than the detail account values for the item line appear as follows:
Example 2: If the Site is anything else besides 1, than the detail account values for the item line appear as follows:
Example 3: Dimension link:
When user manually changes the Site = 3 (or any other site for which dimension value exists) detail account values for the item line appear as follows:
If any values are updated for the billing schedule, the values as they appear for the item in the billing schedule are used for the resulting sales order and deferral schedule. For items that use revenue splitting, the financial dimension values for child items use the financial dimension values of the dimension link, customer and item records as described earlier. If needed, you can import the data entity to update the financial dimension values of child items. For more information on using financial dimensions, see the Financial Dimensions. |
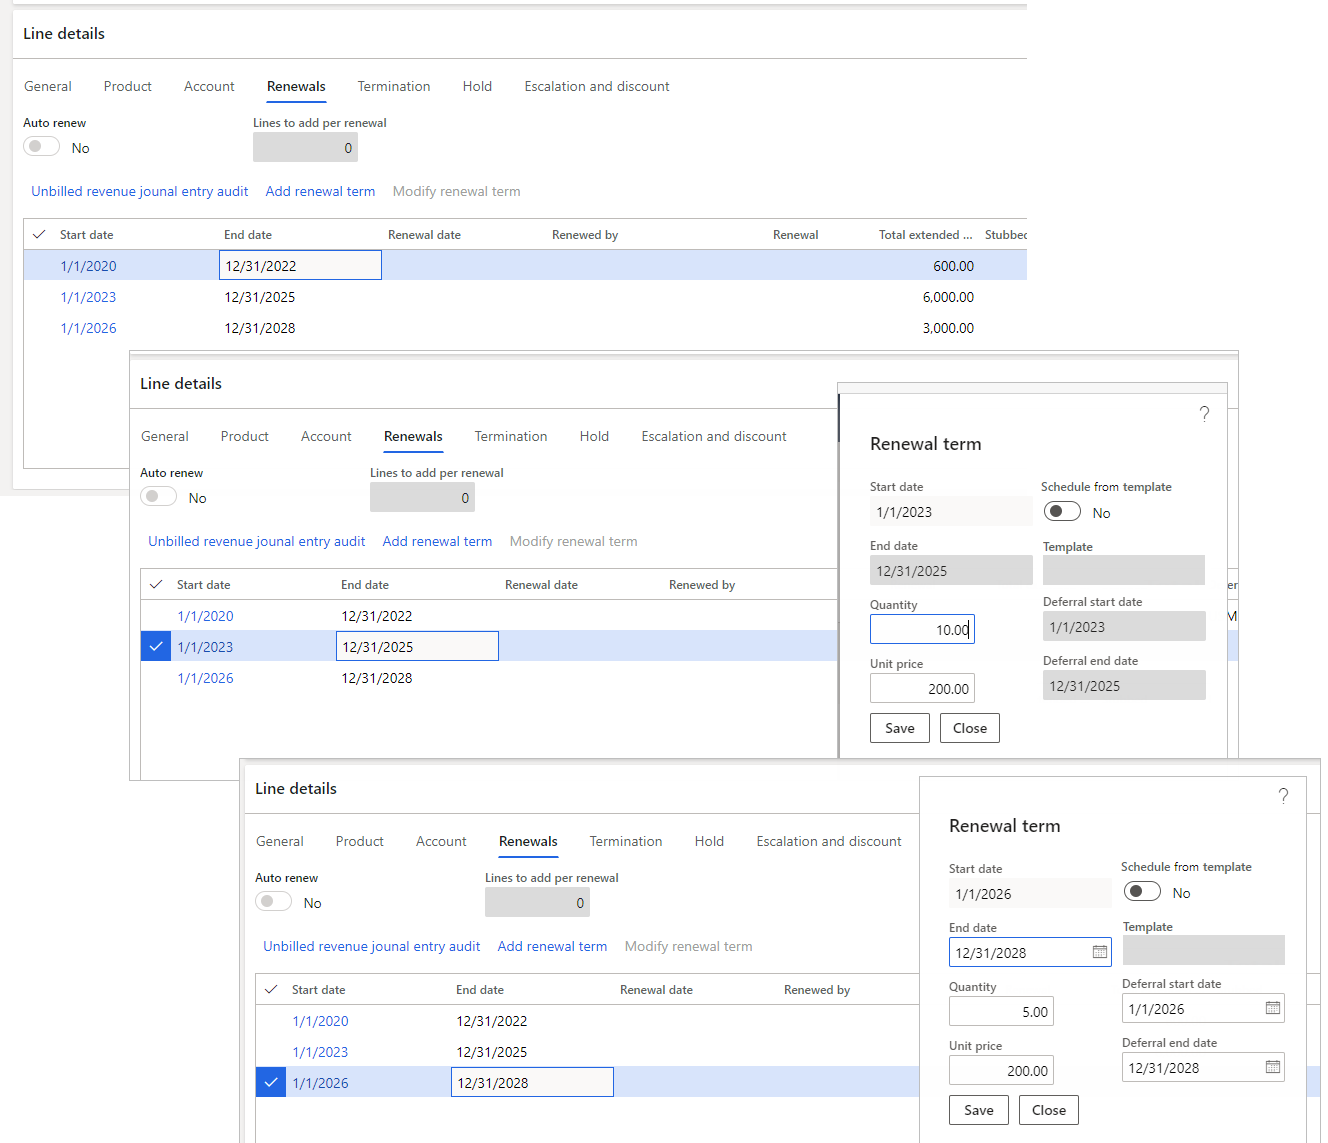
| Renewals tab | |
| Auto renew |
Displays whether the billing schedule line automatically renews for the next billing period:
|
| Lines to add per renewal | Displays the number of lines to add to a billing schedule renewal. |
|
Displays the following columns:
The short-term and long-term unbilled revenue amounts appear only when the a short-term deferral method is selected on the Advanced Recurring Contract Billing Parameters page and the accounts are set up on the Unbilled Revenue Setup page for the line item. |
|
| Termination tab | |
| Termination date | Displays the date on which the billing schedule line is terminated. The default value is from the Termination date in the header, but you can change it. |
| Termination type | Displays the termination type. The default value is from the Termination type in the header, but you can change it. |
|
Displays the following columns:
|
|
| Hold tab | |
|
Displays the following columns:
|
|
| Escalation and discount tab | |
| Escalation |
Select to allow escalations for the billing schedule line. Any escalation lines from the header are rolled down when the billing schedule line is created:
When this option is selected, you can set up the escalations for the billing schedule lines on the Escalation and Discount page. The default setting is based on the Billing schedule group selected, but you can change it. |
|
Displays the following columns:
|
|
| Audit tab | |
|
Displays the following columns for sales orders that have been canceled:
|
|
Buttons
This tab has the following buttons:
| Button | Description |
| Renewals tab | |
|
Select an action to perform: |
|
| Unbilled revenue journal entry audit | Opens the Unbilled Revenue Journal Entry Audit, where you view all changes for items that use the unbilled revenue feature. |
| Add renewal term |
Opens a dialog where you can add a renewal term for the item. The start date of the new renewal term is the next date after the end date of the previous term, and it cannot be changed. You can change the renewal end date, the deferral start and end dates, the item quantity, and unit price. The dialog also includes the Calculate unit price button. |
| Modify renewal term |
Opens a dialog where you can modify a renewal term. For the initial term, you can change the deferral start and end dates prior to creating the initial journal entry. For subsequent terms, the start date cannot be changed and is the next date after the end of the previous term. If a renewal term exists after the term you are modifying, the dates of the term cannot be changed. In this case, you can change only the quantity and unit price for the renewal item. For example, three terms exist. The first term cannot be changed because it has already started. For the second term, only the quantity and unit price can be changed. For the third term, all values can be changed, except the start date. Additionally, the Schedule from template option allows you to create a deferral schedule based on the template for the unbilled revenue item. When this option is Yes, select the deferral Template and change the deferral start and end dates as needed. Subsequent renewal terms use the same deferral template, which can be changed. |