In this article
Use this page to create, delete, or edit billing schedules. You can also review a list of all billing schedules.
When you select to view a billing schedule, a separate page showing the details of the billing schedule.
When you create a billing schedule, the default values for the billing schedule are determined by the billing group associated with the billing schedule. Also, other default values are set up on the SBS ARCB Billing Schedule Setup form. You can change any of the default values as needed.

Revenue Split
When you add an item that is a part of a revenue split, keep the following information in mind:
- The Parent amount cannot be deferred.
- The start date, end date, quantity, unit, site, auto-renewal and warehouse values for child items are based on the parent item.
You cannot change these values for the child items. Any changes must be made for the parent item. - The Pricing method is Flat and cannot be changed.
- Child items can be added or removed.
- Child items can have one of the following:
- Same Billing frequency and Billing intervals as the parent item.
- The Billing frequency set to One-time, which automatically sets the Billing intervals to 1.
- The sum of the net amount of the child items is equal to the Parent amount.
- If the MEA type for the sales order is single, the corresponding MERA transaction line is created when the parent and child lines are added.
- When the allocation method for a revenue split is Equal amounts and the Parent amount is changed, the amounts for all child lines are recalculated.
- For a revenue split that has the Allocation method set to Variable amount:
- The net amount of the parent item appears in the Parent amount column.
This value can be edited. However, the unit price, net amount, and discount cannot be edited and show a zero (0) amount. - The unit price for child items shows a zero (0) value.
You can edit the unit price or net amount. The parent amount updates automatically when you edit any of its child item values.
- The net amount of the parent item appears in the Parent amount column.
- For a revenue split that has the Allocation method set to Percentage:
- The net amount of the parent item appears in the Parent amount column.
This value can be edited. However, the unit price, net amount, and discount cannot be edited and show a zero (0) amount. - The net amount for child items is calculated as follows: Percentage * Parent amount.
- The net amount of the parent item appears in the Parent amount column.
- For a revenue split that has the Allocation method set to Equal amount:
- The net amount of the parent item appears in the Parent amount column.
This value can be edited. However, the unit price, net amount, and discount cannot be edited and show a zero (0) amount. - The net amount of the child items is calculated by dividing the Parent amount equally among all child items.
- When child items are removed or added, the net amount and unit prices are recalculated so that all child lines have equal amounts.
- If the Parent amount cannot be divided perfectly equal, the net amount and unit price of the last child item may be slighter more or less than the other child items.
- The net amount of the parent item appears in the Parent amount column.
Add a Billing Schedule
To add a billing schedule, follow these steps:
- From the SBS ARCB Billing Schedule List, select New, the Billing Schedule Group List appears.
- Select a billing schedule group, and select OK.
- In the Schedule FastTab, update the following as needed:
- If automatic numbering is setup, the billing schedule No. is automatically updated. If the billing schedule group does not use automatic numbering, specify the number.
- Select the Sell-to Customer No..
The Customer Name and Sell-to address and contact information updates with the information from customer record. If needed, edit the address information. - If needed, select the End User No. and the Billing Start Date.
- The Billing End Date is automatically updated based on the Frequency and Number of Periods specified.
- As needed, specify values for other options.
- In the Schedule Lines FastTab, add line items to the billing schedule.
- In the Schedule Details FastTab, specify the line details for a specific line item, such as currency code, payment terms and method, and other options.
- In the Shipping and Billing FastTab, select the shipping and billing information.
The SBS ARCB Billing Schedule Card page appears with some options already updated based on the settings from the billing schedule group. If needed, you can edit any option.
If the billing schedule you create has a Pending Approval status, you must use the Activate Schedule action to change the status to Active so that you can process further actions.
Delete a Billing Schedule
To delete a billing schedule, follow these steps:
- Select one or more lines that you want to delete, and select Delete.
- When you are asked to confirm the action, select Yes.
You can delete only one billing schedule at a time.
The following actions can be performed on a billing schedule or a billing schedule line.
Copy a Billing Schedule
To create a copy of a billing schedule, follow these steps:
- On the SBS ARCB Billing Schedule Card page, select Actions tab > Copy > Copy Schedule.
- In the New Schedule FastTab, do the following:
- Specify a Description and select a Customer.
- Specify the start and end dates for the billing schedule.
- If need, change the Billing Frequency and Number of Periods.
- For existing lines, you can change only the Pricing Method, Unit Price, or Quantity as needed.
- Select Copy Process.
- Select whether you want all items to use the same start and end dates.
On the SBS ARCB Billing Copy Schedule page, the Source Schedule FastTab is automatically updated with the information of the billing schedule you want to copy.
After the copy process finishes, the newly created billing schedule appears in the SBS ARCB Billing Schedule Card page.
-
If the billing schedule being copied is Terminated, the newly created billing schedule is the exact same except the status of the billing schedule and all lines are active and the termination date is cleared.
-
If the billing schedule being copied is On Hold, the newly created billing schedule is the exact same except the status of the billing schedule, and all lines are active
Terminating a Billing Schedule
To terminate several billing schedules, use the SBS ARCB Billing Batch Termination Process.
To terminate a billing schedule, follow these steps:
- From the SBS ARCB Billing Schedule List, select a line. Or from the SBS ARCB Billing Schedule Card edit a record.
- Select Actions > Termination > Terminate Schedule, which opens the SBS ARCB Billing Schedule Termination page.
- In the General FastTab, do the following:
- specify the Termination Date.
- Select the Reason Code and Reason Code Value.
- Specify a Termination Note.
- Select Actions > Termination > Terminate.
- When you are asked to confirm the action, select Yes.
To terminate a billing schedule and create a credit memo, follow these steps:
- From the SBS ARCB Billing Schedule List, select a line. Or from the SBS ARCB Billing Schedule Card edit a record.
- Select Actions > Termination > Terminate Schedule.
- In the SBS ARCB Billing Schedule Termination page, specify the Termination Date and set Termination Type to Adjust Schedule.
- Select the Reason Code and Reason Code Value.
- Specify a Termination Note.
- Select Issue credit, and then do the following:
- If you want to prorate the amount of the final invoice, select Prorate Daily.
- Select the Invoice Date.
- If the billing schedule has an associated deferral schedule, select the Deferral Adjustment Method.
- Select Actions > Credit Memo(s), and select Create Credit Memo(s), Post Credit Memo(s), or Post & Send.
- Select Actions > Termination > Terminate.
- When you are asked to confirm the action, select Yes.
To terminate a billing schedule and bill the remaining amount, follow these steps:
- From the SBS ARCB Billing Schedule List, select a line. Or from the SBS ARCB Billing Schedule Card edit a record.
- Select Actions > Termination > Terminate Schedule.
- In the SBS ARCB Billing Schedule Termination page, specify the Termination Date and set Termination Type to Bill Remaining.
- Select the Reason Code and Reason Code Value.
- Specify a Termination Note.
- Select Actions > Termination > Terminate.
- When you are asked to confirm the action, select Yes.
Terminating a Schedule Line
To terminate a billing schedule line, follow these steps:
- On the SBS ARCB Billing Schedule Card page, select one or more lines in the Schedule Lines.
- Select Termination > Terminate, which opens the SBS ARCB Billing Schedule Termination page.
- Specify the Termination Date, and set Termination Type to Bill Remaining.
- Select the Reason Code and Reason Code Value.
- Specify a Termination Note.
- Select Actions > Termination > Terminate.
- When you are asked to confirm the action, select Yes.
Terminate a billing schedule line and create a credit memo:
- On the SBS ARCB Billing Schedule Card page, select one or more lines in the Schedule Lines.
- Select Termination > Terminate, which opens the SBS ARCB Billing Schedule Termination page
- Specify the Termination Date and set Termination Type to Adjust Schedule.
- Select the Reason Code and Reason Code Value.
- Specify a Termination Note.
- Select Issue credit, and then do the following:
- If you want to prorate the amount of the final invoice, select Prorate Daily. .
- Select the Invoice Date.
- In the Actions tab, select Create Credit Memo(s), Post Credit Memo(s), or Post & Send.
- When you are asked to confirm the action, select Yes.
Remove a Termination
Remove a termination from a billing schedule :
- On the SBS ARCB Billing Schedule Card page, select Actions > Termination > Remove Termination.
- When you are asked to confirm the action, select Yes.
Remove a termination from a billing schedule line:
- On the SBS ARCB Billing Schedule Card page, select one or more lines in the Schedule Lines that has been terminated.
- Select Termination > Remove Termination.
- When you are asked to confirm the action, select Yes.
View the Termination History
View the termination history for a billing schedule
- On the SBS ARCB Billing Schedule Card page, select Actions > Termination > Schedule Termination History.
- On the SBS ARCB Billing Schedule Termination History, review the termination changes to the billing schedule.
- When you are finished, select Close.
View the termination history for a billing schedule line:
- On the SBS ARCB Billing Schedule Card page, select a line in the Schedule Lines.
- Select Termination > Termination History, which opens the SBS ARCB Billing Schedule Termination History.
- When you are finished, select Close.
Put a Hold on a Billing Schedule
To put a hold on several billing schedules, use the SBS ARCB Billing Batch Hold Process.
To put a hold on a billing schedule, follow these steps:
- From the SBS ARCB Billing Schedule List, select a line. (Alternatively, edit a record from the SBS ARCB Billing Schedule Card.)
- Select Actions > Hold Functions > Hold Schedule.
- On the SBS ARCB Billing Schedule Hold page, select the Reason Code and Reason Code Value.
- If needed, select Create Adjustment and in Enter Hold Date, specify the hold date.
- Select Actions > Process > Hold.
- When you are asked to confirm the action, select Yes.
To place a hold on a billing schedule line, follow these steps:
- On the SBS ARCB Billing Schedule Card page, select one or more lines in the Schedule Lines FastTab.
- Select Hold > Hold .
- On the SBS ARCB Billing Schedule Hold page, select the Reason Code and Reason Code Value.
- If needed, select Create Adjustment and in Enter Hold Date, specify the hold date.
- Select Actions > Process > Hold.
- When you are asked to confirm the action, select Yes.
To place a hold on a Billing Schedule list, follow these steps:
-
On the SBS ARCB Billing Schedule List page, select one or more Schedule.
-
Select More Option >Actions > Hold >Hold Schedule.
-
On the SBS ARCB Billing Schedule Hold page, select the Reason Code and Reason Code Value.
-
If needed, select Create Adjustment and in Enter Hold Date, specify the hold date.
-
Select Actions > Process > Hold.
-
When asked to confirm the action, select Yes.
![]() Note: The Billing Schedule List action does not support multiple schedule hold processes.
Note: The Billing Schedule List action does not support multiple schedule hold processes.
Remove a Hold
To remove a hold from a billing schedule, follow these steps:
- On the SBS ARCB Billing Schedule Card page, select Actions > Hold > Remove Hold.
- When you are asked to confirm the action, select Yes.
Remove a hold from a billing schedule line:
- On the SBS ARCB Billing Schedule Card page, select one or more lines in the Schedule Lines that is put on hold.
- Select Hold > Remove Hold.
- When you are asked to confirm the action, select Yes.
![]() Note: When a hold date is set, removing the hold requires specifying the removal, resumption, and deferral dates.
Note: When a hold date is set, removing the hold requires specifying the removal, resumption, and deferral dates.
View the Hold History
View the hold history for a billing schedule :
- On the SBS ARCB Billing Schedule Card page, select Actions > Hold Functions > Schedule Hold History, which opens the SBS ARCB Billing Schedule Hold History page.
- When you are finished, select Close.
View the hold history for a billing schedule line:
- On the SBS ARCB Billing Schedule Card page, select a line in the Schedule Lines.
- Select Hold > Hold History, which opens the SBS ARCB Billing Schedule Hold History page.
- When you are finished, select Close.
Apply a Price Adjustment
To apply a price adjustment or a discount to a billing schedule line, follow these steps:
- On the SBS ARCB Billing Schedule Card page, select one or more lines in the Schedule Lines area.
- Select Price Adjustment > Price Adjustment, which opens the SBS ARCB Billing Price Adjustment page.
- Specify the Price Index Calculation.
- In the lines do the following:
- If the price change is a discount, select Discount.
- Specify the Start Date, Frequency, Percentage or Amount, select the Price Index Schedule, and specify the End Date.
- In the Actions tab, select Adjust the Price.
- When you are asked to confirm the action, select Yes.
The item number is automatically updated with the item of the line.
View the Price Adjustment History
View the price adjustment history for a billing schedule:
- On the SBS ARCB Billing Schedule Card page, select Actions tab > Price Adjustment Functions > Schedule Price Adjustment History, which opens the SBS ARCB Billing Price Adjustment History page.
- When you are finished, select Close.
View the price adjustment history for a billing schedule line:
- On the SBS ARCB Billing Schedule Card page, select a line in the Schedule Lines area.
- Select Price Adjustment > Price Adjustment History, which opens the SBS ARCB Billing Price Adjustment History page.
- When you are finished, select Close.
Apply the Price Index History
View the Price Index history for a billing schedule:
- On the SBS ARCB Billing Schedule Card page, select Actions tab > Price Adjustment Functions > Price Index History, which opens the SBS ARCB Billing Price Index History page.
- When you are finished, select Close.
View the Price Index history for a billing schedule line:
- On the SBS ARCB Billing Schedule Card page, select a line in the Schedule Lines area.
- Select Price Adjustment > Price Index History, which opens the SBS ARCB Billing Price Index History page.
- When you are finished, select Close.
View the Discount History
View the discount history for a billing schedule:
- On the SBS ARCB Billing Schedule Card, select Actions tab > Price Adjustment Functions > Discount History, which opens the SBS ARCB Billing Discount History.
- When you are finished, select Close.
View the discount history for a billing schedule line:
- On the SBS ARCB Billing Schedule Card, select a line in the Schedule Lines area.
- Select Price Adjustment > Discount History, which opens the SBS ARCB Billing Discount History.
- When you are finished, select Close.
Archive a Billing Schedule
Archive a billing schedule:
- On the SBS ARCB Billing Schedule Card page, select Actions tab > Archive Function > Archived.
- On the SBS ARCB Billing Batch Archive Process page, select the billing schedule lines that you want to archive.
- Select Archived.
- When you are asked to confirm the action, select Yes.
![]() Caution: Archiving a billing schedule is a permanent action and cannot be reversed.
Caution: Archiving a billing schedule is a permanent action and cannot be reversed.
![]() Tip: To archive multiple billing schedules, use the SBS ARCB Billing Batch Archive Process page.
Tip: To archive multiple billing schedules, use the SBS ARCB Billing Batch Archive Process page.
![]() Note: Only terminated billing schedules can be archived.
Note: Only terminated billing schedules can be archived.
Stubbing a Billing Schedule
Stub a billing schedule:
- On the SBS ARCB Billing Schedule Card page, select Actions tab > Stubbing Function > Apply Stubbing.
- The SBS ARCB Billing Schedule Stubbing page opens, then specify the Stubbing Date.
- In the Actions tab, select Stub.
- When you are asked to confirm the action, select Yes.
Stub a billing schedule line:
- On the SBS ARCB Billing Schedule Card page, select one or more lines in the Schedule Lines area.
- Select Stubbing > Apply Stubbing , which opens the SBS ARCB Billing Schedule Stubbing.
- Specify the Stubbing Date.
- In the Actions tab, select Stub.
- When you are asked to confirm the action, select Yes.
Reverse the Stubbing
Reverse the stubbing on a billing schedule:
- On the SBS ARCB Billing Schedule Card page, select Actions tab > Stubbing Function > Reverse Stubbing.
- When you are asked to confirm the action, select Yes.
Reverse the stubbing on a billing schedule line:
- On the SBS ARCB Billing Schedule Card page , select one or more lines in the Schedule Lines FastTab.
- Select Stubbing > Reverse Stubbing.
- When you are asked to confirm the action, select Yes.
Use Multiple Customer Posting Groups
You can set up multiple posting groups which you can use as alternative posting groups when you are posting sales and purchase documents and journals.
![]() Note: If you are using Business Central 22.0 and SBS ARCB 40.7 or earlier, then you must go to the Feature Management page and turn on these features manually. It is automatically turned on if you are using Business Central 23.0 or later.
Note: If you are using Business Central 22.0 and SBS ARCB 40.7 or earlier, then you must go to the Feature Management page and turn on these features manually. It is automatically turned on if you are using Business Central 23.0 or later.
Turn on:
- Feature Update: Allow using of multiple posting groups for customer or vendor
- Feature Update: Enable use of new extensible exchange rate adjustment, including posting review
To set up multiple posting groups, do the following:
-
Go to the Sales & Receivable Setup and the Customer Card pages and turn on Allow Multiple Posting Groups.
-
Go to the Customer Posting Groups page.
-
Create new posting groups if there are no posting groups. For example, create two posting groups:
-
Domestic Posting Group
-
Alternative Domestic Posting Group
-
-
Assign accounts to the posting groups. For example, assign different Receivables Accounts to different posting groups.
-
Select the posting group to which you want to assign alternative posting groups.
-
On the Customer Posting Groups Action tab, go to Related > Posting Group > Alternative Groups. For more information about setting up posting groups, see Set Up Posting Groups.
-
On the Alternative Customer Posting Group table, add customer posting groups which you can use as alternative posting groups. For example, assign Alternative Domestic Posting Group as an alternative for the Domestic Posting Group.
After you have set up multiple posting groups and added alternative posting groups, you can then use alternative posting groups when you are working with billing schedules. For example, if you create a billing schedule for customer 10000, the default customer posting group is Domestic Posting Group. Because you have set up Alternative Domestic Posting Group as an alternative posting group, you can use that posting group instead of the default one.
Add Items with Extended Text to Billing Schedule
To add extended text to your billing schedule line, do the following.
-
Make sure that you have added extended text to the item or items you want to add to the schedule line. For more information about adding extended text to items, see Set up Extended Text for an Item.
-
Add the item or items to the Schedule Lines.
-
On the Schedule Lines Action tab, select Line > Functions > Insert Ext. Texts.
-
The extended text associated with the item is added to the schedule lines, underneath the item. The extended text appear as lines with the Comment type.
When you invoice the billing schedule, the extended text lines appear on the invoice.
Create a Sales Order or Invoice
A sales order or invoice is created for a line depending on the Sales Document Type selected for the billing schedule line.
To create a sales order or invoice for a billing schedule, follow these steps:
- On the SBS ARCB Billing Schedule Card page, select Actions tab > Invoice Function > Create Order/Invoice.
- In the SBS ARCB Billing Schedule Order/Invoice Creator page, specify the As of Date.
- If needed, select how you want to consolidate the sales orders or invoices, by customer or items.
- Specify the sales order or invoice date.
- In the list, select the billing schedules for which you want to create sales orders or invoices.
- Select the Actions tab and select the actions that you want to perform.
- If you select Create Order(s)/Invoice(s), sales orders or invoices are created for all selected billing schedules. After the sales orders or invoices are created, you can review the log report.
- If you select Post Order(s)/Invoice(s), sales orders or invoices are created and then posted for all selected billing schedules. After the sales orders or invoices are created, you can review the log report.
- If you select Post & Send, sales orders or invoices are created and then posted for all selected billing schedules.
- You can then send the sales orders or invoices to customers who have an sales orders or invoice. Before the sales orders or invoices are sent through the email program, you can edit the message.
- After the sales orders or invoices are sent, you can review the log report.
If the sales invoice amount is negative, a sales credit memo is created.
Preview an Invoice
Review the invoice for a billing schedule:
- On the SBS ARCB Billing Schedule Card page, select Actions tab > Invoice Function > Invoice Preview.
- In the SBS ARCB Invoice Preview page, select the As of date.
- Select whether to Include Invoiced Periods.
- In the Billing Schedule Detail area, add any other filters that you want.
- Select how you want to view the generated report:
- Select Preview to view the report on your screen.
- Select Print to select the destination for the report.
Process Milestone Items
To update the end date on milestone items, follow these steps:
- On the SBS ARCB Billing Schedule Card page, select Actions tab > Milestone > Milestone.
- On the SBS ARCB Billing Batch Milestone Processing page, specify the End Date.
- Select the billing schedule lines that you want to process.
- Select Milestone Process > Process.
- When you are asked to confirm the action, select Yes.
To edit the details for a milestone item, follow these steps:
- On the SBS ARCB Billing Schedule Card page, select a line in the Schedule Lines FastTab.
- Select Milestone > Milestone Details, which opens the SBS ARCB Milestone Details page.
- Review the values in the Header Fields, and make any changes as needed.
- Review the Lines FastTab, and make any changes as needed.
When adding a line, do the following:- Select the Type and Item No.
- Depending on the allocation method selected, specify the Percentage or Amount.
- Select the Frequency.
- Specify a Milestone ID.
- Select Actions > Process > Process.
Specify Revenue Allocation
To specify the revenue allocation for a billing schedule, follow these steps:
- In the list of all billing schedules, select the Schedule Number of the billing schedule.
- In the In the Actions tab, select Revenue Allocation, which opens the SBS MERA Revenue Allocation (ARCB) page.
- Select the MEA Type.
- Specify the MEA Number and the Deferred Contract Revenue Account.
- If the MEA type is Single, the same MEA Number and Deferred Contract Revenue Account applies to each line.
- If the MEA type is Multiple, you can apply a different MEA number and Deferred contract revenue account to each line.
- In the Actions tab, select Enter Percent Line, which opens the SBS MERA Transaction Percent Line page. Available only when SPP Origin for a line is Percent of item.
- For the item, specify the Percent, and select OK.
- In the SBS MERA Revenue Allocation (ARCB) page, select OK.
Review MEA Percent History
To review the MEA percent history, follow these steps:
- In the list of all billing schedules, select the Schedule Number of the billing schedule.
- In the In the Actions tab, select Revenue Allocation, which opens the SBS MERA Revenue Allocation (ARCB) page.
- In the Actions tab, select History.
- In the page that opens review the history, and select Close when you are finished.
Perform Actions on Line Items
In the Schedule Lines FastTab you can perform the following additional actions on a single billing schedule line.
Note: From 1.44.8.0 version, we can update the deferral information even if the schedule line is invoiced except deferral start date. This information can also be updated from the SBS ARCB Deferral Update Utility.
To add a line to a billing schedule, follow these steps:
- Select Manage > New Line.
- For each item line you want to add, do the following:
- Set Type to Item.
- Select the Item No., and specify the Billing Type.
- For Billing Type set to Standard, complete any other information as needed.
- For Billing Type set to Usage, complete other information and ensure to specify the Usage Option. This value determines how you enter the consumption values on the SBS ARCB Billing Detail List.
- For Billing Type set to Milestone, complete other information and ensure to specify a milestone template and edit the milestone details for the line. For more information, see Milestone Billing Workflow.
- For each comment line you want to add, do the following:
- Set Type to Comment.
- In the Item No., select from one of the standard text codes.
- For each resource line you want to add, do the following:
- Set Type to Resource.
- In the Item No., select from one of the available resources.
- Select the Billing Type, and set the Pricing Method to Standard or Flat.
Currently, the Milestone billing type cannot be used for a resource. A resource cannot be a milestone parent. item
- For the line, you can also specify the values under the Schedule Details and Shipping and Billing FastTabs.
- (from v 1.42.2.0) The user is able to edit and add ARCB Schedule Lines with Excel, and then publish the changes.
- On the SBS ARCB Billing Schedule Card page, select a line in the Schedule Lines FastTab.
- Select Line > Functions > Display Billing Details, which opens the SBS ARCB Billing Detail List page. You can review the following information:
- Start and end dates, quantities, unit price, and discount, and amounts
- History of documents
- Meter reading and consumption values (for usage items)
If the item is a usage item, you can enter the meter reading values. - Renewal lines (for items that are automatically renewed)
- When you are finished, close the page.
- On the SBS ARCB Billing Schedule Card page, select a line in the Schedule Lines area.
- Select Support/Renewal > Support and Renewal, which opens the SBS ARCB Billing Support and Renewal Update Process page.
- Change any of the following options, if needed:
- Support Level
- Renewal % or Renewal Amount
- Specify the Reason for the change.
- In the Actions tab, select Process.
- On the SBS ARCB Billing Schedule Card page, select a line in the Schedule Lines area.
- Select Support/Renewal > Support and Renewal History, which opens the SBS ARCB Billing Support and Renewal History page.
- When you are finished, select Close.
- In the list of all billing schedules, select the Schedule Number of the billing schedule.
- In the Schedule Lines section, select a line and select Advanced Deferral > Advanced Deferral Options, which opens the SBS ARED Transaction - Billing Schedule (Advanced Deferrals) page.
- To make the item a deferral item, select Deferral Item.
- Review the accounts for the Revenue, COGS and Discounts FastTabs. If necessary make any changes.
- In the Schedule section, select the Schedule Type.
- If needed to review the deferral item, select Preview.
- Select Recalculate.
By default, these accounts are from the SBS ARED Deferral Defaults Setup page.
Different options appear for the schedule type you choose (Straight Line or Event Based). Complete the options as needed.
- In the list of all billing schedules, select the billing schedule number that you want to edit.
- In the Schedule Lines section, add a line, and select a parent item.
The Revenue Split check box must be selected.
If the parent item is set up to use revenue splitting by default, the lines are updated with the parent item and all child items. - To add a child item:
- Select the parent item, and select Add Revenue Split Child.
- Select the item you want to add and select OK.
- To remove a child item:
- Select the line, right-click the line, and select Delete Line.
- When you are asked to confirm the action, select Yes.
 Note: Upon deletion of parent item, child item will be deleted automatically.
Currently, creating a sales quote and viewing its history is available for individual lines only.
- In the list of all billing schedules, select the Schedule Number of the billing schedule.
- In the Schedule Lines FastTab, select a line and select Sales Quote > Create Sales Quote.
- The sales quote is created and a message displays the sales quote number appears.
- To review the sales quote, in one of the following ways:
- Open the Sales Quote page directly.
- In the Schedule Lines FastTab, select the line item and select Sales Quote > Sales Quote History. In the sales quotes history list, select the sales quote number.
- On the Sales Quote page, the sales quote can be approved or released.
After the sales quote is approved or released the billing schedule line is updated with the unit price or quantity.
![]() Note: The unit price is updated only when the Pricing Method is Flat.
Note: The unit price is updated only when the Pricing Method is Flat.
After a sales order or sales invoice is created from a sales quote, the billing schedule line is updated with the corresponding Sales Document No. The sales document is not updated with the billing schedule number.
Schedule
This schedule header FastTab contains the following fields:
| Field | Description | |||||||||||||||||||||||||||||||||||||||||||||||||||||||||||||||||||||
| Group |
Select the billing schedule group to associate with the billing schedule. Any default values from the billing schedule group are automatically applied to the billing schedule. Billing schedule groups are created on the SBS ARCB Billing Schedule Group page. The default value is set up on the SBS ARCB Billing Schedule Setup page. |
|||||||||||||||||||||||||||||||||||||||||||||||||||||||||||||||||||||
| No. |
Automatically updates with the next schedule number when you create a billing schedule. |
|||||||||||||||||||||||||||||||||||||||||||||||||||||||||||||||||||||
| Description |
Specify a description for the billing schedule. |
|||||||||||||||||||||||||||||||||||||||||||||||||||||||||||||||||||||
| Sell-to Customer No. |
Select the customer account number to associate with the billing schedule. |
|||||||||||||||||||||||||||||||||||||||||||||||||||||||||||||||||||||
| Customer Name |
Displays the customer name. |
|||||||||||||||||||||||||||||||||||||||||||||||||||||||||||||||||||||
| End User No. |
Select an end user ID attached to the customer number used for the billing schedule. |
|||||||||||||||||||||||||||||||||||||||||||||||||||||||||||||||||||||
| End User Name | Displays the end user name. |
|||||||||||||||||||||||||||||||||||||||||||||||||||||||||||||||||||||
| Sell-to |
Displays the address and contact information related to the sell-to address. If needed, you can change any of the sell-to information.
|
|||||||||||||||||||||||||||||||||||||||||||||||||||||||||||||||||||||
| External Document No. |
Specify the external document number. This value is used for creating invoices that are consolidated by customer. For example, a customer has two billing schedules that are the same. When the invoices are created, this value determines whether the invoices are consolidated:
|
|||||||||||||||||||||||||||||||||||||||||||||||||||||||||||||||||||||
| Align to Month |
Select whether to align the billing schedule detail lines to the end of a month when a billing schedule is created or updated:
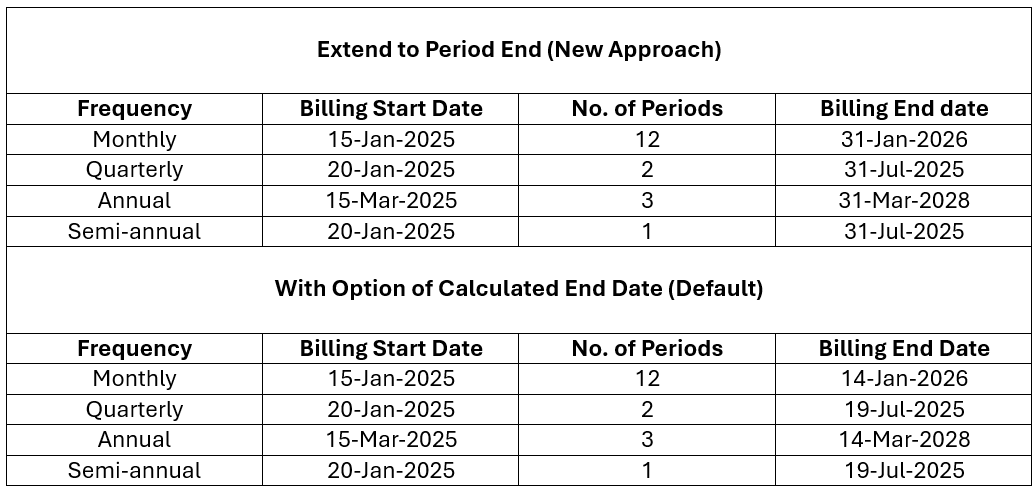
For a billing cycle that starts on April 15, the end of the first billing cycle is April 30. Each subsequent billing cycle then starts on the 1st of the month and ends on the last day of the month. For example, this option is selected and the billing frequency is monthly. For a billing cycle that starts on April 15, the end of the billing cycle is May 14. Each subsequent billing cycle starts on the 15th of the month and ends on the 14th of the month. The default value is set up on the SBS ARCB Billing Schedule Setup page. Starting in version 1.45.5.0, the feature "Align to Month" has been renamed to "Align to Period" in the billing schedule header and line page. When enabled, the end date of the last billing detail and schedule line will align with the last date of the period, based on the frequency specified in the Billing Schedule line. Improved calculation in "Align to Month": previously, for contracts (e.g., 14 Jan 2025 to 13 Jan 2026) with monthly frequency, the last billing period showed wrong period (01 Jan 2026 to 13 Jan 2026); now it correctly extends to the full month (01 Jan 2026 to 31 Jan 2026). It is recalculated based on the frequency and works only for Monthly, Quarterly, Semi-Annually, and Annually. Here are a few examples for more understanding:
|
|||||||||||||||||||||||||||||||||||||||||||||||||||||||||||||||||||||
| Align to Period Approach |
There are two options for this field:
|
|||||||||||||||||||||||||||||||||||||||||||||||||||||||||||||||||||||
| Start Date |
Specify the start date of the billing schedule, which is used for the annual accumulation logic. This date rolls down to lines where the deferral start date is greater than the billing start date on the header and also the lines are not billed yet. When the billing frequency is set to One Time, the date is not rolled down to the line items. |
|||||||||||||||||||||||||||||||||||||||||||||||||||||||||||||||||||||
| Frequency |
Select the default billing schedule frequency (for example, Daily, Weekly, Monthly, Annually, Biennially, triennially etc.) *Biennially and Triennially frequencies are supported only for CSP items and cannot be used with non-CSP items). The default value is set up on the SBS ARCB Billing Schedule Group page. |
|||||||||||||||||||||||||||||||||||||||||||||||||||||||||||||||||||||
| Number of Periods |
Specify the The default value is set up on the SBS ARCB Billing Schedule Group page. |
|||||||||||||||||||||||||||||||||||||||||||||||||||||||||||||||||||||
| End Date |
Displays the end date for the billing schedule. The billing end date is used for the annual accumulation logic. The end date is automatically calculated based on the billing start date, billing frequency, and the number of This date rolls down to lines where the billing schedule end date is not specified. When the billing frequency is set to One Time, the date is not rolled down to the line items. If you leave the number of billing |
|||||||||||||||||||||||||||||||||||||||||||||||||||||||||||||||||||||
| Contract Length (Months) |
(added in version 1.42.2.0). This field is read-only. This value is calculated whenever the user adds or edits the Start Date or the End Date. If the user modifies the Frequency , Number of Periods, or the End Date on the schedule header (which would alter the Start Date or the End Date), then the Days and Months field in the header will be recalculated. The formula used to recalculate the Contract Length (Months) is: MONTH(end_date) - MONTH(start_date) + 12 * (YEAR(end_Date) - YEAR(start_date)) For example, if the billing schedule start date is Feb 2, 2024, and the end date is June 1, 2025, then the Contract Length (Months) value will be: June - Feb + 12 * (2025-2024) = 6 - 2 + 12 = 16 |
|||||||||||||||||||||||||||||||||||||||||||||||||||||||||||||||||||||
| Alignment Date |
Specify the alignment date. When a date is entered, the billing details for the line are aligned to the specified date. This date becomes the default date for the line items, and can be changed as needed.
When adding a line item to a billing schedule, you can specify the alignment date for the line item. When the alignment date is specified, the billing details for the line are aligned to the specified date. Review the examples to learn how specifying the Alignment Date for a line item works. Example 1: For example, a line item has the following settings:
The following table shows the billing detail:
Example 2: For example, a line item has the following settings:
The following table shows the billing detail when no alignment date is specified:
Scenario 1: The Alignment Date is June 21, 2021. The alignment date is within a period for which an invoice has been created. And because the invoice has been created, the billing details are not updated. Scenario 2: The Alignment Date is June 21, 2022. The alignment date is within a period for which the invoice has not yet been created. In this scenario, the billing details for the periods that have not been invoiced are updated. The billing details are shown in the following table:
|
|||||||||||||||||||||||||||||||||||||||||||||||||||||||||||||||||||||
| Interval |
Specify the number of intervals for the billing schedule. The default value is set up on the SBS ARCB Billing Schedule Group page. |
|||||||||||||||||||||||||||||||||||||||||||||||||||||||||||||||||||||
| Renewal Lines |
Specify the number of lines to add to a billing schedule that is being renewed. The default value is set up on the SBS ARCB Billing Schedule Group page. |
|||||||||||||||||||||||||||||||||||||||||||||||||||||||||||||||||||||
| Status |
Displays the billing schedule status:
The default value is set up on the SBS ARCB Billing Schedule Group page. |
|||||||||||||||||||||||||||||||||||||||||||||||||||||||||||||||||||||
| Termination Date |
Displays the date on which the billing schedule is terminated. |
|||||||||||||||||||||||||||||||||||||||||||||||||||||||||||||||||||||
| Salesperson Code | Select the salesperson code for the billing schedule. From v1.43.2.0. When a user changes the Salesperson Code on the Billing Schedule Header, the following pop-up message will appear: "This will change the dimension specified in the document. Do you wish to recalculate / update the dimensions? If "Yes", then we will update the dimensions, If "No", then we will not update the dimensions. | |||||||||||||||||||||||||||||||||||||||||||||||||||||||||||||||||||||
| Responsibility Center | Select the responsibility center for the billing schedule. From v1.43.2.0. When a user changes the Responsibility Center on the Billing Schedule Header, the following pop-up message will appear: "This will change the dimension specified in the document. Do you wish to recalculate / update the dimensions? If "Yes", then we will update the dimensions, If "No", then we will not update the dimensions. | |||||||||||||||||||||||||||||||||||||||||||||||||||||||||||||||||||||
| Auto-Renewed |
Select whether to automatically renew a recurring contract billing schedule for the next billing period:
When a billing schedule is renewed, the default billing group used for renewal schedules is specified on the Renewal Schedule Group on the SBS ARCB Billing Schedule Setup page. |
|||||||||||||||||||||||||||||||||||||||||||||||||||||||||||||||||||||
| Notice Given Days |
Specify the default number of days notice that is given before a billing schedule is due for renewal. The default value is set up on the SBS ARCB Billing Schedule Setup page. |
|||||||||||||||||||||||||||||||||||||||||||||||||||||||||||||||||||||
| Renew X days in Advance |
Specify the default number of days in advance that a billing schedule can be renewed. The default value is set up on the SBS ARCB Billing Schedule Setup page. |
|||||||||||||||||||||||||||||||||||||||||||||||||||||||||||||||||||||
| Prorate Partial Period |
Select whether to prorate the partial billing periods:
The default value is set up on the SBS ARCB Billing Schedule Setup page. |
|||||||||||||||||||||||||||||||||||||||||||||||||||||||||||||||||||||
| Invoice Separately |
Select whether separate invoices are based on the customer:
For example, a customer have five contracts. Three of the contracts are to be consolidated on a single invoice, and the other two contracts each require separate invoices. The default value is set up on the SBS ARCB Billing Schedule Group page. |
|||||||||||||||||||||||||||||||||||||||||||||||||||||||||||||||||||||
| Align Deferral to Billing |
Select whether to align the start and end dates for the deferral schedule to use the same dates as the billing schedule.
|
|||||||||||||||||||||||||||||||||||||||||||||||||||||||||||||||||||||
| Split into Separate Invoices per Quantity |
Indicates whether the invoice for an item is split into separated invoices based on the quantity of the item.
A billing schedule is created for item A001 with a quantity of 3. When this option is turned on and the invoice is created, three separate invoices are created. Each invoice is for item A001 with a quantity of 1. On the SBS ARCB Billing Detail List for the line, you can review the following columns:
Continuing with the example, one of the invoices for item A001 is deleted. So only two invoices for the item A001 of the billing schedule exist. When reviewing the SBS ARCB Billing Detail List, the Billed check box is cleared. The MULTIPLE link can be selected to review the invoices that have already been created. Also, any 'missing' invoices for the item can be created when invoices are created for the item. The default value is set up on the SBS ARCB Billing Schedule Group page. |
|||||||||||||||||||||||||||||||||||||||||||||||||||||||||||||||||||||
| Calculation Method |
Select the calculation method for the invoice creation date:
Note: Period-based calculation methods are available only when the billing frequency is set to Annually or Quarterly. The default value is set up on the SBS ARCB Billing Schedule Group page. |
|||||||||||||||||||||||||||||||||||||||||||||||||||||||||||||||||||||
| Days Before Start Date |
Specify the number of days before the billing period start date to create the invoice. Available when Calculation Method is X Days Before Start Date. The default value is set up on the SBS ARCB Billing Schedule Group page. |
|||||||||||||||||||||||||||||||||||||||||||||||||||||||||||||||||||||
| Milestone No. |
Select the milestone template that you want to use. The template determines how the price of a milestone item is allocated. |
|||||||||||||||||||||||||||||||||||||||||||||||||||||||||||||||||||||
| Sales Document No. |
Displays the sales document number for the billing schedule. If multiple sales documents are attached to the billing schedule, the value is MULTIPLE, and you can select the text to view a list of all sales documents for each billing schedule line item. Selecting the sales document number opens the corresponding sales document page, where you can view the details. |
|||||||||||||||||||||||||||||||||||||||||||||||||||||||||||||||||||||
| Estimated Usage Quantity |
Specify the estimated consumption for a usage item. For new usage items where the first invoice has not yet been created, this value is the default estimated usage quantity for a line. Also, when this value is updated, the changed value can be applied to line. For existing usage items where the first invoice has already been created, changing this value does not affect the line. |
|||||||||||||||||||||||||||||||||||||||||||||||||||||||||||||||||||||
| Auto Renewal Option |
Indicates how the date on which the billing schedule is automatically renewed is determined:
For X Days in Advance, the calculated renewal date is based on the Renew X days in Advance specified. |
|||||||||||||||||||||||||||||||||||||||||||||||||||||||||||||||||||||
| Invoice Customer |
Select which customer name appears on invoices for the billing schedule. This option works with the Bill-to option for the billing schedule lines.
|
|||||||||||||||||||||||||||||||||||||||||||||||||||||||||||||||||||||
| User Defined Fields |
Only the user-defined fields that are specified on the SBS ARCB Billing Schedule Setup page appear. If you do not see the user-defined fields, select Show More in the heading of the FastTab. The user-defined fields for billing schedules are independent and unrelated to the user-defined fields for deferral schedules. |
|||||||||||||||||||||||||||||||||||||||||||||||||||||||||||||||||||||
| Prepaid Schedule | Off = Regular, On = Prepaid. When enabled, the field contract will be treated as Prepaid contract. Prepaid contracts use a points-based system. | |||||||||||||||||||||||||||||||||||||||||||||||||||||||||||||||||||||
| Credit Upon Reconciliation |
Determines whether a credit memo can be generated when actual consumption is less than the committed (pre-billed) quantity during reconciliation.
|
Schedule Header Actions
The schedule header has the following actions. These actions are readily available on the header or from the Actions menu.
| Action | Description |
| Dimensions | |
| Dimensions | Opens the Edit Dimension Set Entries page, where you can edit the dimension set for the billing schedule. |
| Copy | |
| Copy Schedule | Select Copy Schedule, which opens the SBS ARCB Billing Copy Schedule page, where you create a copy of the billing schedule that is currently displayed on this form. |
| Termination | |
|
Select an action to perform on the billing schedule: |
|
| Terminate Schedule | Opens the SBS ARCB Billing Schedule Termination page, where you terminate the selected billing schedule. When you terminate a billing schedule, the status changes to Terminated. |
| Remove Termination | Displays a dialog where you confirm that you want to remove the termination from the selected billing schedule. When you select Yes, the termination is removed, and the status changes to Active. |
| Schedule Termination History | Opens the SBS ARCB Billing Schedule Termination History page, where you review the termination history of the billing schedule. |
| Hold | |
|
Select an action to perform on the billing schedule: |
|
| Hold Schedule | Opens the SBS ARCB Billing Schedule Hold page, where you apply a hold to the selected billing schedule. When you put a hold on a billing schedule, the status changes to OnHold. |
| Remove Hold | Displays a dialog where you confirm that you want to remove the hold from the selected billing schedule. When you select Yes, the hold is removed, and the status changes to Active. |
| Schedule Hold History | Opens the SBS ARCB Billing Schedule Hold History page, where you review the hold history of the billing schedule. |
| Price Adjustment | |
|
Select an action to perform on the billing schedule: |
|
| Adjust the Price | Opens the SBS ARCB Billing Price Adjustment page, where you apply an price adjustment or a discount to the selected billing schedule line. |
| Schedule Price Adjustment History | Opens the SBS ARCB Billing Price Adjustment History page, where you review the price adjustment history of the billing schedule line. |
| Price Index History | Opens the SBS ARCB Billing Price Index History page, where you review the Price Index history of the billing schedule line. |
| Discount History | Opens the SBS ARCB Billing Discount History page, where you review the discount history of the billing schedule line. |
| Renewal | |
|
Select an action to perform on the billing schedule: |
|
| Renew Schedule | Displays a dialog where you confirm that you want to renew the billing schedule. |
| Renewal History | Opens the SBS ARCB Billing Schedule Renew History, where you review the renewal history of the billing schedule. |
| Renewal E-mail History | Redirects the user to the SBS ARCB Sent Renewal Emails page to view the email thread. |
| Archive | |
| Archived |
Select Archived, which opens the SBS ARCB Billing Batch Archive Process page, where you archive the billing schedule that is currently displayed on this form. |
| Stubbing Function | |
|
Select an action to perform on the billing schedule: |
|
| Apply Stubbing | Opens the SBS ARCB Billing Schedule Stubbing page, where you stub the selected billing schedule. |
| Reverse Stubbing | Reverses the stubbing that was applied to a billing schedule. |
| Invoice | |
|
Select an action to perform on the billing schedule: |
|
| Create Order/Invoice | Opens the SBS ARCB Billing Schedule Order/Invoice Creator, where you create sales orders or invoices for the billing schedule. |
| Invoice Preview | Opens the SBS ARCB Invoice Preview, where you can generate a preview of the invoice for a billing schedule. |
| Milestone | |
| Milestone |
Opens the SBS ARCB Billing Batch Milestone Processing page where you update the completion date for specific milestone items for multiple billing schedules or customers. |
| Activate Schedule | |
| Activate Schedule |
Select to activate a billing schedule. For billing schedules that have a Pending Approval status, the status is updated to Active. After the billing schedule is active, you can use the SBS ARCB Billing Schedule Order/Invoice Creator to created invoices for the billing schedule lines. |
| Move Schedule Line | |
|
This functionality is not available for terminated billing schedules that have no active lines. |
|
| Move Schedule Line |
Opens the SBS ARCB Billing Schedule Move Item page where you move all active schedule line items from the current billing schedule to a different billing schedule. |
| Move Schedule Line History |
Opens the Billing Schedule Move Item Line History, where you can view the move history of the selected schedule line item. |
| Revenue Allocation | |
| Revenue Allocation |
Opens the SBS MERA Revenue Allocation (ARCB) page where you can specify the details of the revenue allocation. |
| Unbilled Revenue | |
| Create Unbilled Revenue Initial Journal Entry |
Opens the Create Unbilled Revenue Initial Journal Entry page. This action is not available for existing billing schedules or for billing schedule lines in which the invoice has already been created. |
| Customer Inquiry | |
| Customer Inquiry | Opens the SBS ARCB Customer Inquiry for the selected customer. |
| Actions > Schedule Serialized Detail | |
| Schedule Serialized Detail | Opens a dialog where you can review the serial number details for the billing schedule. |
| Related | |
| Customer |
Opens the Customer Card for the customer attached to the billing schedule. |
Schedule Lines
In this page there are two new fields, Price Group ID and Adjustment Line No.
Price Group ID: This field, by default, will be visible,
Adjustment Line No.: This field will display the the billing schedule line number. This field is non editable, and is added through personalization or design.
Note: Only items with the same billing frequency will be grouped together. If the frequency, start date, end date, billing type, interval, No of periods, or renewal option, of another line is different, then the user will not be able to use the Sames group ID if it is associated with the schedule line Error Message will be displayed that the Frequency should be same
This FastTab contains the following fields:
| Field | Description |
| Type |
Select the type:
When the milestone functionality is used, the Resource type cannot be a milestone parent item. |
| No. |
Select the item number. |
| Description |
Displays the description for the item. You can change the description if needed. |
| Billing Type |
Select the billing type for the item:
For lines that are Resource type, select only Standard or Usage. A resource cannot be milestone parent item. |
| Usage Identifier |
Specify the identification for the usage item. |
| Accumulate on Import |
For Usage type items only. Indicates whether the usage (reading or consumption) billing detail line amount is a single value or an accumulated total of multiple values.
When this check box is selected, the billing periods on the SBS ARCB Billing Detail List cannot be edited directly. Instead, each billing period line is the sum of several lines that have been imported to or edited directly on the Usage Consumption Details dialog. For more information, see Import Accumulated Usage Information. |
| Usage Option |
Select how to record usage information for a usage item:
You can edit this value when Billing Type is Usage. |
| Location Code | Specify the location code. |
| Pricing Method |
Select the default pricing method for items in a billing schedule:
For a parent item in a revenue split, this value is Flat Tier, and it cannot be changed. For a Resource type, only Standard or Flat can be selected. |
| Unit of Measure Code |
Select the unit of measure for the item. The options available are based on the base and sales unit of measures for the item as set on the Item Card. |
| Service Item |
Add a service item to a billing schedule line. Only service items where the Customer No. matches the Customer on the Billing Schedule can be selected. After adding an item, you can click the Service Item card to navigate to the Service module and review related maintenance and service visits. Select Show Details to view or edit the linked service item. Notes:
Single Service Item Associated
Multiple Service Items Associated
The Service Item information from the Billing Schedule Line also flows to:
Service Item No. Field on SBS ARCB Contract Information As of v1.47.2.0, the Service Item No. field is available on the SBS ARCB Contract Information page. The field displays the Service Item information associated with the related Sales Line. Field behavior depends on the number of associated Service Items: Single Service Item Associated
Multiple Service Items Associated
|
| Unit Price Excl. Tax | Specify the price of one unit not including the tax. |
| Quantity |
Specify the quantity for the item. For child items in a revenue split, the quantity is automatically entered from the parent item and cannot be edited. |
| Variant Code |
Select the variant code for the item. Variant codes are a standard Microsoft Dynamics 365 Business Central feature. To be able to see this column, personalize the view. |
| Estimated Usage Quantity |
Specify the estimated consumption for a usage item. Change this value as needed. For new usage items, the default value is from the header. When reviewing the SBS ARCB Billing Detail List, this value is applied only to periods where the invoice has not been created. For more information, see Estimating Usage for an Item. |
| Line Amount Excl. Tax |
Displays the value of the line item not including the tax. The amount is calculated as follows: Quantity * Unit Price Excl. Tax. For items in a revenue split, this value displays a zero (0) amount for the parent item. For each child items displays a calculated value: quantity * unit price. |
| Tax Group Code | Specify the tax group code. |
| Start Date |
Specify the start date for the line item. For items in a revenue split, only the date for the parent item can be edited. All child items use the same date as the parent item. |
| End Date |
Specify the end date for the line item. For items in a revenue split, only the date for the parent item can be edited. All child items use the same date as the parent item. |
| Alignment Date |
Specify the alignment date. When a date is entered, the billing details for the line are aligned to the specified date. The default date is from the header. For an example, refer to the header description.
|
| Frequency |
Select the default frequency for a billing schedule associated with this group: Onetime, Daily, Weekly For items in a revenue split, the value for child items is from the parent item. For the child item, you can keep the same value as the parent item or change it to One-time. |
| Payment Terms Code |
Select the payment terms for the billing schedule line. The default value is from the Payment Terms Code in the Schedule Details FastTab, but you can change it as needed. If the payment terms are different for each line, separate invoices are created for the lines. |
| Payment Method Code | Select the payment method used by a customer to pay for the billing schedule. |
| Direct Debit Mandate ID | Select the payment method used by a customer when payment for an item is directly from a customer's bank account. |
| End User |
Select the end user for the line. The default value is from the header. When creating invoices and consolidating by customer, the end user value is also considered for the consolidation. |
| Interval |
Specify the billing interval you want to use. For items in a revenue split, the value for child items is from the parent item. For the child item, you can keep the same value as the parent item or change it to one. |
| Status |
Displays the billing schedule status:
|
| Auto Renewed |
Select whether to automatically renew a billing schedule line:
|
| Revenue Split |
Indicates that a line uses revenue splitting:
|
| Parent Amount | Displays the net amount of the parent item of a revenue split. This amount is the sum total of all child items in a revenue split. |
| Next Invoice Date | Displays the date on which the next invoice is to be created. |
| Next Invoice Amount | Displays the amount for the next invoice. |
| Total Contract Outstanding Excl. Tax | Displays total outstanding balance (excluding the tax) of the contract. The currency amount is displayed in the currency code selected in the Schedule Details FastTab. |
| Total Invoiced Excl. Tax | Displays the invoiced amount (excluding the tax) of the contract. The currency amount is displayed in the currency code selected in the Schedule Details FastTab. |
| Total Contract Excl. Tax | Displays the total amount (excluding the tax) of the contract. The currency amount is displayed in the currency code selected in the Schedule Details FastTab. |
| Unbilled Revenue |
Indicates whether the line item uses the unbilled revenue feature. This check box is automatically selected for items that are set up on the SBS Unbilled Revenue Items Setup page. When this check box is selected, the actions for the unbilled revenue functionality are available. |
| Sales Document Type |
Displays the sales document type that is created for the billing schedule line when the SBS ARCB Billing Schedule Order/Invoice Creator is used: Sales Invoice or Sales Order. The default transaction type is set up on the SBS ARCB Billing Schedule Setup page. You can change the value as needed. For milestone or revenue split parent items, the child items are updated with the same transaction type as the parent. |
| Sales Document No. | Displays the sales document number for the line. Select the line to open the corresponding sales document page, where you can review the details. |
| Bill-to |
Select to where the invoice for the line is sent. The default value is from the Bill-to option on the Shipping and Billing FastTab:
For billing schedules created from a Sales Order or Sales Invoice, the bill-to information is from the Shipping and Billing FastTab of the sales order or invoice. For line items that use revenue splitting, all items within the same revenue split must have the same bill-to customer. However, different revenue split groupings can use different bill-to customers. |
| Auto Renewal Option |
Indicates how the date on which the billing schedule is automatically renewed is determined:
For X Days in Advance, the calculated renewal date is based on the X days in Advance specified. The default value is from the header option. |
| X days in Advance |
Specify the default number of days in advance that a billing schedule can be renewed. The default value is from Renew X days in Advance in the header. |
| Next Invoice Date | Displays the date for the next invoice. |
| Next Invoice Amount | Displays the amount for the next invoice. |
| Split into Separate Invoices per Quantity |
Indicates whether the invoice for an item is split into separated invoices based on the quantity of the item.
A billing schedule is created for item A001 with a quantity of 3. When this option is turned on and the invoice is created, three separate invoices are created. Each invoice is for item A001 with a quantity of 1. On the SBS ARCB Billing Detail List for the line, you can review the following columns:
Continuing with the example, one of the invoices for item A001 is deleted. So only two invoices for the item A001 of the billing schedule exist. When reviewing the SBS ARCB Billing Detail List, the Billed check box is cleared. The MULTIPLE link can be selected to review the invoices that have already been created. Also, any 'missing' invoices for the item can be created when invoices are created for the item. The default setting is from the header, which can be changed as needed. |
| User Defined Fields |
Only the user-defined fields that are specified on the SBS ARCB Billing Schedule Setup page appear. The user-defined fields for billing schedules are independent and unrelated to the user-defined fields for deferral schedules. |
| Prorate Partial Period (from version 41.2 onwards) |
The default prorated partial period from the Billing Schedule Header. This can be added to the Billing Schedule Line via the Personalization function. Select whether to prorate the partial billing periods: On: Calculates partial amounts for the first or last periods that are not full billing periods. The amounts for partial billing periods is a fraction of the full billing period amount. Off: Does not calculate partial amounts when the first or last periods that are not full billing periods. Partial billing periods are charged the same amount as full billing periods. |
|
Price Group ID (from version 43.5 onwards) |
User can enter the Price Group ID in this field for item lines they want to group together in billing schedule. Note: Only items with the same billing frequency will be grouped together. If the frequency, start date, end date, billing type, interval, No of periods, or renewal option, of another line is different, then the user will not be able to use the same price group ID. |
| Original Sales Transaction No | This field stores the value of original sales document number from where this billing schedule created. |
| Tax-Liable | Populated from the customer card of specified bill-to-customer. |
| VAT Registration No. | Populated from the customer card of specified bill-to-customer. |
| Gen. Bus. Posting Group | Populated from the customer card of specified bill-to-customer. |
| VAT Bus. Posting Group | Populated from the customer card of specified bill-to-customer |
| Tax Area Code | Populated from the customer card of specified bill-to-customer |
| Customer Price Group |
The Customer Price Group field can be added to the billing schedule line using personalization or page customization. By default, this field is hidden.
Note: If needed, you can update the Customer Price Group on existing billing schedule lines using the Customer Update Utility. |
| Allow Committed Billing |
Allows users to bill for committed quantity and use reconciliation.
|
| Attachments | |
|
Select the paperclip to attach files for the billing schedule. This box shows the total number of attached files. You can review the attached files as needed. The files attached to the billing schedule are independent from the files attached to a deferral schedule. |
|
Line Actions
This FastTab contains the following actions:
| Action | Description |
| Manage | |
|
Select an action to perform on the selected line: |
|
| Advanced Deferral Options |
Opens the SBS ARED Transaction - Billing Schedule (Advanced Deferrals) page. Not available for lines that are Resource type. |
| Add Revenue Split Child | Opens a dialog where you can select a child item to add to the sales document. Available only for parent items of a revenue split. |
| Bill-to | Opens the SBS ARCB Bill-to Customer Details dialog where you select the bill-to customer for the invoice. |
| New Line | Adds a line above the currently selected line. |
| Delete Line | Deletes the currently selected line. |
| Line | |
|
Select an action to perform on the selected line: |
|
| Functions > Display Billing Details | Opens the SBS ARCB Billing Detail List page, where you review the details of a billing schedule line. |
| Related Information > Dimensions | Opens the Edit Dimension Set Entries page, where you can edit the dimension set for the line. |
| Functions > Insert Ext. Texts | Adds extended text comments to the billing schedule lines. If you have added extended text to an item, and then select Insert Ext. Texts, then the extended text will appear on the billing schedule lines. |
| Price Options | |
|
Select an action to perform on the selected line: |
|
| Min/Max and Free Qty | Opens the SBS ARCB Price Options page, where you specify the minimum and maximum and free quantity pricing option. |
| Tier Pricing | Opens the SBS ARCB Tier Pricing page, where can view the tier price levels for the item. |
| Termination | |
|
Select an action to perform on the selected line:
|
|
| Terminate | Opens the SBS ARCB Billing Schedule Termination page, where you terminate the selected billing schedule line. When you terminate a billing schedule line, the status changes to Terminated. |
| Remove Termination | Displays a dialog where you confirm that you want to remove the termination from the selected billing schedule line. When you select Yes, the termination is removed, and the status changes to Active. |
| Termination History | Opens the SBS ARCB Billing Schedule Termination History page, where you review the termination history of the billing schedule line. |
| Hold | |
|
Select an action to perform on the selected line:
|
|
| Hold | Opens the SBS ARCB Billing Schedule Hold form, where you apply a hold to the selected billing schedule line. When you put a hold on a billing schedule line, the status changes to OnHold. |
| Remove Hold | Displays a dialog where you confirm that you want to remove the hold from the selected billing schedule line. When you select Yes, the hold is removed, and the status changes to Active. |
| Hold History | Opens the SBS ARCB Billing Schedule Hold History page, where you review the hold history of the billing schedule line. |
| Price Adjustment | |
|
Select an action to perform on the selected line:
|
|
| Price Adjustment | Opens the SBS ARCB Billing Price Adjustment page, where you apply an price adjustment or a discount to the selected billing schedule line. |
| Price Adjustment History | Opens the SBS ARCB Billing Price Adjustment History, where you review the price adjustment history of the billing schedule line. |
| Price Index History | Opens the SBS ARCB Billing Price Index History, where you review the Price Index history of the billing schedule line. |
| Discount History | Opens the SBS ARCB Billing Discount History, where you review the discount history of the billing schedule line. |
| Renewal | |
|
Select an action to perform on the selected line: |
|
| Renew | Opens the SBS ARCB Billing Schedule Line Renewal Info page, where you set the selected billing schedule line to automatically renew. |
| Renewal History | Opens the SBS ARCB Billing Schedule Renew History, where you review the renewal history of the billing schedule line. |
| Stubbing | |
|
Select an action to perform on the selected line: |
|
| Apply Stubbing | Opens the SBS ARCB Billing Schedule Stubbing page, where you stub the selected billing schedule line. |
| Reverse Stubbing | Reverses the stubbing that was applied to a billing schedule line. |
| Support/Renewal | |
|
Select an action to perform on the selected line: |
|
| Support and Renewal | Opens the SBS ARCB Billing Support and Renewal Update Process page , where you change the support and renewal information for a billing schedule line. |
| Support and Renewal History | Opens the SBS ARCB Billing Support and Renewal History, where you review the support and renewal changes for a billing schedule line. |
| Milestone | |
| Milestone Details |
Opens the SBS ARCB Milestone Details page where you edit the information for an item that uses the milestone billing functionality. |
| Move Schedule Line | |
|
This functionality is not available for terminated billing schedules that have no active lines. Select an action to perform on the selected line: |
|
| Move Schedule Line | Opens the SBS ARCB Billing Schedule Move Item page where you move the selected line item from the current billing schedule to a different billing schedule. |
| Move Schedule Line History |
Opens the Billing Schedule Move Item Line History, where you can view the move history of the selected schedule line item. |
| Change Item | |
|
Select an action to perform on the selected line: |
|
| Change Item | Opens the SBS ARCB Billing Schedule Change Item Line History page where you change the item for the selected line. Only items that have an active status can be changed. |
| Change Item History | Opens the Billing Schedule Change Item Line History, where you can view the change history of the selected schedule line item. |
| Unbilled Revenue | |
|
Select an action to perform on the selected line: |
|
| Unbilled Revenue Default | Opens the Unbilled Revenue Defaults page for reviewing and managing journal Template, Batch, and unbilled account details. |
| Create Initial Journal Entry |
Opens the Unbilled Revenue Parameters page, where you specify the parameters for creating the initial unbilled journal entry. The default values are from the setup for the unbilled functionality. This action is not available for existing billing schedules or for billing schedule lines in which the invoice has already been created. |
| Journal Entry Audit | Opens the Unbilled Revenue Journal Entry Audit, where you view all changes for items that use the unbilled revenue feature. |
| Calculate Unit Price | |
|
Select an action to perform on the selected line: These actions are available for Standard type line items with a Flat pricing method. |
|
| Calculate Unit Price | Opens the Calculate Unit Price dialog. |
| Unit Price History |
Opens the Unit Price History dialog that shows an audit trail of the changes: new contract price and frequency, old contract price and frequency, user who made the change, and the date and time of the change. If the billing schedule line is deleted, the unit price history is also deleted. |
| Sales Quote | |
|
Select an action to perform on the selected line: |
|
| Create Single Sales Quote |
Creates a sales quote for the selected line(s).
After the sales quote is created, you can review the sales quote on the Sales Quote page. The sales quote is updated with all item information for the selected line item. Sales quotes are a standard Microsoft Dynamics 365 Business Central feature. For more information, see Make Sales Quotes |
| Create Multiple Sales Quotes |
Creates multiple sales quotes for the selected line(s).
After the sales quote is created, you can review the sales quote on the Sales Quote page. The sales quote is updated with all item information for the selected line item. Sales quotes are a standard Microsoft Dynamics 365 Business Central feature. For more information, see Make Sales Quotes |
| Sales Quote History |
Opens a dialog where you can review all the sales quotes created for the selected line item only. To review the details of a sales quote, select the sales quote number. If a billing schedule line item is deleted from the Schedule Lines FastTab, the corresponding sales quote is deleted from the sales quote history. However, the sales quote remains on the Sales Quote list. |
| Service Item Tracking | |
|
Select an action to perform on the selected line: |
|
| Service Item Tracking Line |
Opens the Schedule Item Tracking Line dialog. This dialog is update either manually or automatically based on how the billing schedule for the service item is created. For a general workflow, see Serialized Items Workflow. When manually assigning the serial tracking number(s) for the service item, the number of serial tracking numbers assigned must match the specified quantity. For example, if the service item has a quantity of 2 in the billing schedule, two serial tracking numbers must be assigned to the service item line. The serial tracking number for the service item can be changed or deleted anytime before the first invoice is created. Also, the serial tracking number must be assigned to the item before the invoice can be created. For billing schedules that are on hold or terminated, the Schedule Item Tracking Line dialog is read-only. Also, for terminated billing schedule, the serial tracking number(s) become available for use. All serial tracking numbers must be previously set up on the SBS Tracking Number Master page. |
| Activate/Deactivate Tracking No. |
Opens the tracking number activate/deactivate dialog, where you specify the activation or deactivation dates for the service item and tracking number combination.
The activation and deactivation dates are currently for reporting purposes only. |
| Serialized Detail | |
|
Select an action to perform on the selected line: |
|
| Line Serialized Detail |
Opens a dialog where you can review the serial number details for the billing schedule line. Details include the following:
|
| Aggregate Usage Quantities | |
|
Select an action to perform on the selected line: |
|
| Usage Identifiers |
Opens the Aggregate Usage Identifiers page where users can set up usage identifiers along with the service item no. (optional) |
Schedule Details
The FastTab has the following fields:
| Field | Description |
| Currency Code | Select the currency code for the item. |
| Customer Posting Group | Select the customer posting group for the item. |
| Location Code |
Displays the location code of the item. |
| Department Code | Select the department code for the item. |
| Customer Group Code | Select the customer group code for the item. |
| Payment Terms Code | Select the payment terms for the item. |
| Payment Method Code | Select the payment method used by a customer to pay for an item. |
| Direct Debit Mandate ID | Select the payment method used by a customer when payment for an item is directly from a customer's bank account. |
| Tax Liable | Select the tax liability code for the item. |
| Tax Area Code | Select the tax area code for the item. |
| Payment Service | Select the payment service that can be used by a customer to pay for an item. Payment services is a standard Microsoft Dynamics 365 Business Central feature. For more information, see Enable Customer Payments Through Payment Services |
Shipping and Billing
The FastTab has the following fields:
| Field | Description |
| Ship-to |
Select the address to where all billing schedule items are sent.
|
| Shipment Method |
Select the details for the shipment method:
|
| Package Tracking No. | Specify the tracking number for the package. |
| Bill-to |
Select the customer to where the invoice is sent.
|
| Overage Bill-To Customer |
Specify an Overage Bill‑To Customer so that usage above a defined minimum threshold on a usage‑based contract is invoiced to a different customer. |
Overage Bill-To Customer (Available from version 1.47.0.0)
The Overage Bill‑To Customer feature allows you to split billing for usage‑based contracts between two customers when consumption exceeds a defined minimum threshold. This is commonly used when one customer is responsible for the base commitment, and another customer is responsible for any excess (overage) usage.
This functionality applies only to usage‑based items where a Minimum Quantity or Minimum Amount is defined.
If the billed quantity or amount exceeds the defined minimum, the system creates two separate invoices:
-
The main customer invoice is created for the quantity or amount up to the minimum limit
-
The overage customer invoice is created for the quantity or amount exceeding the minimum limit
Billing Example
Scenario
-
Minimum Quantity: 5
-
Billed Quantity: 7
-
Overage Bill‑To Customer is specified
Result
-
Quantity 5 is invoiced to the main customer
-
Quantity 2 is invoiced to the Overage Bill‑To Customer
-
Two invoices are created automatically
Behavior
Billing schedules do not display Bill-to related fields (for example, Tax Liable, Payment Terms, Payment Method, Gen. Bus. Posting Group, VAT Registration No., VAT Posting Group). During invoice creation for the Overage Invoice, these values are automatically taken from the corresponding Customer Master.
After invoice creation, if multiple invoices are generated, “Multiple” is displayed in the billing details. By selecting it, you can view all related invoices. The overage invoice will have the Overage Billing indicator selected, identifying it as an overage charge.
Invoice Linking
To check the link between invoices, open the main invoice and go to Contract Information.
-
If an overage exists, you will see the Overage Invoice Number. You can select this number to open the related overage invoice.
-
If no overage exists, this field will not be shown.
Note: The Bill-to Customer cannot be modified on transactions associated with overage billing.
Deletion
If a sales transaction is deleted, all associated invoices (both main and overage) are automatically deleted. Similarly, if a posted invoice (main or overage) is canceled, all linked posted invoices are also canceled automatically.
If a transaction is associated with an overage invoice, a corrective credit memo cannot be created.
Once an overage invoice has been created, the Bill-To Customer No. on the billing schedule cannot be modified or removed.
Not Supported
The following features are not supported with Overage Bill‑To Customer:
-
Split into Separate Invoices per Quantity
-
Revenue Split
-
Unbilled Revenue
-
Milestone items
-
Point Pack
-
Price Groups
Note: Price Groups are not currently supported with overage billing. It is recommended not to use Price Groups when this feature is enabled.
Note: When performing a Copy & Move of an ARCB schedule, the Overage Bill-To Customer is also copied and moved along with the schedule.
FactBox
The following Subscription Billing FactBoxes are available for the line item in the Schedule Lines:
| FactBox | Description |
| Billing Details | |
| Displays the billing details for the selected line. The following information is available: | |
| Previous invoice number | Displays the invoice number for the previous billing period. Select the link to view the invoice details. |
| Next invoice information |
Displays the information for the next invoice of the current billing period, including:
|
| Next invoice period dates | Displays the start and end date of the current billing period. |
|
Consumption details |
Displays consumption information for a usage item that has the Usage Option set to Reading:
|
Unit Discounts
In the Billing Schedule line subpage , three more fields are added to display the Unit Discount, Unit Price Including Discount and Amount Including Discount. The value of these fields will be defaulted from SBS ARCB Billing Schedule Line.

Unit Discount: This field will store the total discount applied on the line.
Unit Price Including Discount: This field will store the unit price including Discount amount(Unit Price –Discount Amount).
Amount Including Discount: This field will store the total amount including Discount (Total Qty * Unit Price Including Discount) .
Example 1: Discount of $100
-
Create a billing schedule unit price as $3000, Quantity as 6.
-
Open the Price Adjustment page from the action of Billing Schedule Line Subpage .
-
Now apply for a discount of $100.
-
The Value in these three fields will be calculated as follows:
-
Unit Discount: 100 (Total Discount applied on line.)
-
Unit Price Including Discount: 2900 (Unit Price – Unit Discount).
-
Amount Including Discount: 17400 (Total Qty * Unit Price Including Discount).
-
Example 2: Escalation of 10%
-
Create a billing schedule amount as $3000, Quantity as 6.
-
Open Price Adjustment page from the action of Billing Schedule Line Subpage .
-
Now Escalate the line at 10%.
-
The Value in these three fields will be calculated as follows:
-
Unit Discount: 0 (Unit Discount will be 0 here as esclation is used here and no discount is applied .)
-
Unit Price Including Discount: 3300 (Unit Price(3000) + 300(10% Escalation Applied).
-
Amount Including Discount: 19800 (Total Qty * Unit Price Including Discount).
-
Example 3: Escalation of 10% + Discount of $100
-
Create a billing schedule amount as $3000, Quantity as 6.
-
Open Price Adjustment page from the action of Billing Schedule Line Subpage .
-
Escalate the line with 10 %.
-
Apply $100 Discount on the Next line onto the Price Adjustment Page.
-
The Value in these three fields will be calculated as follows:
-
Unit Discount: 100
-
Unit Price Including Discount: 3200 (Unit Price(3300) – Unit Discount(100)).
-
Amount Including Discount: 19200 (Total Qty (6) * Unit Price Including Discount (3200)
-
Example 4: Multiple Discounts
In this example, two discounts will be applied: $100, and $200.
-
Create a billing schedule amount as $3000, Quantity as 6.
-
Open Price Adjustment page from the action of Billing Schedule Line Subpage .
-
Apply Discount of $100.
-
Re-Apply Discount of $200.
-
The Value in these three fields will be calculated as follows:
-
Unit Discount: $300 ( Discount 1 . $100 + Discount 2. $200 )
-
Unit Price Including Discount: 2700 (Unit Price(3000) – Unit Discount(300)).
-
Amount Including Discount: 16200 (Total Qty (6) * Unit Price Including Discount (2700)
-
Example 5: Both Percentage and Amount Discounts
This example will use discount of $100 and a discount percentage of 10%.
-
Create a billing schedule amount as $3000, Quantity as 6.
-
Open Price Adjustment page from the action of Billing Schedule Line Subpage .
-
Apply Discount of $100.
-
Re-Apply Discount of 10%.
-
The Value in these three fields will be calculated as follows:
-
Unit Discount: $400 ( Discount 1 . $100 + Discount 2. 10% ($3000 % 10 =$300) .
-
Unit Price Including Discount: 2600 (Unit Price (3000) – Unit Discount (400)).
-
Amount Including Discount: 15600 (Total Qty (6) * Unit Price Including Discount (2600).
-
Example 6: Discount Applied, Line is Invoiced & Discount Removed.
-
Create a billing schedule amount as $3000, Quantity as 6.
-
Create Invoice for 3 months .
-
Open Price Adjustment page from the action of Billing Schedule Line Subpage .
-
Apply Discount of $100.
-
The Value in these three fields will be calculated as follows:
-
Unit Discount: $100 .
-
Unit Price Including Discount: 2900 (Unit Price (3000) – Unit Discount (100)).
-
Amount Including Discount: 17400 (Total Qty (6) * Unit Price Including Discount (2600).
-
Remove the $100 Discount
-
The Value in these three fields will be calculated as follows:
-
Unit Discount: 0 .
-
Unit Price Including Discount: 3000 (Unit Price (3000) – Unit Discount (0)).
-
Amount Including Discount: 18000 (Total Qty (6) * Unit Price Including Discount (3000).
-
Periodic Consumption Reconciliation
Periodic Consumption Reconciliation enables you to compare actual usage against committed (pre-billed) quantities for usage-based billing scenarios. This process ensures that any variance between what was invoiced and what was consumed is accurately adjusted.
If actual usage exceeds the committed quantity, additional charges can be invoiced. If actual usage falls short, eligible credits can be applied based on configuration. All adjustments are tracked through billing detail lines and linked to the original billing period.
Workflow
-
Create a Billing Schedule Line with a Usage item, and enter the Estimated Usage Quantity (committed consumption).
-
Enable the Allow Committed Billing option.
-
Use the Invoice Creator page to generate invoices for the committed quantity.
-
After invoicing, go to Billing Details > Actions > Consumption Details and enter or upload the actual consumption.
-
Open the Periodic Consumption Reconciliation page and apply filters to locate the relevant records.
-
Review the displayed values for Committed Consumption, Actual Consumption, and the resulting Difference.
-
Select Reconcile to process the variance.
-
The system creates a new Billing Detail Line for any overage or underutilized quantity and links it to the original billed period.
Difference Calculation Logic
The system calculates the variance using the following formula:
Difference = Actual Usage Quantity - Committed Billed Quantity
Positive Difference (Overconsumption)
When the actual usage exceeds the committed billed quantity:
A new Billing Detail Line is created for the excess quantity.
You can generate a separate invoice for the adjustment, ornclude the adjustment in the next billing cycle.
Example
| Committed Quantity | Actual Usage | Difference |
|---|---|---|
| 1,000 | 1,150 | +150 |
Result:
A sales invoice is generated for 150 units.
Negative Difference (Underconsumption)
When the actual usage is less than the committed billed quantity:
-
A new Billing Detail Line is created for the underutilized quantity.
-
The Credit Upon Reconciliation setting determines whether a credit can be issued:
-
Enabled: A Credit Memo can be created.
-
Disabled: A Credit Memo cannot be created.
-
Example
| Committed Quantity | Actual Usage | Difference |
|---|---|---|
| 1,000 | 880 | -120 |
Result:
A credit memo is generated for 120 units, if allowed by configuration..